How do you install xducer on transom?

bill1968

Cadet
Joined
Jul 19, 2006
Messages
7
I am installing a new fishfinder and would like to know what is the best way to seal the screws in the transom? i have heard of 5200 4200 and marine tex
is one better then the other or is there something else i could use?
 

JB

Honorary Moderator Emeritus
Joined
Mar 25, 2001
Messages
45,907
Re: How do you install xducer on transom?

I used 5200 and/or a nylon gasket/washer.
 

jtexas

Fleet Admiral
Joined
Oct 13, 2003
Messages
8,646
Re: How do you install xducer on transom?

I use 5200 - some say it's "too permanent" - but I've had no problems removing/reinstalling it for repairs.

If you need to fill abandoned screw holes, use marine-tex.
 

bill1968

Cadet
Joined
Jul 19, 2006
Messages
7
Re: How do you install xducer on transom?

Thank you for your help I will get the 5200
 

Scaaty

Vice Admiral
Joined
May 31, 2004
Messages
5,180
Re: How do you install xducer on transom?

Use the 4200 (Walmart..$4)..the 5200 will need at least 10 days to cure, 4200 in 3
 

jammer

Petty Officer 2nd Class
Joined
May 19, 2007
Messages
110
Re: How do you install xducer on transom?

I personally used 4200 myself because it drys in 24 hours. 5200 I personally think is the best but it takes many many more days for it to dry properly.
 

miswirvin

Seaman Apprentice
Joined
Jul 1, 2007
Messages
35
Re: How do you install xducer on transom?

5200 fact cure tacks in an hour and is hard in 24hrs. It's in a red and whit package. The blue is the slow curing. Use 5200. It's about 14.00 for a tube.
 

jtexas

Fleet Admiral
Joined
Oct 13, 2003
Messages
8,646
Re: How do you install xducer on transom?

5200 forms a good protective seal for your 'ducer screws immediately - it won't wash off in the lake. Now, if you're using it to fill empty holes, or need it to adhere something to your hull, give it 10 days to cure....sealing a thu-hull livewell intake, something like that. Just my opinion. Based on experience.
 

POINTER94

Vice Admiral
Joined
Oct 12, 2003
Messages
5,031
Re: How do you install xducer on transom?

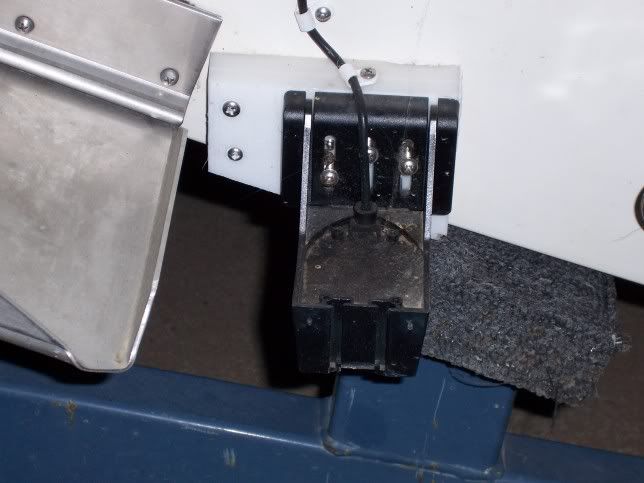
I installed a plastic plate about 1/2" thick. I forget the material, but it won't expand in water and it is really hard. I got it out of our test lab. I cut it to fit the hull shape. I did this because I am forever changing things around. This way the initial screws to hold the plastic to the hull never change. I can replace the transducer many times without drilling new holes into the hull.

100_0070.jpg
 

ddennis

Petty Officer 1st Class
Joined
Aug 15, 2006
Messages
351
Re: How do you install xducer on transom?

I installed a plastic plate about 1/2" thick. I forget the material, but it won't expand in water and it is really hard. I got it out of our test lab. I cut it to fit the hull shape. I did this because I am forever changing things around. This way the initial screws to hold the plastic to the hull never change. I can replace the transducer many times without drilling new holes into the hull.

100_0070.jpg

Hmmm, pointer you may be on to something there... Any Idea as to what that material is? I would imagine if I bought a chunk of that and installed it properly with LOTS of 5200 behind it, and around the screws as I put them in that it would be pretty safe to say I wouldnt have to worry about leaks into the screw holes and eventual softening of my transom. I am really paranoid about my transom! I am still thinking about in hull mounting it though.... Oh well. I got a week to think about it as I have to abandon my new (to me) boat at home to travel for work over the weekend. :-(
 

Bindernut

Seaman
Joined
Jul 12, 2006
Messages
63
Re: How do you install xducer on transom?

That material that Pointer used looks like UHMW plastic. It's used in a lot of industrial applications, but isn't real common out in the public. Check your local lumber yard or even a farm implement shop.
That's what I used for my xducer mount too...I scored a small scrap piece from work for my mounting board.

Another option to make a transducer mounting plate is to use a chunk of synthetic deck material (you know, the plastic stuff you can get at Menards, Lowes, etc to build a weather proof deck). A friend of mine used that and it works great too.

When you fasten the board to your hull, seal it up good with 5200 and screw it on. Or if your hull is virgin, you could even just epoxy the board to the hull without screws. Epoxy won't hold UHMW by itself very good though...even if you rough the back up good with sandpaper. Some ingredient in it is too "slick" to let the epoxy get a good hold on it.

I built my plate large enough to mount my transducer and left room for a speedometer sensor if I decide to add one in the future.
 

POINTER94

Vice Admiral
Joined
Oct 12, 2003
Messages
5,031
Re: How do you install xducer on transom?

I no longer work where I got it but the engineer confirmed the properties of the plastic. (Non swelling, UV stablized, strong, water has no affect on it) I broke off screws at the head even with pilot holes. I used a light application of 5200 in a bead all the way around and predrilled the mounting holes that I packed with 5200. When I screwed it down, it lightly oozed a nice even bead all the way around. The screws are the only point of entry for water, so why overdoit with the 5200.

I would agree, in hindsight I would have grabbed a larger chunk of the stuff! But I think with the way my boat is set up (It has huge trim tabs for it's size) it wouldn't have made a huge difference. Be very careful with decking material even some of the "synthetic" decking is made from wood fibre.
 

WaterWitch2

Chief Petty Officer
Joined
Jun 14, 2007
Messages
545
Re: How do you install xducer on transom?

West Marine sells a plastic product called "Starboard". It's kind of like the material used for plastic cutting boards. Go to westmarine.com and search starboard.
 

bigtwin

Petty Officer 3rd Class
Joined
Mar 10, 2006
Messages
85
Re: How do you install xducer on transom?

A couple months ago my wife came up to me and ask me if I had seen her small plastic cutting board. I replied by pleading the 5th.
I used the 3M 4200 to seal the old holes, I then made a cardboard template, traced the outline of the template to the "cutting board", using a fine tooth jigsaw blade I cut out the mounting plate, and attached with stainless steel screws that I counter sunk.
the $4 cutting board works great!
 
Top