Transom Trouble (w/pics)

wolfspyryt

Cadet
Joined
Jul 1, 2008
Messages
29
Re: Transom Trouble (w/pics)

When I cut the transom, is it preferable to have the grain running horizontal or vertical? Does it matter?
 

Joe_the_boatman

Chief Petty Officer
Joined
Apr 14, 2005
Messages
482
Re: Transom Trouble (w/pics)

The ply's in the plywood run 90? to each other, so it would be "best" to put the two pieces of plywood at 45? to each other (which would give the max number of grain directions).

However, that means using 2 sheets of 4'X8' instead of 1; so ,I'd just use 1, and forget about grain direction.
 

wolfspyryt

Cadet
Joined
Jul 1, 2008
Messages
29
Re: Transom Trouble (w/pics)

The few extra bucks for a sheet of ply is ok ... I will find a use for the scrap.

I plan to re-build the console(s) so there are 2 like yours ... well, similar.

I will cross the grain.

Thanks!

PS ... nice boat
 

wolfspyryt

Cadet
Joined
Jul 1, 2008
Messages
29
Re: Transom Trouble (w/pics)

Could someone advise me on the best glue for the transom?

Also ... the best paint or way to seal the wood?

And the best silicon or alternate sealant?
 

fonthillhdtv

Seaman Apprentice
Joined
Jun 24, 2008
Messages
41
Re: Transom Trouble (w/pics)

use a polyurethane glue like gorilla glue to bond the 2 or 3 plywood layers together but be prepared to trim them after as the glue will foam out the sides as it cures but it will never come apart.
Once the transom is glued up use a product like smith Bros. 2 part penetrating
epoxy to seal the plywood use 2 or 3 coats till the wood stops absorbing it.
Then paint it with a few coats of epoxy floor paint then predrill all your holes
slightly oversize and fill with a 2 part epoxy ,once cured install the transom and
drill all your holes the proper size through the epoxy. when installing the new bolts seal them all with 3m 5200 or 4200
follow all these steps and you should have a transom that out lasts the boat or you. I just finished mine this weekend, keep an eye out for pics soon
 

reelfishin

Captain
Joined
Mar 19, 2007
Messages
3,050
Re: Transom Trouble

Re: Transom Trouble

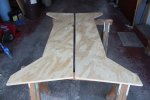
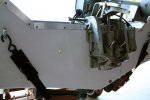
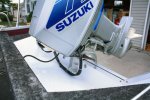
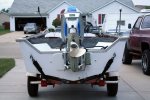
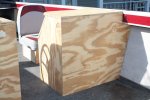
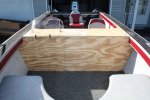
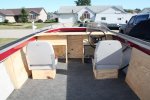
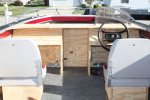
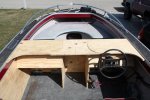
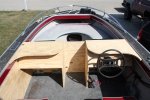
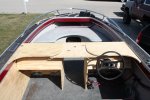
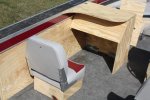
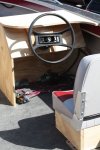
Here are some views of the transom terror ...

note:
  1. 3 section transom
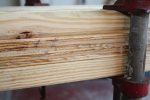
  2. warped / bowed even without engine
  3. wood still looks good though it has to go
  4. transom support snapped on both sides

I've taken apart several later model Starcraft transoms which were built factory with three pieces, most were 1976 or later.
Those transoms when right will have no flex, my 1967 18' is still all original and rock solid. The broken transom support is a lot of your movement.
It looks to me like the former owner cut that transom to match the earlier model boats which had a much larger splashwell.

I've done several of those boats so far, most were older models.
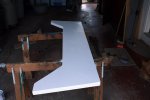
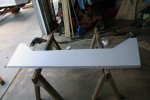
I normally remove the motor and all transom mounted accessories, then unbolt the many splashwell screws, remove both upper caps and all top caps and remove the wood out the top. On some it comes right out, on a few I had to tweak the gunwale aluminum edge a bit to make clearance, I simply pushed it back down when reinstalling the caps later. I've yet to have one that I had cut anything to get it out whole. Even on those that were three piece when new, I replace it with a one piece transom.

I run the outer plywood grain horizontally, I've yet to find wood wide enough to be able to cut a one piece, full width 72" or better section with the grain vertical. So far every one I've done has come out rock solid. I do laminate a single layer of glass cloth in between the two sheets with lots of epoxy as my resin. I completely encase the new wood in epoxy. I drill all holes using the originals as my template and seal them before final installation. I also coat the inner transom metal with epoxy paint to prevent corrosion down the road as well. I've yet to find a broken support, but they are aluminum and fairly easy to weld.
 

wolfspyryt

Cadet
Joined
Jul 1, 2008
Messages
29
Re: Transom Trouble (w/pics)

Here are some updated pics of the progress ...

New transom is cut with the grain at an angle ... 2nd piece is flipped over to cross the grains.

Then glued together ... clamped ... screwed ... clamped and screwed some more.

After the glue set for 24 hrs ... I sanded ... cleaned and sanded some more.

I then applied a resin based sealer.primer. I have 2 coats per side drying now.

Next I will sand and apply a 3rd coat of sealer.

Then the Finish coat will be applied in 2-3 coats. Possibly with a light sand.

Should be re-installed by Saturday Noon!!!!!
 

Attachments

  • IMG_0616.jpg
    IMG_0616.jpg
    86.4 KB · Views: 0
  • IMG_0617.jpg
    IMG_0617.jpg
    78 KB · Views: 0
  • IMG_0624.jpg
    IMG_0624.jpg
    60.8 KB · Views: 0
  • IMG_0625.jpg
    IMG_0625.jpg
    75.9 KB · Views: 0

wolfspyryt

Cadet
Joined
Jul 1, 2008
Messages
29
Re: Transom Trouble (w/pics)

Here is the finished transom ... I am posting a couple other questions. Please check out my new posts (questions).

Thanks for all the great advice. You helped a novice look like he knew what he was doing.

TAZ
 

Attachments

  • IMG_0661.jpg
    IMG_0661.jpg
    61.8 KB · Views: 0
  • IMG_0668.jpg
    IMG_0668.jpg
    95 KB · Views: 0
  • IMG_0665.jpg
    IMG_0665.jpg
    84.4 KB · Views: 0

jonesg

Admiral
Joined
Feb 22, 2008
Messages
7,198
Re: Transom Trouble (w/pics)

Looks like a pro worked on your boat.

How does it ride in the water now?
 

wolfspyryt

Cadet
Joined
Jul 1, 2008
Messages
29
Transom has now turned into a restoration

Transom has now turned into a restoration

Transom has now turned into a restoration. Being an 18' "MARINER", I did not like the center console. So I am building 2 close-able consoles with pass-through, side boards and much more. Here are the photos of the start ...
 

Attachments

  • IMG_0003.jpg
    IMG_0003.jpg
    90 KB · Views: 0
  • IMG_0004.jpg
    IMG_0004.jpg
    81.6 KB · Views: 0
  • IMG_0006.jpg
    IMG_0006.jpg
    76 KB · Views: 0
  • IMG_0007.jpg
    IMG_0007.jpg
    83.8 KB · Views: 0
  • IMG_0008.jpg
    IMG_0008.jpg
    75.3 KB · Views: 0

wolfspyryt

Cadet
Joined
Jul 1, 2008
Messages
29
Re: Transom Trouble (w/pics)

more photos ...


Boat rides so much better with a solid transom. Still alot of work to do, but it does keep me out of the bars ...LMAO !!!!!
 

Attachments

  • IMG_0009.jpg
    IMG_0009.jpg
    90.7 KB · Views: 0
  • IMG_0010.jpg
    IMG_0010.jpg
    90.8 KB · Views: 0

wolfspyryt

Cadet
Joined
Jul 1, 2008
Messages
29
Re: Transom Trouble (w/pics)

Thanks, I like the way things are coming along.

I plan to finish the consoles by giving the actual "dashboard" a coat of Maroon paint to match the side stripes and seats. The rest of the consoles, side boards and the boxes for the seats will get a covering in carpet. I will of course completely seal and paint them first.

I will also add some aluminum trim (sparingly) to accent and protect parts of the consoles. Plus add more rigidity to the structure.

I plan to purchase various pieces of aluminum "angle" and "flat-stock" to make a 5-Piece Sectional windshield. Add some glass/plexi/lexan and hinge it at the center for the walk-through.

I also have to finish the "side-panels" by cutting a "hide-away" recessed compartment for the Throttle Control ... kinda' embedded into the wall of the boat. Maybe even a simple lockable door to cover it up.

I will post more pics when I complete more.

I have been "engineering the pieces on the fly. No blueprint or planning as it were. Funny thing is I have a Architectural Drafting Degree and I know better than to proceed without a plan ... but all is working out well.
Thanks to everyone who has advised, corrected, assisted and guided me through some rough waters on the resurrection of this old girl.
 

wolfspyryt

Cadet
Joined
Jul 1, 2008
Messages
29
Re: Transom Trouble (w/pics)

few more pics
 

Attachments

  • IMG_0013.jpg
    IMG_0013.jpg
    92.2 KB · Views: 0
  • IMG_0014.jpg
    IMG_0014.jpg
    95.2 KB · Views: 0
  • IMG_0015.jpg
    IMG_0015.jpg
    93.7 KB · Views: 0
  • IMG_0016.jpg
    IMG_0016.jpg
    77.2 KB · Views: 0
  • IMG_0019.jpg
    IMG_0019.jpg
    82.7 KB · Views: 0
Top