First Restore 84 Wellcraft Elite 200

othelloears

Petty Officer 2nd Class
Joined
Jun 28, 2008
Messages
123
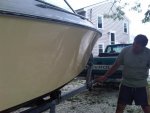
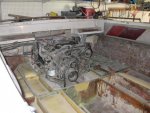
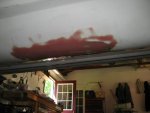
Just joined iboats to help with my first total boat restore...she's a 1984 Wellcraft Elite 200. Has a 5.0 228 mercruiser and alpha I with 740 original hours. Everything is original. I hope to post the "before" pictures shortly. Plan is to document the entire project

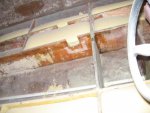
Bought it off craigslist in the spring and used it all summer to see if I wanted to make a commitment. So far so good. Hull seems clean except for area of rub through on the bottom which is my first priority.

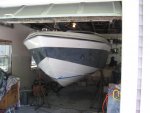
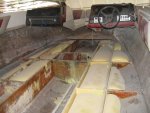
Just pulled her for the year and starting stipping her down.

Ive been on the site for a couple of months getting ideas. though I'd start with a couple preliminary questions.

1) Anyone from the NH/MA area know where I can get supplies at a reasonable price? I prefer not to order everything particularly heavy resins online.

2) Anyone familiar with these particular boats? I am curious whether I have a (a) cored hull (b) structural flotation foam under the floor (c) any issues common to these boats that i should be aware of?

Thanks for all the help and I look forward to getting going this weekend.
 

loppster

Seaman Apprentice
Joined
Jun 30, 2006
Messages
36
Re: First Restore 84 Wellcraft Elite 200

Welcome to Iboats....

I would be interested in your restore project as I have an 83 Wellcraft Elite 200. I really like the boat, but I am having some water leaking into the bilge problems and am concerned with this.

Please post pictures and detail your progress and what you find. I would greatly appreciate this.
 

othelloears

Petty Officer 2nd Class
Joined
Jun 28, 2008
Messages
123
Re: First Restore 84 Wellcraft Elite 200

Sorry for not posting the picks, I got sick of thinking and started some demo.

I'll post some demo picks shortly

Started in on the deck. The right side was caving in. I started by tearing out all the original carpet. i was stunned to find a half *** deck repair on the port side. 1/2 the deck was a stained peice of plywood with no glass at all. The starboard was wet splinters. The good news is the stringers were in fine shape. I was tempted to leave the rear deck (about 1/3) to the back but thought better of it. It tuns out the rear deck had been replaced as well. A slightly better job. The problem is they didnt re-cap the rear stingers which were soggy mush. All in all i only have 4 partial stringers only 3-4' each.

When I pulled the rotten stringers I found that the manufacturer didn't sompletely galss in teh transom The rear stringers attached directly to the transom wood which was damp in that area but solid.

My other big project, the bottom, didn't go well. i am stripping all the bottom paint. The prior owner would apparently slap on BP WITHOUT cleaning the bottom, There is paint over barnacles ect.. Its the roughest bottom youve ever felt. i wondered why I lacked power. Then I found a 1' long "wear through". Fibers hanging out everywhere. Looks like he drove over something. The first layer of poly was gone. Are these blisters Looks like I'll need to add some biax.

I also found about 10 spots the size of a nickel where the gel coat pully off exposing the mat underneath. Is that what a "blister" is?

Couple questions at this point.

1) I had decided to go all poly on the deck, mainly for cost. Now that I am 'joining' areas and the hole in the bottom, I am thinking I should go epoxy for all the stringer repairs. and then I can still use poly for on top of the deck. Any thoughts?

2) On the "blisters" can i just fill in with epoxy "peanut butter" or marine tex or do I need to add matt. Its only the depth of the gell coat and the mat seems solid below.

3) Ive read on this site I can use antifreeze to help dry wet wood. There is a couple areas including the areas of the transom showing, I wanted to dry out and then CPES. My question is can I then use CPES over that area or will it prohibit adhesion/soaking.

Thanks
 

othelloears

Petty Officer 2nd Class
Joined
Jun 28, 2008
Messages
123
Re: First Restore 84 Wellcraft Elite 200

Grinded all winter and am finishing up glassing the stringers.

I have a fuel tank question. I have an aluminum 43 gallon belly tank. It was originally foamed in including sitting on about an inch of foam. I understand from all my reading that I shouldn't foam it. I read the article about installing it on a "deck" but I don't have the height to do that.

How do I install this thing? Or more specifically what do I put the tank on? I was told rubber was no good. My plan was sit the tank on 2 trimboards(azec) which would be epoxied to the hull. I would prefer something softer though.

Your ideas would be appreciated.
 

othelloears

Petty Officer 2nd Class
Joined
Jun 28, 2008
Messages
123
Re: First Restore 84 Wellcraft Elite 200

I owed you guys some photos but I have been unable to make them small enough to upload to the site. I got one to upload which is the craigslist ad photo of what I bought. The ad did not include the rotted deck and stringers, water logged sterndrive or hole in the bottom though.

For those thinking of doing this I thought I'd give an update...

I am shooting for the 4th to launch.

Started grinding last october when I pulled the boat. I removed about 1/2 the stringers that were trashed and grinded 12" up the hull. The 4 1/2 grinder (dewalt) with "flapper disks" from Harborfreight worked the best. used a 7" for some of the sides but it was some freaking haeavy I was douced after an hour or so. The metal "cutting" disks are perfect for preliminary removal

Another valuable tip are the bags they now offer for the home depot shop vacs..Save a hell of a lot in filters and cleaning and changing. I used 2 bags for the whole project

I also bought a porter cable 6" orbital with vacuum attachment which saved a hell of a lot of time of cleaning

After probably 30-50 hours I have the hull clean of excess fiberglass

I chose epoxy resin becuase I was new and I was mending old to new. aside frmo the price difference, as a beginner yo ucan't beat it...It allows more room for error and the mixing is much simpler, no temp calculations

I used 3/4" pine trimboards for the stringers which was what I had originally. My stringers were originally raised off the hull so I did not fillet on the bottoms just the tie ins to the cross members. I found no problems with the 1708. I cut all the pcs and numbered them with a chart. I routered the tops of the stringers

I ordered all major materials from Uscomposites. I started with the 7 gallon med kit. I used 12" 1708 tape and then wrapped fully with 1708.

Stringers are now in and glassed

Today I cut my boardboards...3/4" ext ac ply from lowes...and put on the 1st coat of thinned epoxy. That was a b*t trying to fit the hull angled both ways.

I got screwed on my tank. I had the orginal aluminum 43 gallon v/belly tank which I planned to use but after stripping it down did not like the pitting. I spent a week trying to find a tank that would fit. Just ordered a 33 gallon poly tank v/belly tank from oceanlink which was the closest I could get in that space...3 week delay though..more than enough to do

I am "trying" to do a totally dry deck. I put in a 1" pvc drain for the ski locker and sealed all compartments except the rear bilge compartment. i know people differ on this but I am going to try it. I bought "coal tar epoxy" when I was going to resue my tank which I will now use on the hull and stringers to water proof. I guess the stiff is amazing.

I am going to foam and just bought the 16 lb 2lb kit from US. I also bought some 4lb for a base for the tank as well as some 1/8" neoprene strips. I will not foam in the tank but need a base for the v/belly.

I am going to put three coats of thinned epoxy on the bottom of the deck but not cloth.

I am using 12" 1708 tape for the deck/hull joint and will use PL and stainless screws to secure to stringers. I also plan to use PL for the deck fillets. I am toying with the idea of doing biscuit joints for the decks pcs to stiffen

I am using 2 layers of 4oz cloth for the deck and an going with perfection and nonskid. boatersisland seems to have all the best prices on paints. I was going to use durabak but decided against it because of problems matching other areas of interior.

I am ordering a new alpha from sei this week

I have to patch a 8" hole in bottom...3 layers 1708. I am now sanding the bottom clean. Many areas of crazing gelcoat. I am patching with thicked epoxy and bought the west barrier additive and will do 3 coats on the bottom.

I was hoping to sand and paint the exterior and redo the uphostery but dont think I'll get to it this season.All this work and no one will see it...Still ugly boat..but safe. With the hole patched and smooth and hundreds of pounds of water and foam removed I believe I'll be much faster

Thanks for all the help...6 weeks to go
 

Attachments

  • untitled low.jpg
    untitled low.jpg
    10.1 KB · Views: 0

Paul Bell

Seaman
Joined
Nov 22, 2008
Messages
66
Re: First Restore 84 Wellcraft Elite 200

First of all there is a special place in my heart for your Wellcraft.
My first real boat was a 84 180 Elite. That boat was a blast in so many ways.
I get the impression your in this for the lang haul.
I look forward to seeing your progress.
I redid my 89 Celebrity 224 Se this past winter and just finished a complete overhaul.
I tried to take pics along the way.
I had so many of the same questions for the fuel tank.
Here is my experience:
http://picasaweb.google.com/pacerdude/EntireDeckReplacement89Celebrity224se#
Good luck with your project!
 

othelloears

Petty Officer 2nd Class
Joined
Jun 28, 2008
Messages
123
Re: First Restore 84 Wellcraft Elite 200

I will try to post pictures.

I am stunned how similar the celebrity is...stringers, hull, ect...

How did you attach the tank. I saw you 5200'd the pvc trimboard on the tank. Did you just sit the pvc on the hull? Did you use any foam. I am concerned the angles are not the same and edges would be on the hull.

Has anyone used coal tar epoxy on the stringers? Can I use it on fiberglass?
 

Paul Bell

Seaman
Joined
Nov 22, 2008
Messages
66
Re: First Restore 84 Wellcraft Elite 200

Regarding the tank and the Veranda trim boards once 5200,d to the tank the tank was set on the hull. Bilge water now can freely move beneath the tank keeping the tank drier and off the hull.
I recall reading the you should not foam around the tank. Foam soaks water so you dont want it against the tank.
The trim boards have a little give and softness to them to compensate for slight differences.
The shape of my tank and hull are also very similar.
Hope that helps!!
Paul
 

othelloears

Petty Officer 2nd Class
Joined
Jun 28, 2008
Messages
123
Re: First Restore 84 Wellcraft Elite 200

I am actually making that tank area completely dry, sealing it off from the bilge area. I won't "foam in" the tank but do need to have a foam base to support the tank which is plastic. The angle of the tank and angle of the hull are different. My drain line also runs under the tank.

I just got word frmo the suppplier I won't see the tank for a month which is trouble for my 4th weekend launch. Once I get the tank I have to set it, run lines, glue and screw deck, fillet deck, tape deck, cloth deck, lay interior supports and prime and paint deck. That also assumes I can get everything else (refinsh bottom including 8"hole with epoxy and barrier, sand prime and paint hull, gimble, bellows and new drive.

I bought 4lb foam from US to pur for the base, sit the tank on it. Does anyone know if the plastic tank will have enough rigidity to hold the foam from expanding. I am concerned the foam expansion pressure will push collapse the tank in the middle. Has anyone done this?
 

othelloears

Petty Officer 2nd Class
Joined
Jun 28, 2008
Messages
123
Re: First Restore 84 Wellcraft Elite 200

I think I finally figured out this photo issue.

Making progress trying to launch for the 4th.

As you see strngers in, drain in, most foam in. Waiting for tank so I am stuck on interior but I cut & fit deck and 3 coats epoxy on bottom.

Waiting on tank I satrted exterior. Got on boat stands in my 21' garage which I thought was accomplishment in itself. Sanded everywhere with 80 grit. Porter cable 6" orbital with vaccum is a beast.

Ground out crazing and hole in bottom. Put in patch of 5 layers 1708 on hole in bottom

Drilled out all thru hull screws oversiezed and filled with epoxy

Filled all gouges

Sanded and dewaxed twice

Just put on today 1st coat of epoxy on bottom. Do not use 3/8" roller as they tell you on shipeshape...too much epoxy which runs. Use thin foam roller

I will put on second coat later today and wait till set and fill holes with thickended epoxy. Its 70 here today so I should have 5-6 hours between. Tomorrow morning I will sand with 80grit, dewax twice and 2 coats epoxy with barrier additive. Will sand with 80g and petit ablative for final

I was using staright acetone for wipe down but broke down and bought gallon of fiberglass prep. It definately has an additive in it that stays on hull longer. I assume tulene or xylene which works better than acetone alone

While I am doing bottom I am working on upper. Sand, dewax, sand , dewax.

Bought gallon of epoxy primkote for 2 layers and am finishing with perfection fighting lady yellow 2 coats. Will sand and dewax between each.

For those thinking of doing this IT IS ALOT OF F"N work!!!! and MONEY!!!! I work 60 hours a week and have 3 kids. I put in 2 hours a night and 8 on sat and sunday and holidays. Ive spent 2-3k and have not touched the interior. Ive used 10 gallons epoxy. If you are not an obsessive, compulsive, hard wokring A-hole with cash to burn who thouroughly enjoys bustin your *** and can appreciate your results DON"T BOTHER! Save the 3k, take your time and buy a nicer boat. Ive redone cars, houses, you name it...this SUCKS! 90% of the hours Ive spent no one will ever know or see.

good luck
 

Attachments

  • IMG_3933.JPG
    IMG_3933.JPG
    45.2 KB · Views: 2
  • IMG_3934.JPG
    IMG_3934.JPG
    69.2 KB · Views: 2
  • IMG_3935.JPG
    IMG_3935.JPG
    56.7 KB · Views: 2
  • IMG_3940.JPG
    IMG_3940.JPG
    37.9 KB · Views: 2
  • IMG_3943.JPG
    IMG_3943.JPG
    57.7 KB · Views: 2
Last edited:

othelloears

Petty Officer 2nd Class
Joined
Jun 28, 2008
Messages
123
Re: First Restore 84 Wellcraft Elite 200

Couple more
 

Attachments

  • IMG_3943.JPG
    IMG_3943.JPG
    57.7 KB · Views: 1
  • IMG_3947.JPG
    IMG_3947.JPG
    43.5 KB · Views: 1
  • IMG_3950.JPG
    IMG_3950.JPG
    23 KB · Views: 1

othelloears

Petty Officer 2nd Class
Joined
Jun 28, 2008
Messages
123
Re: First Restore 84 Wellcraft Elite 200

Moving along but wanted to give you guys a heads up. On sat I put on 2 layers of epoxy on the hull to seal the bottom from the crazing and blisters. On sunday I started sanding the bottom to put on 2 coats of barrier. Apparently because of the cool temps the epoxy did not sure and some slipped past my goggles around my eyes. Woke up monday to go to work and my eyes were swollen shut! Rocky I stuff!

Dr. put me on prednisone which cleared it right up.Even gave me 2 refills when I told him I had to keep going.

Notwithstanding the reaction. Got the 2 coats barrier on and a coat of pimekote on the hull. Plan on sanding everything down for antifouling on the bottom and another coat of epoxykote before 2 coats of perfection. At least it now looks like ive been doing something

Sterndrive from SEI arrived today.

Still wainting on tank to finish deck & interior.

4 weeks to go!
 

othelloears

Petty Officer 2nd Class
Joined
Jun 28, 2008
Messages
123
Re: First Restore 84 Wellcraft Elite 200

I'll have some more pictures tonight. Making progress but slowly. Been sanding for 2 weeks.

Put on 2 coats epoxy on bottom...sanded and 2 coats barrier coat...sanded

Sanded the hull 4 times...2 coats of primekote

Had real trouble with the epoxy primekote. Couldn't find a combination of thinner, roller, and tipping. If its thick you have to sand too much and go through; if its thin you sand through. Ended up going with some sanded through areas but glass smooth with 220 grit. There is a middle ground I couldn't find. I do not think you should tip it.

Put on 1st coat of perfection. Rolled and tipped. I was scared because of the primer problems but wow!. 1/8" foam roller from jamestown and good 4" brush for tipping. It must be cool (50-70) There are brush marks when you finish painting which are absoultely gone when it dries. Its stunning how it dries. My 20ft. boat took most of the quart. Looks like I'll use 3 coats/quarts.

I am going to sand between base coats and am debating wainting 24 or 48 hours to sand...Any recomendations?

Tank finally came yesterday so I can get back to the interior. Hope to install tank, glue and screw deck boards, epoxy, tab to hull and 2 coats cloth this weekend. What are the odds?

Ive got 2 more weeks to the 4th. Working 3 hours a night after work and 8 on sat and sundays. Haven't added everything up but the 100$ misc (acetone, cups, mixers, breshes, rollers) is really adding up.
 

chrishayes

Senior Chief Petty Officer
Joined
Apr 9, 2009
Messages
691
Re: First Restore 84 Wellcraft Elite 200

Man I hear ya, I am at 2500$ and I dont even have stringers in yet! I crapped out my old trusty air compressor and had to buy a new one. Cha ching. Then I had to buy "cheap" tools to work with the glass because everyone says that it will kill your tools. Damn it, I have all the tools that I just bought! Really wheres the sense in that? Oh well, its kinda fun, you have to admit it...and by the way, you say that you are doing all this work that no one will ever see...Well, I see it and it looks great! Congrats on being an obsessive compulsive A hole! Welcome, come sit down and tell the group your name and a little about yourself.:p Keep it up, you are flying compared to my pace and you are doing very quality work. Hope you meet your D day.
 

othelloears

Petty Officer 2nd Class
Joined
Jun 28, 2008
Messages
123
Re: First Restore 84 Wellcraft Elite 200

4 days to go and still ontrack for 4th launch.

Tank arrived but had to reroute all the lines and change filler and vent location. Tank was smaller than original so I had to add another frame/stringer/cross brace. My plan to sit the tank actually worked. I wrapped the tank in plastic..poured 4lb foam down, sat tank and let it harden. As I suspected the pressure from the foam caved in the tank a little but some sanding and shaping made a nice base. Neoprened new box with scraps off ebay. Drilled new line holes, ran lines, finashed foaming.

Ended up epoxying a 3"pvc elbow into deck to make watertight. Seemed to work fine. We'll see if epoxy holds up.

Glued and screwed deck. Sanded deck and hull.

used 1708 12" to tape deck to hull

My plan was to do to layers of 4oz cloth. Got 1 done and realized I did not order enough. Had to go to west and got screwed!!!!!! 16.99 a yd for 6oz!

Finished glassing layer of 6oz over 4oz on deck

Sanded/grinded as smooth as I could

1 coat of epoxy primekote is on

Sanded ext hull with 320 grit and put on final coat of perfection. FOr final coat I used the cheap black foam pads they say not to use to tip but it came out the best of any coat. Would recommend. Must do thin coats..It does run if not careful. Great paint. We'll see how it lasts

Replaced my gimbal and put on my new sei 106 replacement sterndrive. What a btch! Would not go on for sht.

I have 4 nights left

I am going to sand primer and coat with perfection snow white with 50% flattening agent for whole interior. I am going to do 2nd coat on just floor with nonskid

I am going to install all partions/supports using pvc trimboard. I am also going to epoxy the pvc trimboard to deck for bases for anything to be screwed into deck (seats, batery, power steering pump)

Last night for misc hookups ectt...
 

othelloears

Petty Officer 2nd Class
Joined
Jun 28, 2008
Messages
123
Re: First Restore 84 Wellcraft Elite 200

Just wanted to close the loop...not that anyone cares.

Good news...made my Jult 4th weekend deadline..minus a couple loose ends.

New paint and deck looked amazing! See photo of dad's reflexion

Thats where the good news ended.

1st weekend...Trim pump went then an Electrical short kept blowing fuses(towed in twice that weekend)

2nd weekend...Shift cable went (rubbed against coupler) Towed in again... Was so frusterated I pulled boat and brought to shop...Sat there for 3 weeks

Went down for my weeks vacation with family...Boat not ready until Tuesday afternoon of vacation...550$ for new shift cable and told me to replace power steering pump for 600$

Rainy day but so excited to have my boat back drove around for 2 hours

Woke up next morning at 5am to bring son fishing...Got out a mile and...nothing...turns our engine coupler spun...TOWED IN....

END OF SEASON...300 HOURS AND @ 8K REBUILDING AND 4 HOURS OF BOATING

Engine is now pulled. Wasn't that bad. Waiting on coupler and power steering pump

looking into vinyl for all new upholstery...

As we red sox fans always USED to say...There is always next year!
 

Attachments

  • Picture 033.jpg
    Picture 033.jpg
    56.9 KB · Views: 1
Top