Bow hook repair!

FFScott6

Petty Officer 2nd Class
Joined
Aug 2, 2007
Messages
136
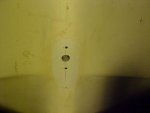
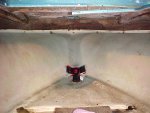
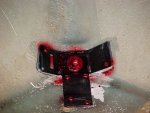
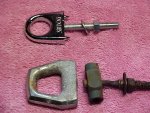
I have a 1963 Aristocraft "Funliner 17" In our case the name rings true! Anyway, The bow hook was terribly loose, after investigating deeeeppp under the dash I found that this was the second or 3rd repair to the hook. The last fix was to replace it, at which point someone put a body section of a brass valve under the nut and washer (don't ask, I can't imagine what they were thinking).

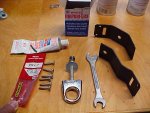
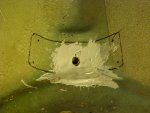
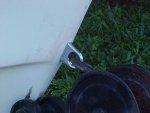
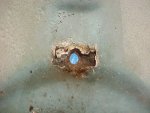
My Aristocraft is a double fiberglass hull. Well the valve body managed to pull thru the inner glass leaving me a floppy and very unstable hook all but puuling on the outer hull alone. I've removed the hook via a hack saw and the new one will be here tomorrow. I'm thinking of CAREFULLY screwing a "custom made" aluminum plate fashioned to fit the inner hull contour (out of a 10" X 10" 1/8th aluminum flat stock) that should offer to spread the load inside.

I nned to know what material(s) to use to repair the f/g? I have read the "marinetex" and similar products will fill such areas and prevent crushing in the future? I'm hoping to drill out whatever fix I do and mount the new bow hook before this weekend. It's looking like a great weekend to hit the Chesapeak flats!

Thanks to all for responding.

BTW. she's powered by a 1960 Gale Sovereign 60hp V-4 and with a miss I made 22mph last weekend! (I found/fixed a bad plug wire, now I wanna see what it'll really do). Let me say that 6gal does't last long though. I'll be adding a second tank.
 

thrillhouse700

Senior Chief Petty Officer
Joined
Aug 5, 2009
Messages
778
Re: Bow hook repair!

I just fixed my bow eye, but I didn't have any fiberglass damage. Post up a pic if you can. How easily is it reached from the inside? I am not sure if I would marine tex the bow eye seeing as how it supports a good deal of weight. (But what would i know I just started restoring haha). How we did ours was, removed old glass and wood support piece, sanded down smooth, laid in 2-3 layers of glass to flatten out the corner a bit, PLed a piece of 3/4" ply, then we are going to glass over it again once its dry.
 

FFScott6

Petty Officer 2nd Class
Joined
Aug 2, 2007
Messages
136
Re: Bow hook repair!

I'm all F/G inner and outer. I'm told both layers are structural since there are NO wooden components in this boat. So I would rather not cut out any F/G. I can reach it ok to squeeze in a filler material from inside and outside. I'll see if I can post a pic tonight. not sure a pic will turn out well from inside nbut i'll try.

Keep the responses coming please... I'll utilize the best parts of all opinions to make my repair.Thanks, Scott
 

FFScott6

Petty Officer 2nd Class
Joined
Aug 2, 2007
Messages
136
Re: Bow hook repair!

Here are a couple pics before. 1. new and old hooks, 2. inner hull (pulled in against the outer hull good 1/2") removed the loose f/g & awaiting a final cleaning and vacuum, 3. outside masked for repair w/lines to mark centers.
 

Attachments

  • MVC-710F.JPG
    MVC-710F.JPG
    95.7 KB · Views: 0
  • MVC-712F.JPG
    MVC-712F.JPG
    53.5 KB · Views: 0
  • MVC-715F.JPG
    MVC-715F.JPG
    34.2 KB · Views: 0

thrillhouse700

Senior Chief Petty Officer
Joined
Aug 5, 2009
Messages
778
Re: Bow hook repair!

I would say at the very least, bevel out the cracked part and fill it. But maybe wait for some of the more experienced restorers to chime in :)
 

redfury

Commander
Joined
Jul 16, 2006
Messages
2,657
Re: Bow hook repair!

If you can get to it from the inside, then you'll want to have something for it to spread the load out onto. I piece of thick aluminum bent with the "v" will work nicely, or you can just use just about anything that will spread the load. Lots of fiberglass thickness with a weave and large washers would do the trick, but the larger the area you can spread the load over, the better.

My Glastron has a piece of wood about 10 inches long fiberglassed in with heavy roving. The wood is rotten and I've pulled the boat up from the ground onto a trailer without issues with the bow eye...though I am going to repair it.

I'll be using a 9 ply plywood blank glassed in to do the trick after I've sealed up the holes in the wood for the bow eye.

As far as yours goes, I'd be a little concerned about the size of that hole to be honest. How large is the hole compared to the lug that is going to go through it from the bow eye?
 

thrillhouse700

Senior Chief Petty Officer
Joined
Aug 5, 2009
Messages
778
Re: Bow hook repair!

I agree with redfury, just because of the size of that hole I would be weary of putting marine tex or any other filler on it, scared it may pull through.

We are almost done with ours, 4 layers of glass, 9" x 2" strip of plywood, lots of pl to glue it in, PB over it then when pb dries 1-2 layers of glass. I will be able to TOW the trailer with my bow eye. Or if we have motor toubles winch it onto the trailer haha.
 

FFScott6

Petty Officer 2nd Class
Joined
Aug 2, 2007
Messages
136
Re: Bow hook repair!

OK. here's the steps so far.
1. cleaned everything good
2. filled old 3/8" hole after marking centers
3. drilled a fraction size smaller than 3/8" hole for new hook.
4. packed "marine tex" to fill void inside & build up inside to original height
5. fashioned supports as shown below to distribute force to inner hull, 9 x 9

next, I will install supports and secure bow hook with marine silcone outside (to ensure water seal around threads) and tighten a nylon lock nut, finally install 8 stainless steel screws #12 x 1" on the perimeter of the supports. The Fibreglass inner hull was sound (no radial cracking) I discovered this loose hook before it had a chance to do more damage. I would have liked a ubolt type hook but I did not have space. Maybe I'll get out tomorrow afternoon for a couple of hours!
 

Attachments

  • MVC-724F.JPG
    MVC-724F.JPG
    34 KB · Views: 0
  • MVC-726F.JPG
    MVC-726F.JPG
    66.1 KB · Views: 0
  • MVC-723F.JPG
    MVC-723F.JPG
    57.8 KB · Views: 0

FFScott6

Petty Officer 2nd Class
Joined
Aug 2, 2007
Messages
136
Re: Bow hook repair!

Well, It is finished.

This morning I knocked down the high spots on the inner patch of marine tex and began the fitting,

1. installed bow hook with marine silicone on threads and nipples to help keep water out.
2. installed my new base plates and secured with the nylock nut. predrilled for 8 S/S screws and secured them.
3. sprayed battery terminal protector on bolt threads and other exposed metal.
4. Cleaned up and posted these finished pics. All together from disassembly to prep to clean up took 5 hours not including waiting for the Marine tex to cure.

Unfortunately we can't go out today :-( I have to work at home.. says the Mrs. (just kidding she enjoys going out too, but we do have work to do at home!
 

Attachments

  • MVC-727F.JPG
    MVC-727F.JPG
    45.3 KB · Views: 0
  • MVC-729F.JPG
    MVC-729F.JPG
    52.8 KB · Views: 0
  • MVC-730F.JPG
    MVC-730F.JPG
    61.2 KB · Views: 0
Top