1989 Four Winns 160 Restoration With Pics

solar7647

Lieutenant Junior Grade
Joined
Apr 23, 2009
Messages
1,218
Re: 1989 Four Winns 160 Restoration With Pics

Your new engine mount looks nice and solid. What did you make it out of and what did you use to bed it in?
.

I used 1/2" ply laminated together until i got the thickness in needed. I used outdoor liquid nails to hold it to the hull and then glassed it all in. The surface was glassed in with 1.5oz matt, 10oc cloth, 1.5oz matt, and topped with 10oz cloth. So it is about 1/4" thick.

I did it that way cause i figured if water did get in it would take longer to rot the wood since there would be resin every 1/2" and its 8" thick. When I removed the original one i measured how thick the glass on the surface was and just made it that thick.

It turned out really solid.
 

Robert4Winns

Petty Officer 2nd Class
Joined
Oct 28, 2009
Messages
146
Re: 1989 Four Winns 160 Restoration With Pics

It's looking really good, Robert. I have a renewed interest since finding loose motor mount bolts on the port side.

I saw a post somewhere making a transom or motor mounts or some other part that fits against the hull, and someone suggested to make a pattern by hot-gluing ice cream sticks together. Sounded silly at first, but the more I thought about it, the more it seemed it might work really well.

I am going to do exploratory surgery, but I'm sure it's not going to be simply a case of stripped out bolt holes. The boat is a 1988, so I'm guessing it's about due for an overhaul. This will all be new to me- it's boat #4, but one was a new boat, and I've never done anything other than routine maintenance on any of them, so it's gonna be a real 'experience'.

ex?pe?ri?ence  /ik-speer-ee-uhns noun, verb,-enced, -enc?ing. ?noun

1. knowledge or practical wisdom gained from what one has observed, encountered, or undergone.

2. what you got when you didn't get what you wanted.

Thanks ftl900. It seems that a lot of the boats of this vintage on this forum end up turning into bigger projects than expected. I hope you find some solid and dry wood in yours. Good luck.
 

ltjag101

Seaman Apprentice
Joined
Apr 18, 2010
Messages
37
Re: 1989 Four Winns 160 Restoration With Pics

Thanks. I hope to get it ready for the lake by the time my kids are out of school for the summer. But, it has been slow going.
Good luck on your project. If you only have to replace the deck that would be nice, but I would check out the transom and stringers very well on a boat that old, especially with a PO that would put in house carpet. Who knows what else was repaired incorrectly. I'll be watching for your thread.

i doubt it will be as easy as what i plan but there is still hope for this old boat

just as you thoght it would be a simple repair and balooned into a huge project filled with little adventures mine may very well do the same but i will try to get mine done in a weekend or two with the help of my brother both of our tool boxes full of tools lots of pepsi, hot dogs and burgers it should be doable if it stops at the floor.

on a side note the pregnant wife has the weirdest craving "BOATING" that is the reason for the fast paced schedule. DONT MAKE PREGNANT WOMEN UNHAPPY BAD STUFF HAPPENES:mad::eek:
 

MountaineerMiner

Petty Officer 2nd Class
Joined
Mar 9, 2010
Messages
146
Re: 1989 Four Winns 160 Restoration With Pics

isnt all that grinding so much fun!!! along with some weak joints the tabbing in several places on mine had never been wetted out completely.

Mike
 

BigBoatinOkie

Senior Chief Petty Officer
Joined
May 28, 2009
Messages
763
Re: 1989 Four Winns 160 Restoration With Pics

Lookin good Robert. You do very thorough work. Keep chippin away at it and you'll get there.
 

solar7647

Lieutenant Junior Grade
Joined
Apr 23, 2009
Messages
1,218
Re: 1989 Four Winns 160 Restoration With Pics

So hows it comming along? You get that thing back together yet! :)
 

Robert4Winns

Petty Officer 2nd Class
Joined
Oct 28, 2009
Messages
146
Re: 1989 Four Winns 160 Restoration With Pics

Since I got the grinding for the stringers done I have been too busy with work and family obligations to put in any meaningful time in on the boat. All I've been able to do is clean up some of the glass dust in the garage. I hope to be able to get the stringers cut and bedded in this weekend.
 

solar7647

Lieutenant Junior Grade
Joined
Apr 23, 2009
Messages
1,218
Re: 1989 Four Winns 160 Restoration With Pics

Since I got the grinding for the stringers done I have been too busy with work and family obligations to put in any meaningful time in on the boat. All I've been able to do is clean up some of the glass dust in the garage. I hope to be able to get the stringers cut and bedded in this weekend.


Yea i know how that goes! I am doing mine on the weekends, I get some time time every once in a while during the week, but 99% of it is on the weekend. The only thing I really get to do during the week is buy things for the weekend!!:D

I am getting close though hopefully i will be done by the end of May!
 

nova23zz502

Cadet
Joined
May 6, 2010
Messages
17
Re: 1989 Four Winns 160 Restoration With Pics

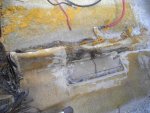
Well it has been too long since I have posted any updates on my project. I have made some progress, but not as much as I had hoped I would by this time. I got the old wood out of the transom and got it down to the outer fiberglass skin. I also repaired the hole I chiseled through the gelcoat and also patched the existing holes from the small step and ladder since I will be installing something else. I also patched a hole from a light that was mounted in the transom since if I reinstall it I will move it to a different location. Although I am primarily using epoxy for this project, I patched the holes with poly resin. Basically I wanted a the complete outer skin of the transom to be poly so I can apply gelcoat from the outside without having problems trying to apply it over epoxy bonding. Unfortunately I do not have any photos of this part.

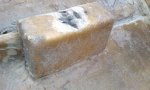
I glued up the plywood for the transom suing 2 layers of 1/2? and one layer of 5/8? to get the appropriate thickness. I used thickened epoxy to laminate the plywood. It took a lot more than I expected. Each layer took over a quart of resin, which I thickened with approximate equal parts of cabosil and wood flour. I clamped the plywood using as many clamps as I could lay my hands on. The work surface I used was two solid core doors, which were fully supported and dead flat so I would be sure the core would end up flat.
9601.jpg


After trying to test fit a template for the transom, I quickly discovered that there was no way I was going to get the new plywood in there without taking the cap off. So I took off the rub rail and about a million screws around the boat and lifted off the cap using some cargo straps secured to a beam and the ceiling of my garage. I just went around raising each strap a little bit at a time. I am doing all of this work alone and didn?t have another place to put the cap so this was the way that made the most sense to me.
9600.jpg


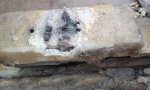
With the cap off it was not a problem fitting in the new plywood core and gluing it in place with thickened epoxy. I had to mix it up in multiple batches, but since I am using epoxy from US Composites with the medium hardener I had plenty of working time. I just spread each batch out on the transom so it would not start to harden in the pot while I mixed up the next batch. It was a real mess and I had my hands full so I don?t have any photos while I was doing it, but here is the plywood glued in.
9602.jpg


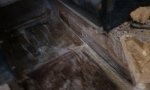
Then I used the same thickened epoxy (PB) to fill the gap and make a fillet around the perimeter.
9603.jpg


After that PB had plenty of time to cure I cleaned up the fillet in a few places and glassed the plywood to the hull. First I put down a layer of 6? 1708 biax followed by layer of 11? biax without mat and then covered the entire thing with 1708 overlaping the prior layers. I did it wet on wet, all in one session.
Does this sound like enough layers or do I need to add more?
9604.jpg


I had to mix up so many batches of epoxy I lost track of how many it took. There is a big difference using the biax without the mat. It wets out so much easier and takes a lot less resin.
There are two spots that I couldn't get it to lay down on the hull where there is a chine(?) on each side. Before laying the glass I filled it in a bit, but not enough so there is an air pocket on each side about 6" from the transom.

Next I am going to start tearing out the floor and stringers.

Looks real good so far. Make sure you epoxy paint all surfaces before you put your new floor down. Sherwin Williams "Dura plate" is noted by many top notch glass guys. Just do the paint work to the letter and it will out last the glass.:D
 

BigBoatinOkie

Senior Chief Petty Officer
Joined
May 28, 2009
Messages
763
Re: 1989 Four Winns 160 Restoration With Pics

Rob......Rob.......Rooooooob. Where you at buddy? We miss you man.:(
 

Robert4Winns

Petty Officer 2nd Class
Joined
Oct 28, 2009
Messages
146
Re: 1989 Four Winns 160 Restoration With Pics

Rob......Rob.......Rooooooob. Where you at buddy? We miss you man.:(

Thanks for keeping up with my project. I have been watching yours and it is encouraging. It has been too long since I have posted any pics. It has been going slow but I have been making progress.

As I mentioned before, I installed the center stringer before I removed the main stringers. I also left the outer stringers in place because they were not wet or rotten and were still very solid. This gives me a good reference to get the other stringers and other under-deck pieces at the correct height.

My next step was to install the bulkheads that go between the main stringers and behind the ski locker and behind the gas tank. I just bedded them in with PL and they were pretty solid. I clamped them at the correct height based on the outer stringers.

9679.jpg

9680.jpg


The front bulkhead is notched around the center stringer and the back one butts up against it. By installing the bulkheads first I had an easy place to clamp the stringers to scribe them to the hull. I could get the stringers pretty close by just taking measurements and I cut them to the approximate shape leaving 1? - 1.5? extra. Then I clamped them in place to scribe them to the shape of the hull.

I clamped the stringers 1.5 inches higher than where it needed to end up.
9684.jpg


Then I went along the length on each side of the stringer and drew a line a little more than 1.5 from the hull. I used a 4" cutoff wheel with the pencil in the center to follow the hull and mark the stringers.
9681.jpg


I did this on both sides of the stringer so I could cut them at the correct angle. After cutting I clamped the stringers again, this time at the correct height, or as far down as it would go. I used a popsicle stick as a feeler gauge under the stringer and marked where I needed to cut off a little more. It took a few test fittings but I ended up with a pretty even gap under the stringers. Then I bedded the stringers with PL.

Now I am in the process of glassing everything in. Once I have the stringers glassed in I also have to add the crossbraces between the inner stringers and outer stringers.
 
Last edited:

Robert4Winns

Petty Officer 2nd Class
Joined
Oct 28, 2009
Messages
146
Re: 1989 Four Winns 160 Restoration With Pics

Here is a couple of pics of the glassing on the stringers so far.
9685.jpg

9683.jpg

I am trying to do as much as I can with th ecap on to maintain the correct shape of the hull, but I will have to take it off again to glass in the very front of the stringers and the floor under the bow.
I have been using 6" wide 1708 biax, then going over that with 10" wide 1200 biax. Does that sound like enough? The original stringers did not seem to have that much.
 

Robert4Winns

Petty Officer 2nd Class
Joined
Oct 28, 2009
Messages
146
Re: 1989 Four Winns 160 Restoration With Pics

I forgot to mention. I tried to use the PL to make a fillet when I bedded the pieces in, but it was very uneven. So I cut and sanded most of that off and have been adding a fillet of epoxy with cabosil and wood flour. That is much easier to smooth out and doesn't get so many bubbles.
 

insanity

Petty Officer 1st Class
Joined
Sep 7, 2009
Messages
227
Re: 1989 Four Winns 160 Restoration With Pics

Subscribing, I have an 86 horizon I need to replace the floor on but now will dig deeper.
 

Robert4Winns

Petty Officer 2nd Class
Joined
Oct 28, 2009
Messages
146
Re: 1989 Four Winns 160 Restoration With Pics

Subscribing, I have an 86 horizon I need to replace the floor on but now will dig deeper.

I hope you do not find what I found. It seems like almost every boat of this age has some amount of rot under the deck.
 

solar7647

Lieutenant Junior Grade
Joined
Apr 23, 2009
Messages
1,218
Re: 1989 Four Winns 160 Restoration With Pics

Hey your alive!!!....wow your getting her done. the work looks good! Keep it up, i like the trick with the grinding disk to make the streight line on the stringer.
 

BigBoatinOkie

Senior Chief Petty Officer
Joined
May 28, 2009
Messages
763
Re: 1989 Four Winns 160 Restoration With Pics

Hey, there you are. Looks like you've made some progress too. As always, very nice work. Smooth move with the grinding disk, very good idea.
 

GracieBell1

Petty Officer 2nd Class
Joined
Jan 8, 2010
Messages
152
Re: 1989 Four Winns 160 Restoration With Pics

I have an '86 Liberator I am restoring. I noticed the same thing you did with the glass. It was only about or less than an 1/8" on all the stringers except in the engine area then it was about 1/4". It seemed to be all mat and no woven roving. They are supposed to be encapsulated but was not in a lot of places. I am scarfing the stringer were roted and drying the damp parts by removing one side of the glass. I hate to take apart the full cockpit as this is the section I am leaving in, from the cabin forward or about 6 feet. Does this sound ok and will it be ok to tab in and encasulate with mat only or should I put a full layer of woven roving over the whole stringer? My engine stringers did not even have glass on the back but did have a build up of mat on the fronts and the mounts. I don't think I can get one big sheet of woven to form to the whole thing. Should I lay up this in two pieces. One sheet going over the stringer and mount then another piece over the side top and other side of the mount. I will attahc picks. I have cut of the bottom glass from the stringers to inspect. Four Winns kept the stringers off the hull and water on onto the bottoms. They are solid but wet and a little discolored. I can dry them then treat them with a sealant. Do you think this will work and give me several years of boating before they rot or get worse? This boat did not have a soft floor but the transom leaked and caused the boat to go under in the back.
 

Attachments

  • 3.jpg
    3.jpg
    49.6 KB · Views: 4
  • IMAG0066.jpg
    IMAG0066.jpg
    143.6 KB · Views: 4
  • IMAG0065.jpg
    IMAG0065.jpg
    151.3 KB · Views: 4
  • IMAG0099.jpg
    IMAG0099.jpg
    143.7 KB · Views: 4
  • IMAG0097.jpg
    IMAG0097.jpg
    144.5 KB · Views: 4

boatingnovice

Recruit
Joined
Feb 21, 2010
Messages
3
Re: 1989 Four Winns 160 Restoration With Pics

Great job explaining the procedure and products used. Sounds like your going to have a great boat and an even greater sense of satisfaction and accomplishment.

Mark
 

MountaineerMiner

Petty Officer 2nd Class
Joined
Mar 9, 2010
Messages
146
Re: 1989 Four Winns 160 Restoration With Pics

Hows the project coming Rob?

Everything looks great so far!!
 
Top