OMC SEI Conversion

Don S

Honorary Moderator Emeritus
Joined
Aug 31, 2004
Messages
62,321
Re: OMC SEI Conversion

I have no clue about the kit, but OMC used a bellows, and Mercruiser used a bellows. They were designed to run the exhaust through the prop. That helps in the overall design and efficiency.
Now, if you take the bellows off, then you have exhaust going around the drive and not through it and the prop as designed.
You decide.
 

flyer4ever

Petty Officer 3rd Class
Joined
Oct 5, 2009
Messages
95
Re: OMC SEI Conversion

The part that I'm interested in, is the need to reverse your shift/throttle handle because of it working backward. From omc to mercruiser. I looked at mine and cannot see how you would do that or could you operate backwards, you know pull it back to go forward. That could be exciting!
 

shep247

Seaman
Joined
Jun 16, 2007
Messages
61
Re: OMC SEI Conversion

The part that I'm interested in, is the need to reverse your shift/throttle handle because of it working backward. From omc to mercruiser. I looked at mine and cannot see how you would do that or could you operate backwards, you know pull it back to go forward. That could be exciting!

Ha! I'll hit that step in about 2 pages from now. I'm not sure how that's going to happen yet, but pulling back to go forward will be the last resort. I think I'm going to try to dismantle the controls, and see if there's something I can rework in there. I might also be contacting SEI about that step too.

As far as the exhaust bellows go, I think I'm going to attempt to hook the old one up for the sake of at least getting most of the exhaust away from my white swim platform.
 

flyer4ever

Petty Officer 3rd Class
Joined
Oct 5, 2009
Messages
95
Re: OMC SEI Conversion

Hey shep247, Hows the changeover comming? Any problems? I think this will be well needed info for several folks thinking about doing this.
 

Ducatinut

Seaman Apprentice
Joined
Apr 8, 2007
Messages
42
Re: OMC SEI Conversion

Hi, all--

I know a little about the conversion kit and will try to answer some of the questions about it (I was fairly involved in the conception/design/testing/etc).

--The controls - if you have a Morse or Teleflex control, you should be able to reverse the throw by changing the attachment point of the cable. My boat has a Morse from 1990 and Teleflex had the book on their website. Not all controls are reversible, so you might need to buy another control. Check ebay if you want, but basic controls are not that expensive. Used controls show up on feeBay all the time for less than $100.

--Shifting quality - this is completely dependent on your rig. My boat shifts sweet and smooth in and out of gear. Keep in mind that the OMC ESA was a neat idea, but pretty bad in real life. Plan on modifying the shift system to behave like Merc's. SEI even includes a piece of wire, a splice and some ties to make it neat (I lobbied for red ties instead of black, but they didn't think my estimated horsepower gains were justifiable :rolleyes: ).

--Cost - the conversion kit is $350 and the drive is $1400. Make sure you buy the anode kit for $60 and go ahead and buy the install kit for $45. SEI will modify the drive if you buy everything at once. You can stick the spare gasket on the shelf and I guarantee you need to replace the nylocks that secure the drive.

--Drive modification - the modification is simple, but mandatory. Their drives are priced right, well-made, and have a warranty that you won't find anywhere else. Can you say the same thing about that corroded POS on a skid? Just go boating and let the factory worry about it.

--Exhaust bellow - There's a few options here: use the OMC bellows and wait for it disintegrate, modify the Merc cup-style bellow, or don't use a bellow at all. I've done all three and decided to go with none at all. The exhaust is louder on plane (I have a V8 and like it :D ), but there are risks (search around a bit, it's been discussed on the boards). As far as performance, I noticed no difference between them.

--Props - I reused my cobra prop with the use of an adapter. To be fair, it's an aftermarket prop and hubbed to be used on either style drive. Take your prop (if you REALLY love it) to a decent shop and they can help you out. If I ever take my boat back out of the water, I'll figure out what the adapter is and post what I know. In the meantime, all I can say is I know it worked for me...

--Install time - if you've never done one, set aside a weekend. Take your time and expect to deal with corrosion, etc. In my shop, we estimate 4-6 man hours depending on the condition of the existing drive. Most of the time consumed is removing the crusty old lump stuck to the stern.

I hope this helps....

Fair winds,

Chris
 

flyer4ever

Petty Officer 3rd Class
Joined
Oct 5, 2009
Messages
95
Re: OMC SEI Conversion

Thanks, that was a lot of help. If you already have a gen 2 drive, is the modification something that can be done at home? Do you know what and how to do it . Thanks Ernie
 

Ducatinut

Seaman Apprentice
Joined
Apr 8, 2007
Messages
42
Re: OMC SEI Conversion

Thanks, that was a lot of help. If you already have a gen 2 drive, is the modification something that can be done at home? Do you know what and how to do it . Thanks Ernie

Ernie--

The modification to the drive is simple - you need to shorten the trim stops on the upper to allow negative trim (effectively "pushes" the stern up during acceleration), to improve your holeshot.

Doesn't take much, but the amount varies by boat. We whacked about 1/2", but YMMV and you might need more (less?) trim. Be careful though, Mercruiser had an issue with excessive negative trim on the Bravo where you could lose control of the boat at higher speeds.

Check out SEI's forums, there's a good discussion from someone who's done the installation.

To be honest though, if you have a Gen II drive sitting around, unload it on evilBay and buy a new one with a warranty for your conversion. The used one will probably fetch enough to cover most of the new drive and some of the kit. Plus, you get a warranty. Should I mention again that they have a great warranty? ;)

Fair winds,

Chris
 

flyer4ever

Petty Officer 3rd Class
Joined
Oct 5, 2009
Messages
95
Re: OMC SEI Conversion

Thanks for the info. Im sure several folks will find this very informative. Hows the Warranty! Oh ya you said that. Just kidding. Thanks Ernie
 

shep247

Seaman
Joined
Jun 16, 2007
Messages
61
Re: OMC SEI Conversion

Update!
I got the bell housing installed today, and put together the 2 pieces of sterndrive. I'm so close I can taste it.
I called sei today to ask them about the exhaust bellows. They said I could monkey around with it and try to clamp the OMC one to the new bell housing, but it wasn't necessary. It would just be louder on plane, but not really while idling. That's cool with me, so I just attached the exhaust bellows on one end, and left about a 4" tail.
While waiting for a 2nd pair of hands to help me attach the sterndrive to the boat, I decided I was going to start trying to reverse the controls. Ta-Da!!! I'm stuck again. I've never installed controls, or removed them, so I don't know how to get the thing off of the boat so I can mess with it. I don't think they're the original controls, as they don't say OMC anywhere, and they're attached to the side of my boat. The mechanical part is on the inside, and the handle is on the outside. I know there's GOT to be a way to remove that handle. Does anyone know any tricks to do this? I'm looking around online, but can't find any examples of the exact controls I have.

Thanks guys,
We're getting there!
 

flyer4ever

Petty Officer 3rd Class
Joined
Oct 5, 2009
Messages
95
Re: OMC SEI Conversion

If you stand on your head and look to the underside you should see a small hole and way inside ,you will find an allen set screw. I had to replace mine recently. (not kidding about standing on your head). Keep us informed and good luck Ernie, Oh yea ,thats on the control arm!
 

shep247

Seaman
Joined
Jun 16, 2007
Messages
61
Re: OMC SEI Conversion

If you stand on your head and look to the underside you should see a small hole and way inside ,you will find an allen set screw. I had to replace mine recently. (not kidding about standing on your head). Keep us informed and good luck Ernie, Oh yea ,thats on the control arm!

Ah, an allen screw. I WAS standing on my head, and saw that hole. There was no light in there, and I couldn't see into it, so I stuck a phillips screwdriver in it to see if it would catch. I'll go try the allen now.

thanks!
 

shep247

Seaman
Joined
Jun 16, 2007
Messages
61
Re: OMC SEI Conversion

Time for another update, and another question, of course :p. I've finally got everything on right (i think). I got a new prop. I let a local prop shop pick one out for me with the caveat that I could try it out once, and if it was the wrong size, I'll bring it back. I installed that, and found that it was hitting the anode fin, so I tried to take it back. He told me that it is normal to have to grind that fin down. I double checked that on the trusty iboat forums, and it is indeed pretty common.

There were questions about how to handle reversing the throw of the helm controls. Well, it seems I have an aftermarket control set already because all I needed to do was pull the cable off of the top throw of the controls, and move it to the bottom. Done and done. The mechanic at the prop shop told me that I should also change the control linkage at the engine to a mercruiser linkage or I could be putting the drive half way into gear, and burn the clutch out. I double checked that with SEI's tech dept., and they said the old OMC one would be fine.

Now all I have left is disabling the ESA (a highly recommended step from SEI), grinding that anode, and filling the drive with oil. Then I'll try out the shifter in the driveway, and if that all checks out, its off to the lake for a trial run.

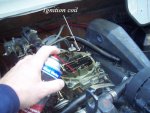
This is where my question comes in. In the instructions, to disable the ESA, it says to "connect the negative side of the coil to the shift interrupter switch" via a wire they provided. Using a multimeter, with one side connected to the neg. pole of the battery (ground) and tapping the poles of the interrupter switches, I found the only one that didn't have continuity, so I think I'm good on that end. I'm not sure what they're talking about when they say "negative side of the coil" though. My GUESS is its the thing at the front of the engine where 2 big wires are attached to a little can. It seems like this would be just like connecting it to the negative pole of the battery though. So question is...What is the coil? Any help you can give would be great. A picture would be even better!

Thanks guys. I'm almost there.
 

Lou C

Supreme Mariner
Joined
Nov 10, 2002
Messages
13,070
Re: OMC SEI Conversion

Find your engine distributor...it will have spark plug wires coming out of it....6 if a V6.....8 if a V8...then find the one wire in the middle of the cap...follow that wire and it shoud connect to cylinder shaped object..that's your coil...and the coil has 2 smaller connections on it...one marked + and one -

On a Chevy 4.3 the distributor is at the rear center of the engine and the coil is slightly foward and to the right of where the dist. is.....
 

Attachments

  • winterize 018a.jpg
    winterize 018a.jpg
    61.7 KB · Views: 1

Ducatinut

Seaman Apprentice
Joined
Apr 8, 2007
Messages
42
Re: OMC SEI Conversion

This is where my question comes in. In the instructions, to disable the ESA, it says to "connect the negative side of the coil to the shift interrupter switch" via a wire they provided. Using a multimeter, with one side connected to the neg. pole of the battery (ground) and tapping the poles of the interrupter switches, I found the only one that didn't have continuity, so I think I'm good on that end. I'm not sure what they're talking about when they say "negative side of the coil" though. My GUESS is its the thing at the front of the engine where 2 big wires are attached to a little can. It seems like this would be just like connecting it to the negative pole of the battery though. So question is...What is the coil? Any help you can give would be great. A picture would be even better!

Thanks guys. I'm almost there.

Here's a detail of the shift interrupt deal. You want to splice into the switch with the long arm on it (the lower switch in this photo).

Here's a blurry detail of the coil in my boat..

You can just see the black wire and shiny new lug where it connects to the negative side of the coil. This part is important - if you hook to the positive side you are sending the battery directly to ground... Not good. I pulled mine apart to make CERTAIN I was on the right terminal, those blasted things are buried in there.

The coil should be clearly marked, but if you're not sure, find a mechanic to help you - preferably one with graying hair. These young'ins nowadays don't know how good they have it... ;)

Good luck and please be careful...

Fair winds,

Chris

PS - in regards to the shift throw, OMC built in about 30% of adjustment each way. You want to adjust the throw so that you have solid engagement in both forward and reverse and NO gear chatter in neutral. It helps to have a helper to spin the prop while you adjust the throw and find center...
 
Last edited:

shep247

Seaman
Joined
Jun 16, 2007
Messages
61
Re: OMC SEI Conversion

Here's a detail of the shift interrupt deal. You want to splice into the switch with the long arm on it (the lower switch in this photo).

Here's a blurry detail of the coil in my boat..

You can just see the black wire and shiny new lug where it connects to the negative side of the coil. This part is important - if you hook to the positive side you are sending the battery directly to ground... Not good. I pulled mine apart to make CERTAIN I was on the right terminal, those blasted things are buried in there.

The coil should be clearly marked, but if you're not sure, find a mechanic to help you - preferably one with graying hair. These young'ins nowadays don't know how good they have it... ;)

Good luck and please be careful...

Fair winds,

Chris

PS - in regards to the shift throw, OMC built in about 30% of adjustment each way. You want to adjust the throw so that you have solid engagement in both forward and reverse and NO gear chatter in neutral. It helps to have a helper to spin the prop while you adjust the throw and find center...

Lou C led me right to the coils, so thanks Lou, but I'm sure glad you posted about the switch side connection. I was going to connect to the bottom pole of the upper box. But now, I'm confused. I've also never used a multimeter, so I could be doing it wrong. :confused: The instructions say

"Using a multi-meter hook one wire up to ground and touch each side of the switch with the other wire. The side that does not show continuity is the side you want to connect the additional wire to..."

I used the multi-meter, turned it on to the Ohms section, and touched the negative pole of the battery with the black wire, and each silver stud on those switch boxes with the red wire. The only stud that didn't make the needle bounce was the stud above the 'X' on the box without the silver arm. Am I using the multi-meter wrong?

Also, when I do figure out which wire its talking about, it says to use a quick tap connector, then cut and tape the original wire on the other side of the quick tap connector. So its saying to cut the wire on the opposite side of the connector from the switch, right?

Thanks again!
 

shep247

Seaman
Joined
Jun 16, 2007
Messages
61
Re: OMC SEI Conversion

The SEI guys aren't in for the weekend for me to bug them, so I figured I'd come to you guys, as you've also been very helpful on several problems so far.


I've located the correct wire to connect to the negative terminal of my coil, and spliced my jumper cable in from the coil. I was just about to cut the wire when I realized that the wire I was about to cut connected to the override switch too. I have a 2 pin plug for the interrupter, and it looks like 1 pin's wire goes to the shift interrupt switch and the other goes to the other (override?) switch, and the two wires left over from the 2 switches are tied together. Is that right? When I cut behind the splice I made with the wire that goes to the coil, its going to leave the override's 2nd lead just dangling. Does this sound weird to anyone else? Why didn't SEI just have me disconnect the plug that goes to the 2 shift assist switches if this is the case.

This also made me realize that this is going to totally disable all shift assist. I read a post from Don S. that said its almost impossible to get the mercruiser drive out of gear without that shift assist due to the dogs being reverse cut. Yikes!

I feel like I'm missing something here, and I'm not cutting that wire until I either get some reassurance from you guys, or I can talk to someone from SEI on Monday.

Let me know what you guys think, and thanks again for all of your help. I feel like I've had someone here working with me the whole time.
 
Top