Starcraft Restoration

Tim S.

Cadet
Joined
Mar 21, 2010
Messages
21
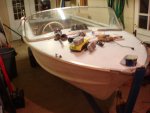
Purchased a 16' Starcraft Nassau last spring and I'm just getting started on the restoration and have a couple questions.

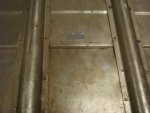
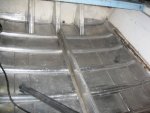
1. I've lifted out the floor boards and removed all of the waterlogged flotation, there is some brown glue like substance left on the edges of the boat. Any suggestions on how to remove it?

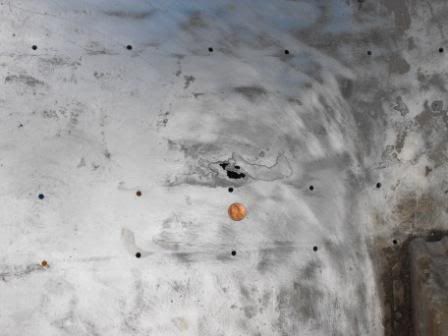
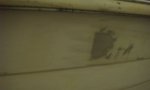
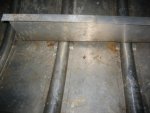
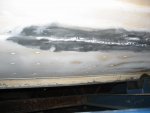
2. Turns out the guy I bought it from...who told me it was leak free...didn't tell me about the 2, 4inch hairline cracks along a bottom seam that leaks water... :( I'm thinking of fixing the cracks by using the new flex epoxy, with a piece of fiberglass cloth over the top of the crack on the outside, and using JB weld on the inside. Any other tips? Has anyone tried the brazing rod I keep reading about? Would that be better?

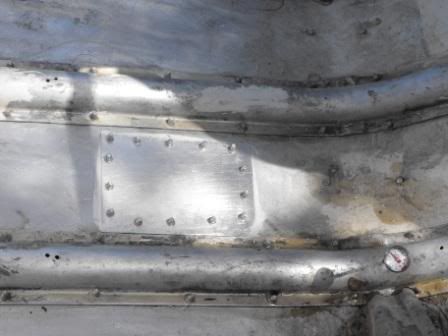
3. I'd like to repaint the boat. I had some help at West Marine and bought some primer and paint, I've been smoothing the old paint on the boat down with some sanding. How careful do I have to be about not taking the paint down to the aluminium? I'd rather just paint over the old paint, but there are spots that the need to be sanded. Also the top of the rivets are hard to sand and not take the paint off. Am I going to have a bunch of rivets now that the paint doesn't stick to???

Thanks for any tips, this forum is awesome. Seeing all of the projects is an inspiration:)
 
Last edited:

bananaboater

Ensign
Joined
Jul 27, 2009
Messages
932
Re: Starcraft Restoration

Welcome Tim,

Many of the questions you have are in other threads. A search for topics will lead you to more detailed info.

The brown glue is original, SC put it between the layers of alum before riveting. Most of us leave it.

Leaking seams I will leave to others.

Regular paint stripper ok for aluminum may speed process. Other threads go into great detail about painting, lots of options.

Good luck with boat and show us pics when you cam. Many of us use photobucket.
 

jspano

Senior Chief Petty Officer
Joined
Oct 30, 2009
Messages
790
Re: Starcraft Restoration

get a photo bucket account and post some pics in the post(be sure to size them right)

like this

hole.jpg


it makes it easier to view

hullpatch.jpg


which means more viewers, and help

patch.jpg


definitely check out other threads of similar boats
same problems
many answers

welcome and good luck
 

Tim S.

Cadet
Joined
Mar 21, 2010
Messages
21
Re: Starcraft Restoration

test Picture
 

Attachments

  • DSC08392.jpg
    DSC08392.jpg
    135.8 KB · Views: 0

Tim S.

Cadet
Joined
Mar 21, 2010
Messages
21
Re: Starcraft Restoration

Here is a shot of the crack in the aluminum. I'm having a welding shot look at it on Thursday. Any other ideas?
 

Attachments

  • DSC08394.jpg
    DSC08394.jpg
    139.4 KB · Views: 0

Tim S.

Cadet
Joined
Mar 21, 2010
Messages
21
Re: Starcraft Restoration

One more question. I have a few spots where the aluminum is showing through. Spots that I needed to sand harder to get all the scratches out. Also the tops of most of the rivets also now have some aluminum showing though on the heads. Can I just primer and paint over these areas?

Thanks!!
 

Attachments

  • DSC08396.jpg
    DSC08396.jpg
    152.9 KB · Views: 0

North Beach

Commander
Joined
Sep 29, 2008
Messages
2,022
Re: Starcraft Restoration

Tim, You'll need to hit all your bare aluminum with Zinc Chromate etching primer befor you apply your paint primer. I'm not sure what paint brand you're using? Some systems call for their own type of etching primer.
 

Tim S.

Cadet
Joined
Mar 21, 2010
Messages
21
Re: Starcraft Restoration

Got the boat back from a local welder. He ran a bead along the seam that was cracked. The fix looks like it worked, I just now have a foot and half weld bead running along the outside, bottom of the hull. Can I sand/grind this weld bead so it is a little more flush or is that a bad idea considering it is repair job? Good thing the weld bead is running front to back...

I spent yesterday scrubbing the inside hull. Found some rusty nails and things that had started to corode the aluminium. After some steel wool and cleaner the boat is looking brand new:)

Another question, as I was down next the hull scrubbing I'm noticing a few dents and dings here and there. Can/should these dents be hammered back out or will it fatigue the metel? Or should I just leave them?

Any tips on painting the bottom of a boat without flipping it or taking the engine off. I'm trying to get the hull painted and floor back in before summer, and than want to work on the topside this fall. Problem for painting is the trailer is in the way. I'm thinking of running a strong line under the engine mount to suspend the boat, but dont' want to rip the transom off. Not sure if the transom is designed to take that much weight. Guess I may just have to take the engine off:( ....summer is almost here.

Hopefully the Gluvit will arrive early this week so I can coat the rivits and seams.

Thanks for the tips!!
 

Tim S.

Cadet
Joined
Mar 21, 2010
Messages
21
Re: Starcraft Restoration

Thought of one other question...

I found the chromite primer for the bare aluminium. I also have interlux primer and paint to roll/brush on.

The other threads are confusing on the painting process. What Ive gathered is to...
cover bare metal with chromite primer than sand with 320
cover entire boat with primer 1st coat, sand with 320
cover boat with primer 2nd coat, sand with 320
cover boat with paint 1st coat, sand with 320
cover boat with paint 2nd coat, no sanding.

Wash down hull in between each stage with a water/vinegar mixture.

I'm I missing anything? Thanks Again!!
 

ezmobee

Supreme Mariner
Joined
Mar 26, 2007
Messages
23,767
Re: Starcraft Restoration

Paint steps certainly sound good to me.

I wouldn't mess with sanding the weld repair. If you already have the interior stripped out then I would seriously consider flipping the hull for paint. It will make your like so much easier. Pulling the motor is not a big deal.

Where are you located Tim? You should update your profile with you location. We SC guys like to know where everyone is from :)
 

Huron Angler

Admiral
Joined
Apr 7, 2009
Messages
6,025
Re: Starcraft Restoration

Looks like you are making some good progress there Tim:)

Is that a brand new Merc hanging off the transom? I like the look of a vintage starcraft aluminum boat with a shiny new(or old) outboard.

Good luck with the rig!
 

North Beach

Commander
Joined
Sep 29, 2008
Messages
2,022
Re: Starcraft Restoration

Tim,
The reason the paint threads are confusing is mainly because we've all used different paints and most of those manufacturers have a different process. Your best bet would be to contact the manufacturer of the brand paint you're going to use and get their recomended process.

I used Petit Easypoxy, a top side paint, for my entire boat. The process was Zinc Chromate on the bare spots, followed by Petit's sandable primer, with a tack rag wipe down between coats of paint.

The process for Interlux paint I beleive is altogether different. I thought someone posted that they have their own private labeled etching primer and recommend you use that.

So the first step of the process is to decide what paint you want to use and then follow their guidlines. Then you can get folks here to share their experiences with that particular brand/type of paint.
 

Tim S.

Cadet
Joined
Mar 21, 2010
Messages
21
Re: Starcraft Restoration

Before a bottle of cleaner...
 

Attachments

  • IMG_1485.jpg
    IMG_1485.jpg
    140.2 KB · Views: 0

Tim S.

Cadet
Joined
Mar 21, 2010
Messages
21
Re: Starcraft Restoration

After a bottle of cleaner. :) Hopefully getting to the Gluvit tomorrow.

Also check out the weld from the local weld shop.

That is a "new" 2001 2 stroke 50 merc. The engine that we bought with the boat was a 1976? Johnson, really cool old engine. I cleaned the carbs spent a number of hours on it last fall and could not get it running smoothly. I gave up took it to a local marina and the tech gave me a laundry list of things that were wrong with it and said that it was time to retire the engine, hence the merc, from an old pontoon.

Any thoughts on trying to bang the dents out of the hull or would you just leave them in there?

Thanks for the other tips.
 

Attachments

  • IMG_1490.jpg
    IMG_1490.jpg
    140.9 KB · Views: 0
  • IMG_1479.jpg
    IMG_1479.jpg
    133.8 KB · Views: 0

Bob_VT

Moderator & Unofficial iBoats Historian
Staff member
Joined
May 19, 2001
Messages
26,065
Re: Starcraft Restoration

Thought of one other question...

I found the chromite primer for the bare aluminium. I also have interlux primer and paint to roll/brush on.

The other threads are confusing on the painting process. What Ive gathered is to...
cover bare metal with chromite primer than sand with 320 NO it is really a light coat of ZC
cover entire boat with primer 1st coat, sand with 320 NO
cover boat with primer 2nd coat, sand with 320 YES only if needed
cover boat with paint 1st coat, sand with 320 MAYBE if needed
cover boat with paint 2nd coat, no sanding. YES

Wash down hull in between each stage with a water/vinegar mixture. NO Only before you use the zinc chromate primer in the very beginning .... This is actually STEP 1

I'm I missing anything? Thanks Again!!
Yes....... have a few cold ones on hand and an easy chair to relax a bit!! :D


Tim S.

Cadet
Joined
Mar 21, 2010
Messages
21
Re: Starcraft Restoration

Got some work done this weekend. Sprayed a spotty layer of green Zinc Chromite primer on the hull. Also, got the first coat of primer on. Another coat of primer and coats of paint to follow.

Lessons Learned:

1st Don't buy cheap brushes/rollers. About half way through the first side we find out that we are leaving little bits of roller and brush hairs in the primer :( We went through and picked them out the best we could, grabbed some different, nicer brushes and went back at it. Because our roller was horrible we ended up using two brushes for the rest of the primer. It worked but this morning there were spots where you could see a brush stroke was ending or starting. Also some of the roller fuz is still in there.

2nd Make sure you have paint thinner on hand for after the paint job. Thinking I had paint thinner at home I started to wash the brushes in water. My hands turned gray with paint. I went to grab the thinner and ......

Overall I think it came out pretty good. We're going to put the second coat of primer on tonight. Than hopefully sand out some of the fuz and imperfections with 320.

Our goal is to get the hull cleaned up and painted, floor put in, and new seats on before the summer starts. Than use the boat for the summer and finish the transom replacement, splash guard, top side and interior work next fall and spring. Summer is to short to not have a working rig.

Another couple questions for the Forum: (Thanks for all the help so far)

Floor, the old plywood floor is probably still usable. It has been drying out in the garage for the past 6 months. However the stern area is a little rotton. I tried coating it with Gluvit to stiffin it but it is only so so. I'm thinking I need to build a new floor, however the floor dimensions are too large for a standard piece of ply. (4'6'' X 9'). What I'm thinking is making the one big sheet out of a few smaller pieces of plywood. Will this effect the stiffness of the floor? I'm noticing some people are using 3/4' instead of 1/2' for the floor is this better? What's the trick in sealing the wood seams between the sections? Tricks on re-rivitting the floor down?

Thanks again!! I'll put some more pictures up tonight.
 

Tim S.

Cadet
Joined
Mar 21, 2010
Messages
21
Re: Starcraft Restoration

Hello again! Got the second coat of primer on last night. It looks great, but there are a few runs and imperfections in the primer, any tricks on getting these out before painting. I'm hoping I can just lightly sand with the 350 and clean them up, but I don't want to go through the primer.....

Also still need to put in a new floor. Mine is pretty rotten. Problem I'm having is the floor dimensions are 4'6'' by 9'. I keep thinking I can just use 3 sheets of ply to make the floor but does that take away some of the strength of the floor/boat? How much structure does the floor add to these boats anyways?

Also the old floor is 1/2 inch. Would you stay with 1/2 or buy 3/4???

Thanks!!
 

ezmobee

Supreme Mariner
Joined
Mar 26, 2007
Messages
23,767
Re: Starcraft Restoration

My 16' Jupiter had three sheets. I put 3/4" in that boat and my current boat. I'm very happy with the solidness of it. I wouldn't go less than 5/8" unless I was glassing the whole thing.
 

Huron Angler

Admiral
Joined
Apr 7, 2009
Messages
6,025
Re: Starcraft Restoration

Using three or four sheets of plywood is standard for a resto like this. You can add a layer of fiberglass on top to join the seams and add strength, not required but does reinforce it.

I'm using 3/4" exterior non-treated ply, sealing it with epoxy resin, two coats with three on the edges.

Many folks have used 1/2" with success as well, all depends on your preference. Using marine-grade ply is another choice, although more $$ and still needs to be sealed with epoxy.

Sounds like you are moving right along:)
 

Tim S.

Cadet
Joined
Mar 21, 2010
Messages
21
Re: Starcraft Restoration

Whew.....what a day. Got the second coat of paint on, off white, i'll post some pics soon.

Also cut some wood floor pieces out. The original one piece of ply floor is now going to be in 3 pieces. Going to bevel the seams at 45% and marry them together.

Questions for the bow piece... there is a flat metal plate at the very bow. Does the flooring hook underneath this or does it sit on top? I think it would work either way but would like to get it right?

Also bought some indoor outdoor carpet today at HD. How have people been putting this on. Wrapping the deck with the carpet or just cutting out and gluing to the top. I'm not sure how you would wrap and than install.

Finally I don't think there is any way my rivet holes are going to line back up to the same holes in the ribs/deck. Any trick on screwing stainless steal screws through the deck to the rib?

Guess that's it for now. Thanks again for all the tips.
 
Top