1987 Ski Centurion Tru Trac II - First Time Rebuild - Floor, Engine, Dash, etc.

Status
Not open for further replies.

kcassells

Fleet Admiral
Joined
Oct 16, 2012
Messages
8,738
That's some nice heater there Arch. And your spot on in regards to moisture. Let air in to flow.
Good advice there AC.:D
 

ACon977

Senior Chief Petty Officer
Joined
Nov 21, 2017
Messages
759
I have used the forced air ones a lot before I put an overhead unit heater in. I would heat things up, layup the glass, let if fire off and open the doors afterwords to vent out all the glass fumes. I would then repeat, those put off a lot of heat quickly.

Thanks! I like the venting idea, I really only ever do one or two layers at a time so I'm not too worried about keeping the area warm for a while.

I liked venting things out so that I could work without a respirator between layups....cutting out glass, getting things ready. I also used some halogen work lights here and there to get the glass to fire off. The key is to make sure your resin and the boat hull are nice and warm.

I have a set of halogen lights for when the power went out in the garage and I was running this rebuild on extension cords from the house. these put out a bit of heat, but I wasnt sure if it would actually warm the hull enough, or if it would just warm the surface.

Also great note about the resin. I did an epoxy lamp project and didnt always warm my epoxy up enough and it was a messssss to work with.


By the way if the heater is getting enough oxygen, the byproducts of running it are carbon dioxide and water. You only get carbon monoxide when it is burning too rich. One other reason I liked to vent things, get rid of some of the humidity.

This is the information that I really appreciate. Full understanding of what is happening, although its not actually all that complicated, knowing things to look out for is key.

I upgraded to one of these and love it, vents outside, and turns on and off via a thermostat. I'm putting another one in my other shop this fall.

These look fantastic, but expensive, and unfortunately probably out of the scope for right now. BUT now I have the link for the future! Thanks a TON Arch!!!
 

archbuilder

Vice Admiral
Joined
Sep 12, 2009
Messages
5,697
By the way a carbon monoxide detector is still a good ideas! You never know that it is getting high until it is too late!
 

ACon977

Senior Chief Petty Officer
Joined
Nov 21, 2017
Messages
759
Hey yall, sorry I havent updated in a while. I did get the CO detector in, and the heater as well! This thing is looking schweeetttt! I plan on firing it up today and seeing how long it takes to heat the garage.


20181015_210340-2016x1134.jpg
 

ACon977

Senior Chief Petty Officer
Joined
Nov 21, 2017
Messages
759
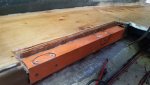
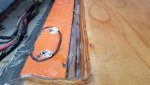
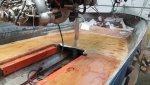
And on Friday it was warm enough for me to glass and so I got the front section, and starboard side of the floor glassed to the hull. I used 
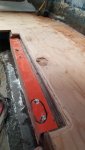
Woodonglass 's idea to cut a thin 1x1 board and fit it into my gap. then I sanded down the corners so it would fit against the shape of the hull a little better. And clipped off one corner as well to help keep the glassing angles smaller. All in all, the gap is filled in and I'm happy.

20181016_075048-1134x2016.jpg . 20181016_075040-2016x1134.jpg . 20181016_075056-1134x2016.jpg

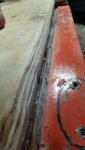
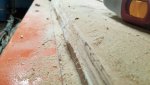
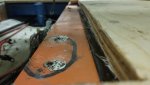
The one thing I am a little bummed out with is that the resin flowed out of the cloth at the top as it cured, I was already late to go to a dinner and didnt have time to baby sit it while it kicked off. I think I have enough adhesion... but I'm not a pro.

20181016_075103-2016x1134.jpg

Is this something I should worry about? can I roll some more on and cure it better? Or do I have to grind it out and put in a new piece?
I've been happy with my glassing so far on this project, but this was definitely something that I am not proud of, and is not up to par with the rest of the boat.
 

kcassells

Fleet Admiral
Joined
Oct 16, 2012
Messages
8,738
Nice....that's what I have but under my tarp vs. the size of your garage. Knowing you .... you have it right on the money.
This might be my last reply..........This conversation will self destruct in 5 minutes if you choose tho take this mission.
 

ACon977

Senior Chief Petty Officer
Joined
Nov 21, 2017
Messages
759
Nice....that's what I have but under my tarp vs. the size of your garage. Knowing you .... you have it right on the money.
This might be my last reply..........This conversation will self destruct in 5 minutes if you choose tho take this mission.

haha well it will take some playing to see what temps I actually get to.

And Im hoping to keep your stuff on here, seems so dumb they've been taking your comments down.
 

ACon977

Senior Chief Petty Officer
Joined
Nov 21, 2017
Messages
759
That glassing will be fine. I don't see any bubbles.

yea... right... I see imperfection, but I see the same thing when I look in the mirror too......

Im just curious if it is actually a big deal, or if it would just be cosmetic to fix it. Looking at the amount of adhesion I have, I think its fine, but it doesnt look pretty to me.
 

AShipShow

Lieutenant Commander
Joined
Jul 8, 2016
Messages
1,803
Looks fine to me... I'd just feather the dry stuff out just so there isn't and edge to catch stuff and pull a runner out of the cloth.
 

ACon977

Senior Chief Petty Officer
Joined
Nov 21, 2017
Messages
759
and yesterday I got the heater hooked up and it fired right up. It was definitely impressive how much heat it put out, even on the lowest setting! Unfortunately, I had to work on the Jeep last night instead of the boat, but Im thinking we should be good on warmth to get the last bit of this glassing done.

Thanks for the recommendation guys! Im very excited to have a year round work space
 

ACon977

Senior Chief Petty Officer
Joined
Nov 21, 2017
Messages
759
Well thanks again for the recommendation kcassells ! This heater is amazing. I had it outside the boat but blowing under the tarp and I had a little sauna going on during my glassing of the port side.

20181019_205052-1134x2016.jpg

I had more time to baby it but I did leave it once I had it all covered and starting to kick off. This morning she still looked almost the same as the starboard side. Not too worried about it. But wishing that it ended up the same as the stringers.

20181020_212737-2016x1134.jpg
 

ACon977

Senior Chief Petty Officer
Joined
Nov 21, 2017
Messages
759
I got the glass cut out for the rest of the floor and got it all fitted. and that led to me realizing that the floor is overhanging a little bit around the engine mounts.

although I knew this already, when I was ready to put resin to glass I got nervous that I would accidentally get resin and glass all over the mounts.

these pictures arent great, but it shows the overhang I want to cut back.

20181020_212649-2016x1134.jpg

20181020_212724-2016x1134.jpg

20181020_212702-2016x1134.jpg

I was thinking of using my jigsaw, but the blade would go too deep. Then I was thinking of grinding with a flap disk. But that would make a mess, and take forever. So maybe my oscillating tool? Although I need new bits.

thoughts from the peanut gallery?
 

Attachments

  • 20181020_212729-2016x1134.jpg
    20181020_212729-2016x1134.jpg
    287.9 KB · Views: 2

ACon977

Senior Chief Petty Officer
Joined
Nov 21, 2017
Messages
759
Well, I guess its just me talking to myself then.

I went out this morning and got new bits for my oscillating tool. Trimming the glass tore up my old ones. And I got the overhang rough cut and an angle roughed out as well.

20181021_145241-2016x1134.jpg

20181021_145258-2016x1134.jpg
 

Attachments

  • 20181021_145248-2016x1134.jpg
    20181021_145248-2016x1134.jpg
    496.9 KB · Views: 1
  • 20181021_120056-1134x2016.jpg
    20181021_120056-1134x2016.jpg
    429.6 KB · Views: 1
  • 20181021_105445-1134x2016.jpg
    20181021_105445-1134x2016.jpg
    370.6 KB · Views: 0
  • 20181021_105450-2016x1134.jpg
    20181021_105450-2016x1134.jpg
    451.8 KB · Views: 0
  • 20181021_145256-2016x1134.jpg
    20181021_145256-2016x1134.jpg
    459.5 KB · Views: 0
  • 20181021_145238-2016x1134.jpg
    20181021_145238-2016x1134.jpg
    559 KB · Views: 0
  • 20181021_105441-1134x2016.jpg
    20181021_105441-1134x2016.jpg
    581.4 KB · Views: 0
  • 20181021_120043-1134x2016.jpg
    20181021_120043-1134x2016.jpg
    511.7 KB · Views: 2

oldrem

Commander
Joined
Nov 7, 2013
Messages
2,002
Just started using an oscillating tool a year ago and don't know now how I ever worked without one. One of my best investments ever. That and a good electric scissors which sure made cutting fiberglass, vinyl and carpet a whole lot easier.
 

sopwithcamel74

Petty Officer 1st Class
Joined
Aug 15, 2018
Messages
203
Very nice work. Still lurking, watching your progress, living vicariously through you as you document your journey. Keep it coming!
 
Status
Not open for further replies.
Top