Transom replacement.

DunbarLtd

Petty Officer 1st Class
Joined
Nov 8, 2016
Messages
357
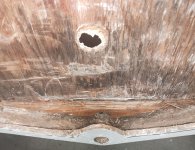
Well, I finally decided to tear into this thing. It is a fiberglass boat from late 80s and about 90% of the transom wood was soft and rotten. I did not notice any cracks or bowing.

I removed the outboard to fix the transom cap (was in really bad shape and I wanted to add a piece of aluminum ) and also to replace splash well drains.

That is where I discovered the inside of the splash well drain hole was wet and i could pick out the dark brown wood easily with my finger. Tapping test comfirmed it was soft in most areas.

So I said screw it. Might as well try because Im either fixing this or its going to the boat graveyard. I have all the tools I need and experience with glass. However, this would be my first attempt to replace a transom.

It would be impossible and not worth the effort/time/cost to attack this from the inside. It has an outboard. The splash well is in the way. There really isnt a "cap" to cut and raise for access. SO.... If this will not fly I will junk the boat I suppose. BUT...if this is doable I would like some tips on what it would take to get this back together.

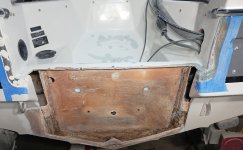
The transom wood is 24 inches WIDE by 19 inches TALL.
1 inch thick transom wood. I will need two pieces sandwiched together to achieve this thickness.

The LOWER half (you can see a horizontal line) was a different piece of wood and 1 1/2" thick. I can imagine it may have been pressure treated 2 x 4. It was in much better shape than the transom piece.

The inside skin seems pretty thin. I thought about adding rigidity there by laying at least one layer of glass but not sure if cloth (biax) or mat or perhaps both? I think I have enough room because I doubt the wood I am buying is going to be exactly one inch thick. So I can make up that difference with glass. Its probably only going to be an 1/8th inch or so, i suppose.

The drain pipe stops at the inside skin. Just on the other side of that is the bilge. A hole was drilled through the wood and that was that. I did not notice any attempt to protect the inside of the hole in the wood. Debating on how to proceed with that.

I have bevelled the existing glass back to a "point" so i can add many layers of glass to beef it up again. Trying to go as wide as i can. The bottom edge however may pose a problem but Im not sure.

I used an oscillating tool to cut out the outer skin and I plan on re-using it and glueing it first most likely with thickened epoxy. Then tabbing in (im assuming) biaxial 1708 at the seams until i get to the level of the existing. Then finish with 3 coats of poly gelcoat.

The outboard probably weighs close to 200 lbs (85HP 2 stroke). And this is a gel coat finish.

So a few questions IF this is possible:
1. Resin type?
2. Cloth or mat type?
3. What material to sandwich two plys together? Cloth or mat in between them?
4. What type of wood for the lower piece?
5. How to protect lower wood from water intrusion through the drain hole??
 

Attachments

  • transom.jpg
    transom.jpg
    1.5 MB · Views: 13
  • transom1.jpg
    transom1.jpg
    1.2 MB · Views: 13
Last edited:

MikeSchinlaub

Petty Officer 2nd Class
Joined
Jan 14, 2025
Messages
179
I've been repairing boats for almost 12 years now, but I've never done one by cutting through the outside. I've seen an old thread here where someone else has, so I would say it should be possible. My answers are...

1. We use polyester resin. I've never used anything else, so I can only recommend what I know.

2. Chopped strand mat and biaxial roving. Mostly mat.

3. It sounds like you want two pieces of 3/4 plywood. Cut a piece of CSM to the same size as the transom to go between the pieces. Screw together with drywall screws, avoiding areas that will need drilled through later.

4. I think that was a sketchy repair from the past. The transom should be one solid thing, not split into a top and bottom half. Ignore that for your repair.

5. We cut a half circle at the drain and build that area with thickened resin. The drain doesn't need any support really, just something to screw into. The skin will hold it just fine.

If I had to do it this way, I wouldn't try to reuse the old skin. Build the transom and attach it to the splashwell skin by covering that side with thickened resin and lagging through any pre-existing holes. Use 2x4's between the lags and splashwell to help distribute the clamping force of the lags. Let it set up, then come back and glass over the whole thing. Then bodywork and paint.

The problem here is, it really should be glassed to the inside of the hull, and gel coated on the inside for some water protection. I don't really have a solution to that with this method.
 

DunbarLtd

Petty Officer 1st Class
Joined
Nov 8, 2016
Messages
357
I've been repairing boats for almost 12 years now, but I've never done one by cutting through the outside. I've seen an old thread here where someone else has, so I would say it should be possible. My answers are...

1. We use polyester resin. I've never used anything else, so I can only recommend what I know.

2. Chopped strand mat and biaxial roving. Mostly mat.

3. It sounds like you want two pieces of 3/4 plywood. Cut a piece of CSM to the same size as the transom to go between the pieces. Screw together with drywall screws, avoiding areas that will need drilled through later.

4. I think that was a sketchy repair from the past. The transom should be one solid thing, not split into a top and bottom half. Ignore that for your repair.

5. We cut a half circle at the drain and build that area with thickened resin. The drain doesn't need any support really, just something to screw into. The skin will hold it just fine.

If I had to do it this way, I wouldn't try to reuse the old skin. Build the transom and attach it to the splashwell skin by covering that side with thickened resin and lagging through any pre-existing holes. Use 2x4's between the lags and splashwell to help distribute the clamping force of the lags. Let it set up, then come back and glass over the whole thing. Then bodywork and paint.

The problem here is, it really should be glassed to the inside of the hull, and gel coated on the inside for some water protection. I don't really have a solution to that with this method.
I do have access to the inside although its pretty tight. The other side of the splash well there are boards I can cut and then just tab back in. Shouldnt be a huge job to do that. That should give me enough room to crawl in there and get some glass and gelcoat.

I definitely thought about that. Theres absolutely no way to access this transom from the inside without cutting the entire splashwell out. Not to mention having to cut out the floor. Its very easy to do for Inboards of course. Thats why I posted...Its a tricky situation.

About not using the old skin. Are there standards on what type of glass to use if Im going to reskin the entire outside? Alternating between CSM and biaxial perhaps? Ive read about doing that. And then theres are so many weights of glass its overwhelming.

The idea for the drain hole sounds good. Thanks.
 

DunbarLtd

Petty Officer 1st Class
Joined
Nov 8, 2016
Messages
357
Reuse the outside skin.-----Simply glue it back in with epoxy.
This was my inital idea after researching.

On the tabbing i assume polyester (isopthalic) will be fine if i bevel the edge all the way down. Just not sure what type and weight glass to use. Ive been reading people use vinylester as well.
 

MikeSchinlaub

Petty Officer 2nd Class
Joined
Jan 14, 2025
Messages
179
I can see what our glass is tomorrow, assuming the weight is on the tag.

I should clarify, I work in a repair shop, but have nothing to do with the ordering. I just cut what I need off the roll or scrap bins and get to work. Material specifics aren't really something I have to think about. It's something I should work on.

If racerone has experience with reusing the skin, I would defer to him. It's just not something I've ever tried to do.

For the resin, polyester is apparently the cheapest and most forgiving on mix ratios, is the least strong (but still plenty strong), and will be compatible. Vinylester is the middle on everything, and epoxy is highest cost, strength, and very picky about the mix. I'm honestly a bit confused about epoxy compatibility. I've read on some manufacturer sites that it isn't compatible with the ester resins, but people are apparently using it for repairs just fine. Defer to other's with experience, and your budget.

Usually, we do two layers of mat and one roving when glassing from the inside, but that won't work on the outside. Your bodywork would eliminate the roving strength when you sand it smooth. Just mat on the outside, 6 inches from the cut on all sides, including around the bottom edge. Grind as gentle of a curve around the corners as possible, fiberglass hates corners.

Also, don't overlook the safety gear. Glasses, respirator with organic vapor filters, and lots of latex gloves.
 

Chris1956

Supreme Mariner
Joined
Mar 25, 2004
Messages
28,073
I replaced the transom on my speedboat from the outside. I would have liked to replace it from the inside however, I did not think the cap was strong enough to support it's own weight and would break when I removed it.

Two key points when replacing the transom from the outside. Replace the original outer fiberglass with a bit more glass, as it will not be as strong as the original. Also, the glass will need to be painted. If the whole boat is painted as was my case, that was not an issue.

I also glassed in P/T 2X2 lumber on the top of the deck and along the hull and splashwell, to give me something to screw the new transom to while the fiberglass hardened. Always use stainless steel screws and bolts. Clamp the transom for resin cure, where practical.
 

Pmt133

Senior Chief Petty Officer
Joined
Jan 6, 2022
Messages
731
So when I did the transom in my 84, I obviously did it from inside but the materials list was the same as @MikeSchinlaub reccomended. I laminated the 2 sheets of 3/4 plywood with titebond 3 (waterproof) though looking back I could've easily used a sheet of wetted CSM between with poly and gotten the same result and not needed as much build up on the skin.

Once it was dry I cut it to the shape of the transom. I glassed the hull side with the 1.5oz CSM to give it a layer to bond to with the thickened resin. I adhered to the cleaned skin with thickened poly with milled fibers and a small amount of cabosil so it didn't run and spred it on the side with the single layer of csm. Clamped in place to the hull.

Once set I laid the filets then tabbed with 2 layups of 1708 and did 2 full size layups of 1708 to tab in. I finished with a layup of csm over the top to make it look nice.

I also did the half circle around the drain. I bedded in a piece of PVC too to direct the water directly to the garboard. Worked nicely.

I suppose doing it from the outside you can follow the same procedure, you'd just be saving the inside skin for bonding to instead of the outside.
 

DunbarLtd

Petty Officer 1st Class
Joined
Nov 8, 2016
Messages
357
So when I did the transom in my 84, I obviously did it from inside but the materials list was the same as @MikeSchinlaub reccomended. I laminated the 2 sheets of 3/4 plywood with titebond 3 (waterproof) though looking back I could've easily used a sheet of wetted CSM between with poly and gotten the same result and not needed as much build up on the skin.

Once it was dry I cut it to the shape of the transom. I glassed the hull side with the 1.5oz CSM to give it a layer to bond to with the thickened resin. I adhered to the cleaned skin with thickened poly with milled fibers and a small amount of cabosil so it didn't run and spred it on the side with the single layer of csm. Clamped in place to the hull.

Once set I laid the filets then tabbed with 2 layups of 1708 and did 2 full size layups of 1708 to tab in. I finished with a layup of csm over the top to make it look nice.

I also did the half circle around the drain. I bedded in a piece of PVC too to direct the water directly to the garboard. Worked nicely.

I suppose doing it from the outside you can follow the same procedure, you'd just be saving the inside skin for bonding to instead of the outside.
This is useful. Thank you.

I may try to fabricate a pvc drain.
 

DunbarLtd

Petty Officer 1st Class
Joined
Nov 8, 2016
Messages
357
I can see what our glass is tomorrow, assuming the weight is on the tag.

I should clarify, I work in a repair shop, but have nothing to do with the ordering. I just cut what I need off the roll or scrap bins and get to work. Material specifics aren't really something I have to think about. It's something I should work on.

If racerone has experience with reusing the skin, I would defer to him. It's just not something I've ever tried to do.

For the resin, polyester is apparently the cheapest and most forgiving on mix ratios, is the least strong (but still plenty strong), and will be compatible. Vinylester is the middle on everything, and epoxy is highest cost, strength, and very picky about the mix. I'm honestly a bit confused about epoxy compatibility. I've read on some manufacturer sites that it isn't compatible with the ester resins, but people are apparently using it for repairs just fine. Defer to other's with experience, and your budget.

Usually, we do two layers of mat and one roving when glassing from the inside, but that won't work on the outside. Your bodywork would eliminate the roving strength when you sand it smooth. Just mat on the outside, 6 inches from the cut on all sides, including around the bottom edge. Grind as gentle of a curve around the corners as possible, fiberglass hates corners.

Also, don't overlook the safety gear. Glasses, respirator with organic vapor filters, and lots of latex gloves.
Our CSM is 1.5 oz/ft2
Ok thanks. I think that is a standard weight in the industry for these small glass boats. Ive made the decision to go with epoxy for this repair. And then wait for it to full cure for a week. Then grind with very low grit and apply my gelcoat. It should work based on the research im doing.
 

Pmt133

Senior Chief Petty Officer
Joined
Jan 6, 2022
Messages
731
Ok thanks. I think that is a standard weight in the industry for these small glass boats. Ive made the decision to go with epoxy for this repair. And then wait for it to full cure for a week. Then grind with very low grit and apply my gelcoat. It should work based on the research im doing.
You can't use standard CSM with epoxy. For the gelcoat, that's fine though I believe you have to use a tie or adhesion promoter of sorts for best adhesion to epoxy.
 

MikeSchinlaub

Petty Officer 2nd Class
Joined
Jan 14, 2025
Messages
179
Pmt133 is right about epxoy and csm. Sorry, I forgot, but it isn't compatible with the adhesive used to glue the strands together.

Gel can cover 36 grit fine, but it has to be sprayed really thick. It can be applied with a brush, but you just can't get the build up of spraying.

What kind of end result do you want? Do you want to not notice the repair, or do you just want it functional?
 

DunbarLtd

Petty Officer 1st Class
Joined
Nov 8, 2016
Messages
357
You can't use standard CSM with epoxy. For the gelcoat, that's fine though I believe you have to use a tie or adhesion promoter of sorts for best adhesion to epoxy.
OK. I understand the styrene issue with epoxy. What I plan on doing is using epoxy PB to glue the wood and outer skin on. When I go to tab in the seam on the outer skin I am going to use isopthalic polyester resin. I suppose I can use CSM for that but I think I will use biax 1708 to tab in the seam on the outer skin. Unless there is a better way? Should I alternate between CSM and biax when doing the seams?
 

DunbarLtd

Petty Officer 1st Class
Joined
Nov 8, 2016
Messages
357
Just glue the outside skin back on.----Easy and least amount of work.
I agree. That was what I had in mind. Just not sure if it would work or not. I think if I use enough epoxy PB it should stick and never come off. Do I need to lay down any glass on the outside of the wood before I glue the skin?? I assume I would have to use something like 1708 if using epoxy.
 

DunbarLtd

Petty Officer 1st Class
Joined
Nov 8, 2016
Messages
357
Pmt133 is right about epxoy and csm. Sorry, I forgot, but it isn't compatible with the adhesive used to glue the strands together.

Gel can cover 36 grit fine, but it has to be sprayed really thick. It can be applied with a brush, but you just can't get the build up of spraying.

What kind of end result do you want? Do you want to not notice the repair, or do you just want it functional?
I am going to roll the gel coat on with some type of fabric roller. Maybe a foam one? I have a hvlp gun but i dont think its the right tool to spray gelcoat so im just going to roll.

Do 3-5 coats i suppose until im happy with it. Ill use unwaxed for these coats and of course waxed for final. I dont care how smooth it is. If it has texture im okay with that. Its just an old ski boat i picked up for cheap some 6 years ago, so no worries.
 

MikeSchinlaub

Petty Officer 2nd Class
Joined
Jan 14, 2025
Messages
179
I was taught that the biax doesn't bond well by itself. It's strong because they are long continuous fibers, but the weave doesn't let them get into the surface scratches very well for a mechanical bond. I've actually peeled off bits of roving by hand that didn't bond well.

I would suggest mat, roving over the transom, then mat until finished. If you're not concerned with looks, run the roving past the transom, but not all the way to the edge of your ground area. The roving needs to be done as one piece, that's what makes it strong.

Hvlp is fine, what is the needle size?
 

DunbarLtd

Petty Officer 1st Class
Joined
Nov 8, 2016
Messages
357
I was taught that the biax doesn't bond well by itself. It's strong because they are long continuous fibers, but the weave doesn't let them get into the surface scratches very well for a mechanical bond. I've actually peeled off bits of roving by hand that didn't bond well.

I would suggest mat, roving over the transom, then mat until finished. If you're not concerned with looks, run the roving past the transom, but not all the way to the edge of your ground area. The roving needs to be done as one piece, that's what makes it strong.

Hvlp is fine, what is the needle size?
I think its 1.4 tip
 

MikeSchinlaub

Petty Officer 2nd Class
Joined
Jan 14, 2025
Messages
179
It would need thinned quite a bit with acetone, but would be doable.

I know acetone isn't ideal, it can interfere with the chemical bond, but practically it's fine. I've never had any issues once I finally got a feel for everything.

If you don't want the mess of spraying though, I think I would go with a brush. It'll be easier to build it up thick.
 
Top