‘85 Chris Craft Scorpion transom, stringers, bulkheads and upholstery

Iceguy1

Cadet
Joined
Mar 13, 2016
Messages
18
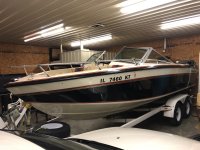
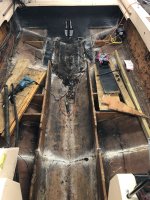
Jumping in head first into a world unknown, any and all guidance along the way will be very much appreciated. I’m pulling the engine Saturday. After getting all the mechanical stuff out and a thorough scrub down, I’d like to get busy on a sturdy cradle. Definitely need some advice on this...

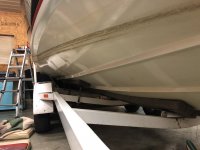
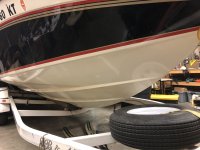
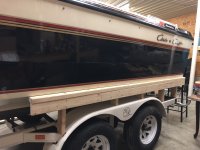
I would like to do everything on my bunk trailer, if possible. My thought was to intertwine added supports with the trailer so I can roll it out of my pole barn for sanding. As can be seen in the pic below, there are two bunks on either side. My thoughts are to add an additional bunk on each side as well as building supports on the front to support the bow.

Is it ok to do it this way? Should the transom be supported from the sides at all if I’m replacing it? Any other areas need support that I should be addressing?

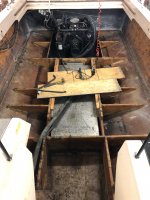
Once the hull is properly supported, the plan is to take the cap off, gut most of the wood and sand sand sand. Then start building, starting at the transom and work my way forward. I have some more core samples to drill, but realistically the only wood I plan on being able to leave are the little wedges of bulkheads that frame in engine, gas tank and ski locker. All of those are solid with no rot and thought they would make a good guide as I replace everything else.

Also, was wondering if anyone knows of any good resources that would be a good step by step guide to this process? I’m finding so many different methods and opinions on the internet. I may be green to this but I know better than to believe the guys on YouTube building transoms out of pressure treated plywood, drywall screws and liquid nails 😂
 

Attachments

  • F03E77FC-5CB9-453D-8673-77A00B7FCE13.jpeg
    F03E77FC-5CB9-453D-8673-77A00B7FCE13.jpeg
    2.3 MB · Views: 18
  • 1577FC11-4104-481D-8F97-3EABD08AA9A8.jpeg
    1577FC11-4104-481D-8F97-3EABD08AA9A8.jpeg
    2.5 MB · Views: 19
  • 2DAEC0C8-0B88-4F5A-958A-0572DE131A8A.jpeg
    2DAEC0C8-0B88-4F5A-958A-0572DE131A8A.jpeg
    1.6 MB · Views: 21
  • EB3E746B-1DFA-4A80-8383-CAC7F75DB60E.jpeg
    EB3E746B-1DFA-4A80-8383-CAC7F75DB60E.jpeg
    3.5 MB · Views: 21

todhunter

Canoeist
Joined
Sep 15, 2020
Messages
1,323
I'm doing an 18 ft boat. I left mine on the double bunk trailer without adding any cradle supports and pulled the cap off. I measured hull width every foot and drew a sketch. I removed 2 of the 5 stringers, the rear bulkhead, and transom and replaced those. While bedding and tabbing in the first 2 stringers I used ratchet straps to hold the top of the hull in shape (it had splayed open about 1/2"). I then gutted the last 3 stringers and replaced those and the bulkhead, again using ratchet straps. After getting all that in it seems to not need the straps anymore. Until you drill core samples, plan on pulling out all the wood, including those bulkheads.

I watched a lot of YouTube - FriscoBoater's SeaRay restoration, JMink's Glastron restoration, and all of Boatworks Today's videos.
 

Scott Danforth

Grumpy Vintage Moderator still playing with boats
Staff member
Joined
Jul 23, 2011
Messages
50,282
I made a plywood and 2x6 support right on the trailer when I did a complete gut-n-rehab boat while leaving it on the trailer

your motor and your drive need to come out first before you do any more demo. I would also pull the tank prior as well.

I would plan on building something as you will be taking that chriscraft down to the bare hull. the mid 80's were prone to having stringer issues.

to pull the cap, I used ratchet straps to the rafters in my shop. 5-6 ratchet straps and hung the cap assembly from the ceiling.

look at the DIY stickies at the top of the thread. look at links 14, 15, 18, 2, 3, 4a and 4b in that order. look at every picture, video and link. 99.5% of the answers you are looking for are in there.
 

Iceguy1

Cadet
Joined
Mar 13, 2016
Messages
18
Thanks for the info guys. Thought I’d post about my progress so far. Done a bunch of drilling for core samples and found lots of good solid wood. Looks like I’m replacing transom, engine mounts, and two bulkheads. Stringers are in good shape all the way down except for a very small are at the very bottoms where they meet the aft bulkhead. Planning on scarfing in new pieces at these very small areas. (Please let me know what you guys think about that) Got much of my demo done as you can see in the pic. Left the hard part for last, the transom. It’s a pretty huge transom and only the very bottom is rotten. That’s a lot of solid wood to hack out of there.

First I built some extra supports on the trailer as seen in the pic. Planning not to have to pull the cap off if I don’t have to. The only rot under the bow floor is in the very bottom of a small bulkhead, looks to be limited to just around the drain hole at the very bottom. Hoping to be able to crawl under there, enlarge the drain hole eliminating all the rot and sealing the cut edge.

Fiberglass supplies are on their way from uscomposites. Picking up plywood this week. Upholstery supplies came weeks ago haha. (Ordered my ultrafeed sewing machine and upholstery supplies before I discovered the rot)

There’s no turning back now.

Im doing everything in marine plywood. Learning from boatworkstoday on YouTube, I plan to alternate layers of csm and 1708 for everything, with polyester resin. Sounds like I’ll be using a lot of resin, but I guess the csm between the 1708 will help with saturation and adhesion of the 1708. Any thoughts or criticism on this would appreciated.

Just one question for you guys for now... Thinking a little into the future, the wood for my motor mounts was rotten beyond recognition, all the way to the top. Just wondering what a typical wood or arrangement of layered wood would typically be used in these types of motor mounts? I included a pic of what they look like. Thanks guys for all the info and wish me luck
 

Attachments

  • 426527FD-2B11-47AA-AAE0-D1B960A3312E.jpeg
    426527FD-2B11-47AA-AAE0-D1B960A3312E.jpeg
    2.1 MB · Views: 17
  • 41528FA4-E000-4B1A-95E0-FBAB8D56D0B7.jpeg
    41528FA4-E000-4B1A-95E0-FBAB8D56D0B7.jpeg
    2.9 MB · Views: 16
  • A3CB6B2C-8887-4249-92E8-41F908448CF8.jpeg
    A3CB6B2C-8887-4249-92E8-41F908448CF8.jpeg
    2.6 MB · Views: 16

todhunter

Canoeist
Joined
Sep 15, 2020
Messages
1,323
Demo is looking good. If your stringers are truly ok, the scarf method should be ok, but you've got it torn down this far...if there's any concern with them, now is the time to replace.

Use a circular saw with a shallow cut depth to saw a grid into the transom, then knock out the chunks with a chisel. My new plywood for the transom was about 77" wide.

You can use ACX plywood to save some money if you want. When I looked it was 1/2 to 1/3 the price of true marine grade plywood.

The 1708 has a 0.8 oz mat stitched to the back side, so you shouldn't need the extra CSM between the 1708 isn't really needed.

I cut one of my old mounts in half to see what it was made of. It was a 2" thick piece of mahogany with a piece of 3/4" plywood on either side (look in my thread...pic is on one of the more recent pages). The mahogany is rot resistant and will take the lag bolt very well. I've seen other restorations just use layers of plywood, but I decided to rebuild with mahogany. I got the mahogany from a local hardwood supplier and am paying $6.50 / board foot.
 
Top