14.5' Espadon Restoration/Mod

Alex_C

Seaman Apprentice
Joined
Jul 18, 2012
Messages
36
I got this boat about a year and a half ago for cheap and ran it a few times a week for about 3 months with no intention to restore it. During that time I found a few issues that needed to be addressed, including some fairly annoying leaks and loose rivets. The PO had added a lot of erm..stuff to the boat. Corrosive hardware, improperly treated wood, lots of unnecessary weight, etc. The next summer after a few trips I got tired of pumping out the boat by hand and decided to try to fix the problem areas. Something strange then happened. The further I got into the "fixing" the more crap I found that needed to be done "while I was there". Eventually I ended up with a bare hull with a lot of holes in it from all the wonderful accessories that were so carefully added to it in the past. Can you detect a hint of sarcasm here?
 

Attachments

  • IMG_7106_Crop.jpg
    IMG_7106_Crop.jpg
    63.7 KB · Views: 2
  • IMG_7107.JPG
    IMG_7107.JPG
    123.7 KB · Views: 1
  • IMG_7118_crop.jpg
    IMG_7118_crop.jpg
    68.8 KB · Views: 1
  • IMG_7103.jpg
    IMG_7103.jpg
    65.4 KB · Views: 1
  • IMG_7110_crop.jpg
    IMG_7110_crop.jpg
    79.3 KB · Views: 2

Alex_C

Seaman Apprentice
Joined
Jul 18, 2012
Messages
36
Re: 14.5' Espadon Restoration/Mod

So I literally removed everything from the boat except the hull or the ribs. Transom out, seating out, everything else dumped in the trash. Nothing was worth keeping. I made a new transom using exterior grade plywood, Titebond III and 3 coats of spar urethane, with many extra coats on the edges. I also repaired some cracks around the ribs by drilling out the ends of the crack with a small drill bit and patching from the outside with 5200 and some rivets.
 

Attachments

  • IMG_0250.jpg
    IMG_0250.jpg
    141.7 KB · Views: 1
  • IMG_0251.jpg
    IMG_0251.jpg
    139.6 KB · Views: 2
  • IMG_0252.jpg
    IMG_0252.jpg
    142.7 KB · Views: 4
  • IMG_0253.jpg
    IMG_0253.jpg
    138.4 KB · Views: 2
  • IMG_0248.jpg
    IMG_0248.jpg
    138.6 KB · Views: 1

Alex_C

Seaman Apprentice
Joined
Jul 18, 2012
Messages
36
Re: 14.5' Espadon Restoration/Mod

Then the tricky part began. Rebuilding all the seats. Lots of template making, fitting and trimming was involved. The middle bench was 3/16" aluminum plate with 3/16" 1x3" angle to secure it to the hull. I used 1/4" closed rivets with steel mandrels dipped in 5200, and added a few extras to distribute the forces amongst more rivets, since the middle bench is very integral to the structure of the hull. The front bench was made from 1/16" aluminum with 1/16" thick hand bent angles to attach to the hull. I used 1/4" and 3/16" rivets using the same approach I used for the middle bench. I re-used the rear seating, but added some more angles to attach it to the hull to make everything more rigid.
 

Attachments

  • IMG_4351.jpg
    IMG_4351.jpg
    68.6 KB · Views: 1
  • IMG_4352.jpg
    IMG_4352.jpg
    71.8 KB · Views: 2
  • IMG_4354.jpg
    IMG_4354.jpg
    66.4 KB · Views: 0
  • IMG_4355.jpg
    IMG_4355.jpg
    57 KB · Views: 0

Alex_C

Seaman Apprentice
Joined
Jul 18, 2012
Messages
36
Re: 14.5' Espadon Restoration/Mod

Next was the framing for the floor, decking, and figuring out where the storage was going to be. This boat will see use in rougher water, so I wanted to keep the center of gravity low. I made a compromise between floor space and stability, and I am pretty happy with where the floor will sit. I cut out the middle of the bench for a walk through layout and framed it in to add more stiffness and support for the floor. Everything was done using 2" X 1/8" wall square tubing and 3/4" x 1/16" wall square tubing. Brackets were either bent from sheet aluminum by hand or cut angles depending on what was called for. Everything was fasted together with closed end rivets and stainless coated self tapping screws where the rivet gun couldn't reach. Anything riveted to the hull got a liberal coating of 5200 to ensure a good seal and extra strength.
 

Attachments

  • IMG_4396_resize.jpg
    IMG_4396_resize.jpg
    126.3 KB · Views: 0
  • IMG_4397_resize.jpg
    IMG_4397_resize.jpg
    113.6 KB · Views: 0
  • IMG_4398_resize.jpg
    IMG_4398_resize.jpg
    130.5 KB · Views: 1
  • IMG_4399_resize.jpg
    IMG_4399_resize.jpg
    125.9 KB · Views: 0
  • IMG_4400_resize.jpg
    IMG_4400_resize.jpg
    133.1 KB · Views: 1

Alex_C

Seaman Apprentice
Joined
Jul 18, 2012
Messages
36
Re: 14.5' Espadon Restoration/Mod

Next was painting the interior. I washed everything out with soapy water, scuffed it thoroughly with emery cloth, cleaned it with vinegar and applied self etching primer. I then applied Tremclad oil based, grey semi-gloss paint with a small roller and brushed everything that the roller couldn't get at. I also made a bow storage and eventual mounting surface for an Fraser (sometimes called Columbia) river anchor mounting system. The storage will get lined with bed liner and will be used to store the anchor chain, rope and buoy. This leaves me to where I am at currently in the project. Next step is getting the plywood cut for all the decking.

I ordered a bilge pump, switch panel, rod holders, rod storage, seating and related hardware, lights, and most importantly a Kenwood MR-355 stereo and speakers with radio antenna and splash proof cover. I will be installing a Deka Intimidator AGM battery. My Motor is a 1984 35 HP short shaft Evinrude with rope start, so I will have to charge the battery when the boat is not in use. Worth the hassle, and the AGM battery should last a good while while only running stuff like a stereo, lights, bilge pump and fish finder. I plan on eventually getting an electric trolling motor to hit up the power restricted lakes, so I need a battery suited for that.
 

Attachments

  • IMG_4421_resize.jpg
    IMG_4421_resize.jpg
    116.8 KB · Views: 1
  • IMG_4422_resize.jpg
    IMG_4422_resize.jpg
    109.4 KB · Views: 0
  • IMG_4423_resize.jpg
    IMG_4423_resize.jpg
    132.1 KB · Views: 0
  • IMG_4424_resize.jpg
    IMG_4424_resize.jpg
    131.3 KB · Views: 0
  • IMG_4425_resize.jpg
    IMG_4425_resize.jpg
    57.8 KB · Views: 1

Alex_C

Seaman Apprentice
Joined
Jul 18, 2012
Messages
36
Re: 14.5' Espadon Restoration/Mod

Here's the most recent shot of the progress
 

Attachments

  • IMG_4426_resize.jpg
    IMG_4426_resize.jpg
    58.6 KB · Views: 1

redstrat

Petty Officer 1st Class
Joined
Dec 29, 2011
Messages
202
Re: 14.5' Espadon Restoration/Mod

Look like you are doing some great work. Thanks for the information and pics.
 

Alex_C

Seaman Apprentice
Joined
Jul 18, 2012
Messages
36
Re: 14.5' Espadon Restoration/Mod

Today I finished cutting out the wood for the decking. I will be staining it "sunbleached" then coating with 3 coats of spar. I am going to use 3/4" vinyl quarter round to do the edges where the different pieces meet. Partially to seal the deck somewhat and avoid losing things down in the bilge, and to cover some mistakes! I still have to build the hatch for the rear deck, I will have to get some SS piano wire and a latch of some kind. Does anyone know what the most cost effective solution for a strong latch is? I want it to close up tight and be strong enough to handle some abuse.

This is the flooring I will be using these black tiles called "multy-tile"
 

Attachments

  • MultyTile_4.jpg
    MultyTile_4.jpg
    40 KB · Views: 2
  • IMG_4427_resize.jpg
    IMG_4427_resize.jpg
    116.7 KB · Views: 2
  • IMG_4428_resize.jpg
    IMG_4428_resize.jpg
    136.7 KB · Views: 1
  • IMG_4429_resize.jpg
    IMG_4429_resize.jpg
    140.4 KB · Views: 2
  • IMG_4430_resize.jpg
    IMG_4430_resize.jpg
    131 KB · Views: 2

Alex_C

Seaman Apprentice
Joined
Jul 18, 2012
Messages
36
Re: 14.5' Espadon Restoration/Mod

Today was a good day, got a lot done.

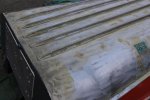
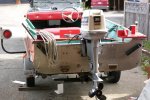
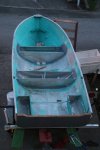
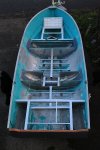
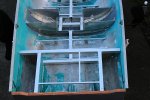
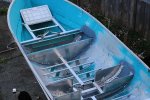
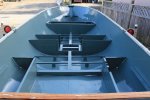
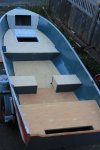
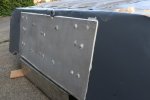
Transom backing plate (1/8" aluminum plate) made and bolted in, as well as transom bolted in. All stainless hardware, nylocks, lots of 5200.

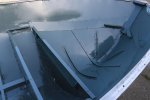
Transom cap restored - Brass cup brush, some hammering, some filing and some JB weld putty to fill some holes and chips/cracks in the metal. This is not a structural piece so I am okay with using JB to fix the cracks. I then installed it, 5200 used on the screws.

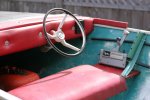
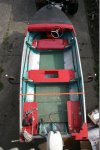
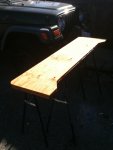
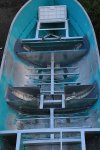
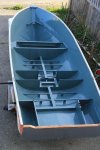
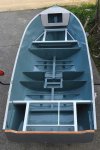
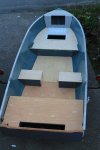
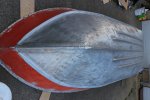
I got 2 coats of spar on all the wood, sanded with 220 in between coats. I got the first coat on early so I had the recommended 6 hours in between coats.

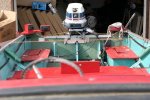
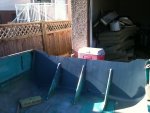
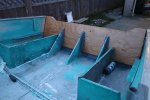
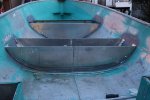
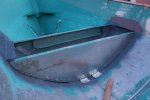
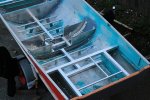
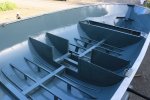
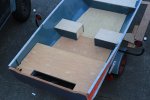
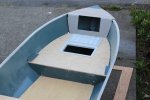
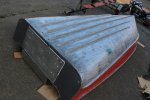
I built the hatch for the rear deck, still need to figure out a latch, but the frame is done, hole is cut and the wood finished.

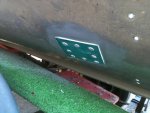
I filled some holes just below the gunwale (above the water line). The PO's prior installation left lots of holes to be filled...did I mention that? Anyway, I used some JB putty to fill those. We will see how well it holds up... None of the holes are in any spot to leak more than a few drops of water if the patch fails, but if the experiment doesn't work I will have to use a SS bolt in each hole. Trying to keep things looking clean as some of the bolts would be noticeable.

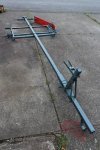
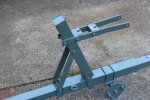
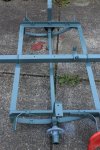
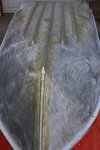
Tomorrow I plan to apply the final coats of spar, and get the boat flipped and prepped for paint. I hope to have a coat of gluvit on all the exterior seams and rivets by the end of the day. While the boat is off the trailer, I also hope to get the trailer spruced up with some wire wheel action, rust-mort and primer, new wiring where needed, and probably a new set of tires, since the old ones have cracks in the sidewall rubber. I have a set of spares somewhere, but I will have to take a look at them before I buy new ones.

Hoping to get this thing buttoned up soon! Want to get it out on the water before June.
 

Alex_C

Seaman Apprentice
Joined
Jul 18, 2012
Messages
36
Re: 14.5' Espadon Restoration/Mod

Today I got the boat flipped, stripped down to fresh metal, washed and got the first coat of Gluvit on the bottom.

I filled some more of those holes around the gunwale with JB weld and also got the 3rd coat of spar on the decking.

Even with all the framing I added, the boat is still pretty light weight, I could move it around easily by myself when it was flipped, should move along nicely with the 35 hp on the back.

The boat is rated for 30, so I added some reinforcement to the transom. Since this engine is based off the 25 HP and is very light, I think I am probably overkill with what I did, but who doesn't like a nice strong transom!

Couple of pics of the boat prepped with a coat of Gluvit, and the transom bolted up. The plate in the back is 1/8" thick plate.
 

Attachments

  • IMG_4431_resize.jpg
    IMG_4431_resize.jpg
    102.7 KB · Views: 2
  • IMG_4432_resize.jpg
    IMG_4432_resize.jpg
    55.4 KB · Views: 2
  • IMG_4433_resize.jpg
    IMG_4433_resize.jpg
    52.3 KB · Views: 2

Streetgang

Petty Officer 1st Class
Joined
Oct 13, 2012
Messages
251
Re: 14.5' Espadon Restoration/Mod

alex,

Nice work.

This appears to be more of a manifesto than a play by play but that is good to go. There is some very professional work going on here so kudos to you and your fast track.

Just guessing but you may have perused some restos here on Iboats aforehand but either way your work is great!

so tagging long and beauty effort !
 

Alex_C

Seaman Apprentice
Joined
Jul 18, 2012
Messages
36
Re: 14.5' Espadon Restoration/Mod

Thanks! I have done my research haha. I started it last summer hoping to get it done by early fall, but i had just moved and my workspace was no where near set up to get things done efficiently...And life happened which didn't afford the time to get my shop set up comfortably. I have had lots of time since to stew on it, and the fresh perspective really helped the motivation factor.

I am trying to hammer this project home for the summer so I don't really have time to take pics of the process. I can definitely answer questions if anyone wants to know how I did something in more detail. I usually take pics after the days work is done so the build is light on pictures.

Thanks for the kind words, it's good to get feedback from people as I don't know anyone who builds boats!
 

Alex_C

Seaman Apprentice
Joined
Jul 18, 2012
Messages
36
Re: 14.5' Espadon Restoration/Mod

please delete, accidental double post
 

Alex_C

Seaman Apprentice
Joined
Jul 18, 2012
Messages
36
Re: 14.5' Espadon Restoration/Mod

I also decided against an AGM due to cost. I paid about $175 for the Deka Intimidator in my Jeep, so I though maybe something smaller in AGM would be around my price range of $150, but in the end the benefits of AGM weren't worth the amp hours per $ I can get with a regular wet cell. I ended up with a 75Ah model, which should give me lots of stereo, fish finder and lights (and hopefully not too much bilge pump) per charge!

I still have to build a little console to mount on the starboard seat, but that can still be stepped and sat on if necessary. It needs to fit the stereo and switch/12V outlet panel I am going to install. For simplicity's sake I am going to make it out of some 3/4" ply I have lying around, which should more than rugged enough to handle some abuse without being too engineered.

I don't want to cut into the baffles that I made out of aluminum by hand...in my garage...so I am going to build some little speaker boxes that will fit under the gunwale braces on the fore seat/deck. I might also see if I can incorporate some small storage/cup holders into the seats. Although I'm a bit after the fact considering most of the work is done, I would rather change my plan and delay things a bit than compromise the quality project or make a cut that I will regret later. Cutting out new metal doesn't make sense anyway!

I have Sunday and Tomorrow morning off work, so I am hoping to get it primed and have the first coat of paint on it by Sunday evening if the weather holds up.
 

jigngrub

Fleet Admiral
Joined
Mar 19, 2011
Messages
8,155
Re: 14.5' Espadon Restoration/Mod

You're doing some really nice work on that boat and it's looking beautiful!

One thing I did notice though was you mentioned using a wire cup brush, brass (it's the copper in it) and aluminum are mortal enemies and brass will corrode aluminum and eat it's way through. A stainless steel wire cup would be a much better choice and even a carbon steel wire would be better than brass.

Do you plan on installing floatation foam?
 

Alex_C

Seaman Apprentice
Joined
Jul 18, 2012
Messages
36
Re: 14.5' Espadon Restoration/Mod

Thanks for the tip, I didn't know that the brass would be so hard on the aluminum. It's too late now, but I will keep that in mind for any other stripping I have to do. I chose brass over steel because it's softer/less aggressive.

I do plan on installing pink/blue insulation foam in the floor, rear seat "pods" on either side of the rear storage, the side seats and the front where the two baffles are. There should be slightly more foam than there was from the factory. I might end up adding more storage later and cutting a small amount of foam out, but I will have to take the boat out on a few trips to see how much storage I'll really need.
 

Alex_C

Seaman Apprentice
Joined
Jul 18, 2012
Messages
36
Re: 14.5' Espadon Restoration/Mod

Instead of building a little console on top of the starboard middle seat, I am thinking a little console to the side between that seat and the rear deck would be cool. I can mount my stereo, switches, have a small hatch for storing things I want accessible while underway, and I can even put a cup holder in it! It shouldn't be too much more work, and I have all the materials to make it.
 

Alex_C

Seaman Apprentice
Joined
Jul 18, 2012
Messages
36
Re: 14.5' Espadon Restoration/Mod

So it was raining today which means that paint & Gluvit are on hold until the sun starts shining again. I need to replace the crankshaft seal on my 1984 Evinrude 35 HP, so today I tackled that. I got as far as getting the seal out by drilling holes and screwing into the seal, then prying out with some side cutters. I noticed some end play in the crankshaft, so I slapped the dial indicator on there and measured about .005" of side to side play. Would it be worth it to pull the power head, split the case and replace the bearings? Now that I think about it, I do remember the motor being a bit noisy...like a rattling type of noise, which could be a symptom of a bad crank bearing, but I'm not sure what is normal noise and what could be a symptom of a bigger problem.

How much work is it to pull the powerhead and replace the bearings? I am pretty mechanically inclined and have a lot of tools. I don't mind doing this now if it means getting a couple more seasons out of this motor. I obviously want to be damn sure the bearings need to be replaced before I spend a whole day tearing the motor apart and putting it back together.
 

Alex_C

Seaman Apprentice
Joined
Jul 18, 2012
Messages
36
Re: 14.5' Espadon Restoration/Mod

I called the local Evinrude/Johnson dealer and they said .005" of play in the upper crank bearing should be normal for a roller bearing. I got the seal in and the engine all buttoned up. I also fixed the stop button which had some corrosion in it and wasn't stopping the motor very well. You had to push it in really hard and hold it there, but after some brushing of the contacts and cleaning it stops very nicely. I got the engine running on the stand and it runs really well still! I let it run for a good 15 minutes or so and the seal showed no signs of leaking. We'll see how it does at WOT once it's on the boat but so far so good. Here's some pics of it all cleaned up. Remember that the engine was leaking oil/fuel all over the place so it was pretty dirty before (I don't have any before pics, so you're just going to have to believe me).

Tomorrow I am going to tackle the trailer, and possibly get the second coat of gluvit on the boat if the weather stops sucking so bad.
 

Attachments

  • IMG_4434_resize.jpg
    IMG_4434_resize.jpg
    138.6 KB · Views: 1
  • IMG_4438_resize.jpg
    IMG_4438_resize.jpg
    140.8 KB · Views: 1
  • IMG_4442_resize.jpg
    IMG_4442_resize.jpg
    59.1 KB · Views: 1
  • IMG_4443_resize.jpg
    IMG_4443_resize.jpg
    59.6 KB · Views: 1
  • IMG_4444_resize.jpg
    IMG_4444_resize.jpg
    65.1 KB · Views: 0

Alex_C

Seaman Apprentice
Joined
Jul 18, 2012
Messages
36
Re: 14.5' Espadon Restoration/Mod

Another productive day:

Got the first coat of Gluvit sanded, washed with soapy water, rinsed and dried. Applied second coat.

I ended up using the full can. I covered some areas that will be dragged over rocks on the river bank..the stern got two coats about a foot back from the transom all the way across the hull.

I also covered some pitted spots in the aluminum...in the end the most of the hull got at least a thin coat.

I got the trailer ripped apart completely. I pulled out all the wiring, pulled of the bunks and rollers, pulled off the plywood "platform" the PO had added along the main beam, cut off the rusty safety chains..you get the point. The bunks had some green astro turf on them that had filled itself full of grit and sand, and you can see where the trailer was wearing away at the hull. I have to come up with something better than a putting green that will allow the boat to slide nicely and not mess up the paint. The wood for the bunks had some rot so I decided to toss them and start fresh. I'll be using cedar most likely.

I wire wheeled off the rust, sanded the old paint down a bit, washed it all with soapy water and then rinsed and dried. I went over some of the rustier looking areas with some rust converter/primer stuff. I could have used more than the half can I had laying around but I got most of the bad spots. I got a thin first coat of the grey Rustoleum that I am using on the boat. I will get another coat on pending the weather. It's supposed to rain tomorrow, but Thursday I have the afternoon off and it's supposed to be sunny.

Here's some pics of the boat with the Gluvit all over it (yeah, there are a lot of drips...that's why I have a palm sander :D ). Also some pics of the trailer all stripped down and painted. If you scroll up to the first couple of posts with the pics of the boat "before" you can see the condition of the trailer.
 

Attachments

  • IMG_4445_resize.jpg
    IMG_4445_resize.jpg
    73.9 KB · Views: 1
  • IMG_4447_resize.jpg
    IMG_4447_resize.jpg
    75.1 KB · Views: 0
  • IMG_4448_resize.jpg
    IMG_4448_resize.jpg
    88.9 KB · Views: 0
  • IMG_4450_resize.jpg
    IMG_4450_resize.jpg
    146.2 KB · Views: 0
  • IMG_4451_resize.jpg
    IMG_4451_resize.jpg
    127.2 KB · Views: 0
Top