1957 35 Johnson (carb adjustment)

Roberthill

Petty Officer 1st Class
Joined
Dec 3, 2012
Messages
317
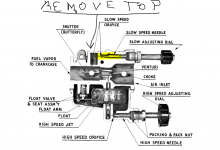
Adjusted carb to run wide open but when it's on slow running have to adjust high and low jets about half a turn richer and when running slow have to adjust jets half a turn leaner . Can someone please point me into what to check for this?
 

racerone

Supreme Mariner
Joined
Dec 28, 2013
Messages
38,431
Set high speed first.-------Then bring to idle and adjust low speed mixture.-----If you have to fiddle as you suggest your carburetor needs attention.
 

racerone

Supreme Mariner
Joined
Dec 28, 2013
Messages
38,431
All the fuel including low speed mixture goes through the high speed jet.----If you have to fiddle you need to inspect carburetor / adjustment procedure.-----Or perhaps there are other motor issues.-----What other trouble shooting has been done ?----Compression test values.----Compression values with relief disconnected are ??
 

oldboat1

Fleet Admiral
Joined
Apr 3, 2002
Messages
9,612
If the h.s. jet is cleared, still need to take off the aluminum compression fitting on top to access idle passages. Best to open up the carb and soak all metal in brake or carb cleaner, then clean every opening with soft wire. Finish with carb spray using the plastic nozzle.

Like all engine adjustments and procedures, one is a complement to the others.
 

Roberthill

Petty Officer 1st Class
Joined
Dec 3, 2012
Messages
317
If the h.s. jet is cleared, still need to take off the aluminum compression fitting on top to access idle passages. Best to open up the carb and soak all metal in brake or carb cleaner, then clean every opening with soft wire. Finish with carb spray using the plastic nozzle.

Like all engine adjustments and procedures, one is a complement to the others.
I'm lost on "take off aluminum compression fitting to access idle passages" can you help me on this? Thanks .
 

racerone

Supreme Mariner
Joined
Dec 28, 2013
Messages
38,431
A round disc on top of carburetor.------Removed to allow inspection of wee holes.------New disc is installed and hit to make it expand and stay in place.
 

Crosbyman

Vice Admiral
Joined
Nov 5, 2006
Messages
5,654
see picture below....

drill a small hole NOT TO DEEP to damage the carb....
take a pic or nail and pop it out
clean all holes 2-3 and needle exit on the side ...you should see neeedle point so unscrew it out to clean and blast the top LS circuit
reinstall a new cap
punch the center with a square head screwdriver or flat punch just enough to expand it
seal the rim with nail polish ..any colour :)

voilà... you are done l
 

Attachments

  • basic carb.PNG
    basic carb.PNG
    307.3 KB · Views: 10

oldboat1

Fleet Admiral
Joined
Apr 3, 2002
Messages
9,612
^^Good description! Initial settings are 1 1/2 open (c.clockwise) for the l.s. needle from lightly closed. Initial h.s. setting is about half to 3/4 turn open. Adjustments are small in a clean carb (increments of 1/8 turn). Tighten the gland nuts to keep the needles in place after tuned in. Should be loose enough that you can make adjustments, but not so loose that they vibrate out and lose their settings. Each needle takes a couple of cork washers.

Final h.s. needle setting is done with the engine pushing the boat at WOT or close. After final adjustment to the h.s. setting. Set the l.s. needle again (engine warmed up and in gear). Should be about 650 rpm -- should shift into gear smoothly without jerking, and without stalling.
 

Roberthill

Petty Officer 1st Class
Joined
Dec 3, 2012
Messages
317
Took boat fishing , running wide open , ran good , but blew the head gasket top of top cylinder , removed spark plug and came in on one cylinder . Looking at a small (3/16") gap . Trying to find a aluminum welder , going to try repairing . Guess that was probably root of my problems.
Thanks everyone for their help. Never knew that could be taken off top of carburetor.
 

Crosbyman

Vice Admiral
Joined
Nov 5, 2006
Messages
5,654
?? did you just blow just the gasket ??? what is the welding for ???

post a picture of 3/16 gap ??? if available
 

Roberthill

Petty Officer 1st Class
Joined
Dec 3, 2012
Messages
317
Here is picture . Finally got it done.
 

Attachments

  • image.jpeg
    image.jpeg
    1.3 MB · Views: 12

Roberthill

Petty Officer 1st Class
Joined
Dec 3, 2012
Messages
317
The one problem with epoxy is that the head gasket would be putting pressure on it . Might work for a couple of trips but heat and pressure would take its toll . MPE(my past experience).
 

Crosbyman

Vice Admiral
Joined
Nov 5, 2006
Messages
5,654
I agree 100% yet this extreme heat version looks promissing...I would try it but not my engine.

could welding cause issues ...doesn'T look like a big job for an exoerienced aluminum welder
 

racerone

Supreme Mariner
Joined
Dec 28, 2013
Messages
38,431
Is the gauge in fact aluminum or the cast iron sleeve.-----If aluminum then a product called ----LUMIWELD-----Might be used for the repair.
 

Roberthill

Petty Officer 1st Class
Joined
Dec 3, 2012
Messages
317
Is the gauge in fact aluminum or the cast iron sleeve.-----If aluminum then a product called ----LUMIWELD-----Might be used for the repair.
Think I am going to try this . Having a hard time finding a welder . Harbor Freight carries this. THANKS
 

oldboat1

Fleet Admiral
Joined
Apr 3, 2002
Messages
9,612
Don't mean to be a downer, but particularly if you like to run your outboards hard, you might be on the lookout for a replacement l.u. There is a lot of corrosion there -- looks like salt water corrosion -- but whatever the cause I would guess the aluminum is pretty dicey. In the meantime, I would clean up what you have and fill the gap with Marine Tex -- the stuff that is supposed to be OK for engine blocks. Then refinish the mating surface of the head (piece of glass and wet/dry paper) to help alleviate warping. Then torque to specs, and retorque after running. If you have another unit ready to go, the current one will probably outlast you. It's a rule....
 
Top