1970 15' Sea Charmer Tri Hull repair

Status
Not open for further replies.

JStrom

Seaman Apprentice
Joined
Jul 11, 2012
Messages
31
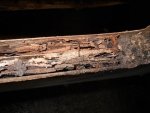
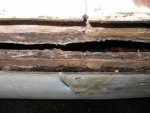
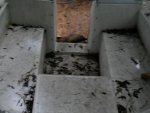
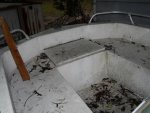
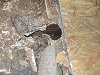
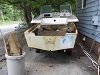
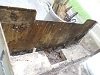
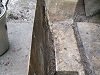
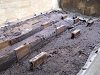
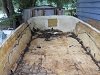
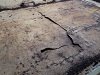
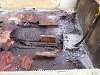
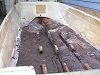
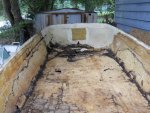
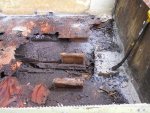
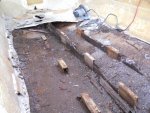
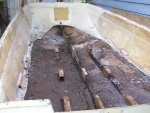
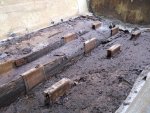
Hi guys. I've been reading and reading and....well, reading the threads here for a couple weeks and finally joined. I've seen some ebarrassingly good work on almost every rehab job. I'm a full time student so what doesn't get finished before August 20th will probably get done very slowly. In the meantime, I have this boat hull with very rotten floors and equally rotten transom. I can't work (school funding condition) so I might as well be productive. The hull floats and doesn't leak (5 hours on the water using just a trolling motor) so I've decided to do what I can and make it workable.

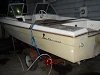
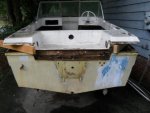
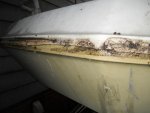
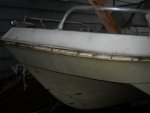
My initial question is how to get the cap separated from the hull? I removed the rub rail drilled out all the rivets so the back came apart very easily. However, the front, although separated about 1/2" just from removing the rivets, won't separate fully. I can't find anything anywhere that's holding it to the hull, but it has to be something! Could the plastic/fiberglass walking/seating area be glued to something? I don't want to pull or pry too hard for fear of damaging the material. ANY ideas here?

I was hoping to have the floor out this evening but an afternoon rain storm (every day in these Georgia summers) and the cap/hull problem put an end to that goal.

Lastly, I should say that my goal here isn't to fully restore this boat. As much as I would like to, I just don't think that's feasible due to school. I'm going to try and take at least 15 credit hours, possibly 18, so I won't have a ton of free time. There's also an issue of funds. I like to eat every day without having to steal it first.

Thanks already for all of the incredible information so many of you have given in the other threads. I was extremely skeptical when I got this boat but now I'm fairly confident as I head into this.
 

Attachments

  • DSCN0424.JPG
    DSCN0424.JPG
    64.4 KB · Views: 2
  • DSCN0437 (640x480).jpg
    DSCN0437 (640x480).jpg
    37.3 KB · Views: 1
  • DSCN0438 (640x480).jpg
    DSCN0438 (640x480).jpg
    42.5 KB · Views: 1
  • DSCN0439 (640x480).jpg
    DSCN0439 (640x480).jpg
    50.1 KB · Views: 1
  • DSCN0453 (640x480).jpg
    DSCN0453 (640x480).jpg
    31.6 KB · Views: 1

JStrom

Seaman Apprentice
Joined
Jul 11, 2012
Messages
31
Re: 1970 15' Sea Charmer Tri Hull repair

Here are some photos of the bow where I can't get the cap free from the hull.
 

Attachments

  • DSCN0446 (640x480).jpg
    DSCN0446 (640x480).jpg
    29.8 KB · Views: 1
  • DSCN0457 (640x480).jpg
    DSCN0457 (640x480).jpg
    31 KB · Views: 0
  • DSCN0442 (640x480).jpg
    DSCN0442 (640x480).jpg
    40.2 KB · Views: 2
  • DSCN0443 (640x480).jpg
    DSCN0443 (640x480).jpg
    24.1 KB · Views: 2

JStrom

Seaman Apprentice
Joined
Jul 11, 2012
Messages
31
Re: 1970 15' Sea Charmer Tri Hull repair

OK! I finally got the cap off the hull. It was getting dark yesterday evening from the rain clouds moving in in addition to the time of day, so I stopped yesterday. Today, I went back out with a flashlight to see what the holdup was. No, not a 'regular' flashlight. The batteries are dead in all THREE of them! So, instead of running to the store for new batteries, I got inside the boat and up under the front with one of those "car-key" lights...a red one. Still, it was enough light to see that nothing was glued down or attached otherwise. There were some rivets at the very base of the walk through but the floor was so far gone that they're just attached to the plastic and not anchored. So, I tried picking up the cap again, but this time from inside the boat. The rear of the cap shifted over and part of the bow, but not all of it. That helped immensely as when I got out of the boat again and when to lift the bow again, I could see a hidden rivet that still needed to be drilled out. ONE rivet. I drilled it and found another reason I was having trouble removing the cap....it's freaking heavy! I had rotator cuff and SLAP surgeries on my right shoulder (right handed) on April 13 and I'm nowhere near where I used to be strength wise. I'm going to get a little creative with getting the hull from underneath the cap as I don't have any help. It looks like I'm done for the day though as I can hear a very heavy rainfall now. Really? MORE rain? Every single afternoon. I think God for it though, truly I do.
 

JStrom

Seaman Apprentice
Joined
Jul 11, 2012
Messages
31
Re: 1970 15' Sea Charmer Tri Hull repair

OK...got a little bit done today before the bottom fell from the sky again....a daily event it seems. I was able to get the cap moved forward so I could work on the transom, but not without a little blood getting spilled along the way. Altogether, I was on the boat for about 2 hours and it seemed as though 45 minutes of that was going back and forth, getting stuff I needed...tools and such. It wasn't nearly as hot here today as it has been (like everywhere, over 100 degrees), but you couldn't tell that from the amount of sweat I was putting out. And I have no doubt that my neck and shoulders are going to be talking to me tomorrow. No doubt at all about that. This shoulder surgery and recovery has made mush out of me. Anyway, the photos sort of show where I'm at. If the weather holds out tomorrow, I'll try and figure out a way to cut out the floor...then on to grinding the inside hull maybe?? We'll see.View attachment 158787
 

Attachments

  • DSCN0475.JPG
    DSCN0475.JPG
    65.7 KB · Views: 1
  • DSCN0468.JPG
    DSCN0468.JPG
    63.4 KB · Views: 1
  • DSCN0471.JPG
    DSCN0471.JPG
    65.9 KB · Views: 1
  • DSCN0472.JPG
    DSCN0472.JPG
    65.5 KB · Views: 1
  • DSCN0473.JPG
    DSCN0473.JPG
    65.2 KB · Views: 1

JStrom

Seaman Apprentice
Joined
Jul 11, 2012
Messages
31
Re: 1970 15' Sea Charmer Tri Hull repair

That first pic of the hole in the floor is where my foot when through when lifting the cap by the consoles on either side of the walkthrough. The second pic is of the small gash and scrapes from the first pic. Third pic is my sort of redneck solution to accessing the transom. I'm single and try to ask for help as little as possible, so it is what it is, and it worked for the time being. The next two pics are post transom removal.
 

JStrom

Seaman Apprentice
Joined
Jul 11, 2012
Messages
31
Re: 1970 15' Sea Charmer Tri Hull repair

Had a good and bad day today. It didn't rain although it clouded up the way it always seems to just before the bottom drops out. This time though, just clouds, no rain. I got the carpet out which wasn't as easy as you might think, given that I couldn't stand in the boat with a floor this bad. A pry bar helped immensely though. Then I got the circular saw out and got to work. Of course, I could feel fiberlass all over my arms, and that was just from sweeping the boat prior to sawing. So, I put on a long sleeved shirt, my carhart (quilted, winter) coveralls, golf cap, safety glasses and dust mask...and got to work. It only got up to 93 here today,so that was a blessing. I still sweat to no end though, and the energy went somewhere, anywhere, everywhere...just didn't stay inside me! I circ-sawed as close as I could to the edge of the hull while standing outside the boat and walked around. I had to pry some of the fiberlass up as I couldn't quite get a full cut all the way around, but overall, this part was the easiest I've done so far. Oh...BUT for the foot or so where my blade when through the hull. Hopefully I'll be able to repair that and not do too bad of a hack job on it. I've never done any of this stuff before, so we'll see.
 

Attachments

  • DSCN0528.JPG
    DSCN0528.JPG
    66 KB · Views: 0
  • DSCN0486.JPG
    DSCN0486.JPG
    66.3 KB · Views: 0
  • DSCN0487.JPG
    DSCN0487.JPG
    65.2 KB · Views: 0
  • DSCN0518.JPG
    DSCN0518.JPG
    66.3 KB · Views: 1
  • DSCN0525.JPG
    DSCN0525.JPG
    65.6 KB · Views: 1

JStrom

Seaman Apprentice
Joined
Jul 11, 2012
Messages
31
Re: 1970 15' Sea Charmer Tri Hull repair

Trying to get these photos to work better. No idea what's happening!
 

Attachments

  • DSCN0486 (640x480).jpg
    DSCN0486 (640x480).jpg
    64.4 KB · Views: 1
  • DSCN0518 (640x480).jpg
    DSCN0518 (640x480).jpg
    78.7 KB · Views: 1
  • DSCN0522 (640x480).jpg
    DSCN0522 (640x480).jpg
    61.8 KB · Views: 0

JStrom

Seaman Apprentice
Joined
Jul 11, 2012
Messages
31
Re: 1970 15' Sea Charmer Tri Hull repair

In this last photo...any idea what these "notches" are/were for? I reposted where my foot went through the floor when I was moving the cap forward from inside the boat.
 

Attachments

  • DSCN0525 (640x480).jpg
    DSCN0525 (640x480).jpg
    54.1 KB · Views: 0
  • DSCN0528 (640x480).jpg
    DSCN0528 (640x480).jpg
    81 KB · Views: 0
  • DSCN0508 (640x480).jpg
    DSCN0508 (640x480).jpg
    47.5 KB · Views: 0
  • DSCN0468 (640x480).jpg
    DSCN0468 (640x480).jpg
    33.2 KB · Views: 0
  • DSCN0490 (640x480).jpg
    DSCN0490 (640x480).jpg
    82.8 KB · Views: 0

JStrom

Seaman Apprentice
Joined
Jul 11, 2012
Messages
31
Re: 1970 15' Sea Charmer Tri Hull repair

I guess I should ask a few more questions at this point. What is the best way to get the very edges of the fiberglass flooring up, where it meets the hull? That's the part I couldn't get with the circular saw. Will that be the best way to get the fiberglass that was holding the stringers in place too? And lastly, for now, what type wood is normally used for stringers? I'm currently awaiting a reply from a stringer manufacturer that makes two piece stringer from what I believe is fiberglass, with the overlap already part of their stringers, with the cushion already build in, so no PBing needed(?). I'm a full time student so $ will be a major factor no matter what I do.
 

yorab

Ensign
Joined
Jul 6, 2002
Messages
960
Re: 1970 15' Sea Charmer Tri Hull repair

Looks like you are doing a fine job so far. I believe that the "notches" are for supporting the edges of the floor where it meets the hull.

Try an angle grinder for the last bits close to the hull. Use a proper mask and eye protection. It gets ugly when you start grinding that old fiberglass.

You can get thin (read: cool) full body suits at your local big-box store that won't break your bank.
 

JStrom

Seaman Apprentice
Joined
Jul 11, 2012
Messages
31
Re: 1970 15' Sea Charmer Tri Hull repair

No progress on the hull since the last photos as I've been studying for school a LOT lately. I'm finally finished with that until the 20th of August though. I hope to jump back in the boat on Monday (I rest on Sundays as it is a holy day). I did, however, come across a motor that I have no idea of it's condition. It's a 50hp Evinrude, 1972 electric shift. Nobody knows if the motor will run but I'm picking it up in about 4 weeks. I know ZERO about boat motors so I don't really plan to have this thing in the water until spring/summer '13...at least not with this motor attached. I know I may have bitten off more than I can chew with this motor as some of the parts aren't available anymore and other cost an arm and a leg. Hmmm...we'll see how it works out either way!
 
Status
Not open for further replies.
Top