1974 Starcraft Supersport 16 restoration

Joined
Feb 19, 2012
Messages
15
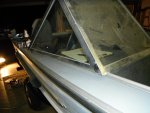
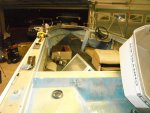
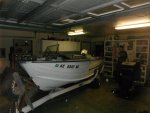
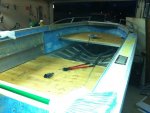
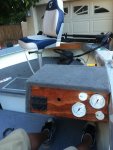
Here is my 1974 starcraft supersport project. I bought the boat about a year ago for the shell and trailer and have been working on it since. I paid $500 for the boat with a squishy floor, half a console, the wrong windshield, and a beat up trailer.

I've looked at tons of boats on this site for inspiration and help but I haven't posted pics yet since this is my first message board and I don't know what I'm doing. I'll try and post the pics I have of the project so far, its nearing completion so I'll post those soon too. You guys have built some awesome boats on here and it has pushed me to make mine nicer than I would have, thanks!!

I plan to use the boat primarily for fishing and camping so I had a few priorities:
- open floorplan and removable seats to make room for gear or sleeping
- fishing deck
- bow mount trolling motor
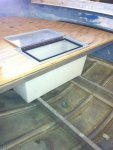
- built in live well

I've taken some shortcuts with the hull - not painting it and not using gluvit or equivalent on the rivets. The hull has minor leaks but it has a 750gph bilge pump and will never be stored in water so I'm not too worried. I may eventually paint the outside but I figured I would focus on the inside where I will spend all my time.

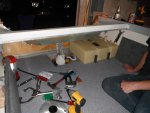
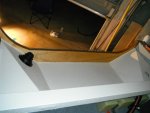
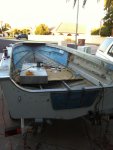
Here is what I started with
attachment.php


The hull has some scuffed areas but is in decent shape overall
attachment.php


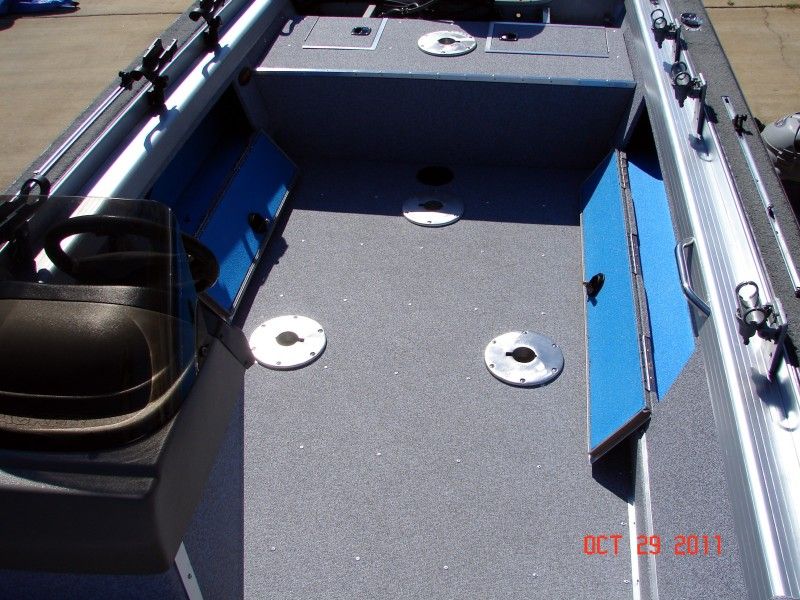
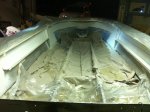
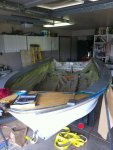
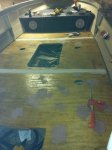
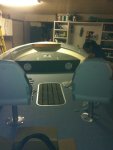
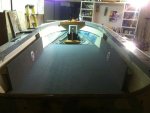
Started out by removing the floor, transom, bow area and trim and cleaning it all out, then primed and painted the gunnels with gray Easypoxy and sprayed the exposed areas inside the boat with white do-it-yourself Gatorguard truck bedliner - this stuff seems to have worked out REALLY well although it hasn't seen the water yet, much easier than paint for these large surfaces. You'll notice the front bow surface aluminum has been removed and I replaced the two weak braces with a solid piece of plywood to mount my trolling motor on. The aluminum will go back on top and it also got sprayed with the white bedliner.

attachment.php


attachment.php
 

Attachments

  • DSCF0349.jpg
    DSCF0349.jpg
    143.3 KB · Views: 50
  • DSCF0348.jpg
    DSCF0348.jpg
    141 KB · Views: 43
  • IMG_1212.jpg
    IMG_1212.jpg
    144.4 KB · Views: 48
  • IMG_1233.jpg
    IMG_1233.jpg
    143 KB · Views: 48
Joined
Feb 19, 2012
Messages
15
Re: 1974 Starcraft Supersport 16 restoration

We built the floor from 3/4" plywood that I waterproofed with an exterior deck sealer. I built a raised fishing deck on the rails that used to hold the bow area seats and supported it with aluminum angle and a vertical 2x4 that is mounted to a small platform I built under the fishing deck to hold the trolling battery (sorry no pic of this, its just 2x4 and plywood screwed into the aluminum ribs). The deck is extremely solid with 2 adults standing on it.

attachment.php


I built a livewell into the fishing deck using a plastic storage bin and sealed aluminum hatch from Cabelas. I glued heavy plastic sheeting glued across the underside of the wood, extending beyond the livewell edges to protect it from water splashing around inside the livewell (no pic of this, sorry). The livewell is plumbed to a 3/4" pump at the transom and there is a 1-1/8 hose running back that serves as the overflow and drain. I hope this drain works, I know most new boats run this out the side above the water line but I didn't want to drill a hole in the side.

attachment.php


This isn't a great pic but we then built a console out of the plywood that will mount to the fishing deck. The holes in the front face of the deck are for speakers, I built small sealed boxes behind those holes to protect them and isolate the sound.

attachment.php
 

Attachments

  • IMG_1057.jpg
    IMG_1057.jpg
    145.1 KB · Views: 49
  • IMG_1076.jpg
    IMG_1076.jpg
    145.6 KB · Views: 49
  • IMG_1139.jpg
    IMG_1139.jpg
    136.4 KB · Views: 48
Joined
Feb 19, 2012
Messages
15
Re: 1974 Starcraft Supersport 16 restoration

Here is the floor mounted, it is held in place with countersunk bolts that go into clip nuts on the outer edge of the boats support ribs and then large screws into the two aluminum braces that run the length of the boat. The holes are drilled in the floor for plug in type seat mounts from Springfield, these are great and make it so all seats can be removed and they are AD rated. I used T nuts that hold themselves in place under the floor for the seat mounts since the floor isn't easily removable. By the way, large hole saws are about the most dangerous tool in the world - I am lucky to still have 10 fingers after a bad slip up.

I used marine vinyl for the main floor so I sealed up all the dents and holes in wood with bondo to provide a smooth surface and then covered the seams with latex caulking as I figured bondo would crack at the seams. The large hole in the middle is for a teak storage hatch I picked up on ebay. The hole by the transom is for access to the pumps.

attachment.php


Here is a shot with the vinyl in and a you can also see the battery box and fishing deck support at the front that I talked about earlier. Also the side trim pieces are carpeted 3/8" plywood with additional speakers in them, the set I bought had 4 so I used them all.

attachment.php


Here is a pic with some of the seats and the hatch in place. The fishing deck is also in place now and covered in carpet, only the floor was done in vinyl. The bow area is also back together, you can see that I replaced the horizontal wood piece with a piece of solid oak (this part was a huge pain) and the aluminum is back in place and sprayed with the white bedliner.

attachment.php
 

Attachments

  • IMG_1314.jpg
    IMG_1314.jpg
    145.1 KB · Views: 39
  • IMG_1340.jpg
    IMG_1340.jpg
    146.2 KB · Views: 40
  • IMG_1331.jpg
    IMG_1331.jpg
    147.8 KB · Views: 37
Joined
Feb 19, 2012
Messages
15
Re: 1974 Starcraft Supersport 16 restoration

Here is a picture of the boat where it is currently at, the console is just sitting there at the moment but the bow end is completed and the 55lb minn kota trolling motor is bolted in place, it fits great. I just picked up a smaller fishing seat and a taller pole for the front, it was a little cramped with a full seat up there.

The next task for the coming weekend will be to get the transom bolted in place so I can get a motor. DOES ANYONE KNOW WHERE TO GET THE ALUMINUM TRIM THAT COVERS THE TOP EDGE OF THE TRANSOM? Mine is totally destroyed.

attachment.php
 

Attachments

  • IMG_1355.jpg
    IMG_1355.jpg
    145.4 KB · Views: 30
Joined
Feb 19, 2012
Messages
15
Re: 1974 Starcraft Supersport 16 restoration

Hoping someone can help me, in the picture below of my transom, see the top row of holes that curve around where the bottom lip of the splashwell fits against the inside? I don't see those holes on other peoples boats. Mine had about 40 bolts that ran all the way through the transom, splashwell, and the outer shell of the boat. I'm getting ready to bolt the new transom in and I don't know if I should go ahead and drill all those holes in the wood and put the bolts back or if I should leave them and try to fill the holes in the aluminum with sealer. Thoughts?

Sorry my pics are so big, I took with my phone and I don't know how to change them.

attachment.php
 

Attachments

  • IMG_1070.jpg
    IMG_1070.jpg
    140.1 KB · Views: 31

jbcurt00

Moderator
Staff member
Joined
Oct 25, 2011
Messages
25,116
Re: 1974 Starcraft Supersport 16 restoration

Has the plywood transom been replaced prior to you replacing it?

The HUGE plywood backer on the exterior of the transom, and what looks to be cracks that were welded along the top of the transom trim cap make me think it's been replaced or was temp fixed previously. The bolt holes look to follow the lip of the splashwell where it connects to the transom, and I don't recall seeing it done that way before.

A: Stainless thru bolts w/ 5200 on each bolt & in each hole then painted or bare aluminum transom

B: JB Weld each hole, sand smooth & paint the transom, w/ solid plywood transom behind the filled holes, JB Weld should stay in the hole. But the splashwell will still need to be fastened to the transom, stainless screws...

A requires thru holes for the bolts, and lots of SS bolts, nuts & washers, but gives you the option of a bare aluminum transom. B requires a lot of JB Weld, and a bunch of filling & sanding, then you need to paint the transom, bare is no longer an option....
 

jigngrub

Fleet Admiral
Joined
Mar 19, 2011
Messages
8,155
Re: 1974 Starcraft Supersport 16 restoration

Those 40 bolts are to hold your splashwell on and reinforce everything.

Your boat looks real nice, but...

Did you build a "sinker" I didn't see any trace of floatation under the decking in those pics, do you not care that your boat will sink to the bottom instead of floating?
 
Joined
Feb 19, 2012
Messages
15
Re: 1974 Starcraft Supersport 16 restoration

Thanks you guys. I think I will probably put the bolts back and use the 5200 on them.

Yes, I did build a "sinker".:facepalm: This is my first boat and first restoration and there was no foam in the floor when I got it so I just went with the same thing. I do care, just wasn't really aware of the need at the time and its kinda too late to go back I think. We don't really get much weather out here and the boat will never really sit at a dock or in the water without me around so I'm hoping I won't have that problem.
 

jigngrub

Fleet Admiral
Joined
Mar 19, 2011
Messages
8,155
Re: 1974 Starcraft Supersport 16 restoration

Yes, I did build a "sinker".:facepalm: This is my first boat and first restoration and there was no foam in the floor when I got it so I just went with the same thing. I do care, just wasn't really aware of the need at the time and its kinda too late to go back I think. We don't really get much weather out here and the boat will never really sit at a dock or in the water without me around so I'm hoping I won't have that problem.

I understand, and since you're a newb to boat restoration I'll explain something to you.

If you'll go to any of the new aluminum boat dealers and look at the brand new (especially V hulls) boats, you will see that the decking is held in place with exposed fasteners. The fasteners are easy to see in the boats with vinyl decking and you might have to dig around to find them with a boat that has carpet... but the majority of new aluminum boats will have exposed deck fasteners.

The deck pieces are wrapped with carpet or vinyl before being installed in the boat and then fastened down, this leaves the fasteners exposed so you can remove the decking without messing up you nice carpet or vinyl. This comes in very handy if you need to make a livewell system repair of mend a gash in the hull below deck. Just remove your decking and fix whatever needs fixing and then replace your decking... and no one can ever tell that you had to remove your decking and you don't mess up your expensive deck finish.

I ripped out the carpeting in my boat and replaced it with marine vinyl, I also wrapped my decking with the vinyl and then installed it with rivets (exposed). If you'll keep your spacing uniform and inline it doesn't look bad and I think exposed rivets adds a certain touch of "heavy duty manliness" to the job.;)

If you look closely, you can see the exposed rivets on my deck in this pic:
DSC02248.jpg

Should I ever need to get below deck, all I have to do is drill out the rivets, remove my decking, fix what needs fixing. and then lay my decking back down and install new rivets. No one will ever know what I did and I won't have to buy new vinyl.

IMO, exposed deck fasteners in an aluminum boat are a "must"!
 
Joined
Feb 19, 2012
Messages
15
Re: 1974 Starcraft Supersport 16 restoration

I hear you, we (my buddies are helping me) discussed that at length, then I cut the vinyl I bought too small and the decision was made for us. Because of how I countersunk the main bolts I could peel the vinyl out if something went wrong and it could be converted down the road for another bit of vinyl. Like you said, newb!
 

djpeters

Lieutenant Commander
Joined
Jun 9, 2010
Messages
1,824
Re: 1974 Starcraft Supersport 16 restoration

Nice job on that interior! Looks really nice.
 

jasoutside

Supreme Mariner
Joined
Dec 20, 2009
Messages
13,269
Re: 1974 Starcraft Supersport 16 restoration

Hey AZ, it's all good, I'm a newb too. Just doing my best to learn as I go along ya know.

Hey, I'd be be real concerned about the lack of flotation too. I don't know if this might be an idea for ya...

What about popping out the seat pedestals (and what ever else you can) to access sub deck of your boat. Then you could go with expanding foam:

http://www.uscomposites.com/foam.html

Just a thought anyway.:)
 

dozerII

Admiral
Joined
Oct 25, 2009
Messages
6,527
Re: 1974 Starcraft Supersport 16 restoration

AZ to answer your question about the trim piece for the top of the transom. Take the old one with you to a sheet metal shop, have them shear and break a new one for you out of similar aluminum, then with the help of two or three friends and a rubber mallet you can form it to the curve of the transom pretty easy. But I would replace the transom first, that is why it cracked.
 
Joined
Feb 19, 2012
Messages
15
Re: 1974 Starcraft Supersport 16 restoration

I just got the new transom bolted in last night, everything seemed to line up and fit well. Good idea on the sheet metal shop. Used 5200 on all those extra bolts and I will paint the whole transom with my left over easypoxy prior to putting a motor on.

I am thinking about popping those seats out and pouring in foam now. I could also pack some up front around where the livewell and battery are, there is a lot of empty space up there, and also behind the trim pieces on the sides of the boat. One thing I'm worried about is that I didn't seal the rivets so there will be some small amount of moisture in the bilge area and I wonder how badly the foam will soak this up. Would I end up worse off in the long run with the foam sitting under there there soaked?

No work today, ASU homecoming vs. UCLA in a couple hours but I'll be back on it tomorrow.
 
Joined
Feb 19, 2012
Messages
15
Re: 1974 Starcraft Supersport 16 restoration

Haha, indeed I have, I used to work for a Birmingham company and had to hear way too much of that! It builds character to root for a consistent loser...and between going to the Sun Devils and Cardinals this week I am building some serious character.

I got my fuel tank and various trim installed over the weekend. Camera is laying in the boat in my friends garage. The fuel tank inlet and the filler in the splashwell are not lined up and I'm not going to be able to get the filler hose I have to connect the two, way too stiff to make the bend. I have one idea that involves a small boarding deck built in on top of the splashwell with the filler installed directly through it to the tank inlet, but other than that I need to find an elbow or some more flexible fuel filler line.

Hope no one out there is being hit too hard by this storm, looks really ugly.
 

SuperGrover

Seaman Apprentice
Joined
Oct 2, 2012
Messages
36
Re: 1974 Starcraft Supersport 16 restoration

You'll notice the front bow surface aluminum has been removed and I replaced the two weak braces with a solid piece of plywood to mount my trolling motor on. The aluminum will go back on top and it also got sprayed with the white bedliner.

Hey AZ - looks like a great project! I'm just starting one myself (much less progress so far than you've made).

So you took the aluminum skin off of the bow deck - did you just take off the aluminum trim along the inside to get that off? You didn't have to touch the outer rub rail did you? How easily did it come out?
I've taken one of the rear corner pieces off above the trasom to get a better look and it looks like the decking is just flat. I was expecting to find it stamped at a 90 degree edge to give the gunwale more strength. That would make it harder to get out and replace, so I'm pleased with what I've found so far. I have alot of holes in my deck! It would be great if I could just take that trim off the inside and slip a new skin in/on the old stuff.

I'm also planning on lockable ski-type storage in the floor to keep paddles, boat hook, etc. in that would not be secure otherwise. I also think it'll help to air out the bilge area. I had been searching in vain using 'ski locker' or something :facepalm: - 'teak hatch' worked though! Geesh - thanks!
 
Joined
Feb 19, 2012
Messages
15
Re: 1974 Starcraft Supersport 16 restoration

Grover - you do have to remove the outer rub rail too, there are rivets underneath it through the skin that you have to drill out.
Drill out the rivets under the nose piece and remove it, then pry out the rubber rub rail from the metal edging. There are screws under there that you remove to pull the metal railing back, then you'll see the rivets along the top edge of the skin. I removed just enough screws to pull the rubrail out of the way of the skin. If the wood underneath is in bad shape you should replace it while you have the chance, it's not bad with the skin off. The vertical wood piece that you can see is another story.
It all went back together surprisingly well and is more solid than it started, just make sure to use big rivets on the nose piece and bend it back closed with a strong clamp or hammer if it gets bent open when you remove it (it bends fairly easy). Hardest part was getting the rubber pushed back into the metal rub rail - I used silicone spray and a rubber hammer and screw driver to force it back in.
Good luck!
 
Joined
Feb 19, 2012
Messages
15
Re: 1974 Starcraft Supersport 16 restoration

Here are a couple pics with the new transom, splashwell and gas tank installed:

attachment.php


attachment.php


So the windshield that came with the boat is not the original but I'd like to use it. The glass extends well beyond the console so its going to have to run down the gunwale. I'm thinking of notching the aluminum trim that runs around the upper inside edge of the gunwale and then mounting the side of the windshield on top of some rubber trim down the gunwale. Does anyone think that will be a problem? I don't know how much these old boats flex.

attachment.php
 

Attachments

  • DSCF0512.jpg
    DSCF0512.jpg
    131.6 KB · Views: 30
  • DSCF0513.jpg
    DSCF0513.jpg
    133.7 KB · Views: 28
  • DSCF0511.jpg
    DSCF0511.jpg
    137.6 KB · Views: 28
Top