1983 Chrysler 45hp Lower Unit Seals

CApTaInGoOfy

Petty Officer 3rd Class
Joined
Aug 17, 2015
Messages
91
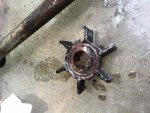
What started off as a simple impeller change ended up turning into a lower unit rebuild almost. Took my impeller housing off to see that it was scored up and the seal on top of the body was chewed up and no good. That part # is FK1073 for the whole water pump kit which includes the impeller, impeller housing, 4 bolts, wear plate, and the pin for the driveshaft.

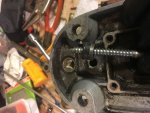
For some reason the genius that I am I unscrewed the shift rod from the lower unit *don't ask becuase I have no idea why I did it..* Trying to screw it back in for me anyway is impossible, tried for a solid 2 hours and it went no where. So onto separating the lower unit halves!

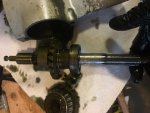
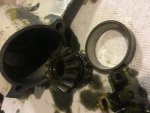
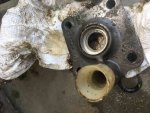
Drained the L/U fluid and took the prop off with no issues. Now the cage bearing was left, started to tap it with a rubber mallet to the side so I can get enough to tap it out and it happened. The top area of the cage bearing broke off... After a few choice words, I kept going, removed the cage bearing. Took the two nuts that hold the L/U halves together off. Backed the top nut off until it was flush with the stud and tapped on it to separate the 2 halves. Removed the gears and the fork and yolk. Took the shift rod seal off as well as the prop shaft seal, with some encouragement via a heat gun. Now the driveshaft seal is another issue. Still in, can't seem to get it out. Sprayed PB on it and will let it sit till Monday, as I have work this weekend 16hr shifts... hooray!

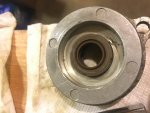
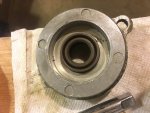
Now for the prop shaft seal and the driveshaft seal, which way do the seals face. The prop shaft when I removed it was a PIA. The flat side as I call it was flush against the housing and the side with the spring in it was facing out. So I had nothing to tap on or get a screwdriver on. Maybe if I had a seal puller it would've been easier but it was a little odd for me. So my question is which was does it face, flat side out or the circular spring side out?

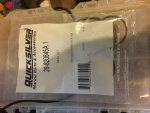
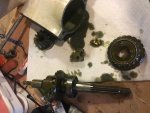
The lower unit seal kit part # FK1074 but it is replaced with part # 26-820645A1

Pics to follow if I can figure out this 400000 size limit for uploads....
 

CApTaInGoOfy

Petty Officer 3rd Class
Joined
Aug 17, 2015
Messages
91
No Title
 

Attachments

  • photo272512.jpg
    photo272512.jpg
    374.2 KB · Views: 0
  • photo272515.jpg
    photo272515.jpg
    381.7 KB · Views: 0
  • photo272517.jpg
    photo272517.jpg
    380.3 KB · Views: 0
  • photo272518.jpg
    photo272518.jpg
    362.9 KB · Views: 0
  • photo272528.jpg
    photo272528.jpg
    385 KB · Views: 0
  • photo272529.jpg
    photo272529.jpg
    388.6 KB · Views: 0
  • photo272534.jpg
    photo272534.jpg
    380.4 KB · Views: 0
  • photo272535.jpg
    photo272535.jpg
    375.9 KB · Views: 0

CApTaInGoOfy

Petty Officer 3rd Class
Joined
Aug 17, 2015
Messages
91
No Title

Which way does this seal have to face? This is the prop shaft seal within the cage bearing housing.
 

Attachments

  • photo272531.jpg
    photo272531.jpg
    378.7 KB · Views: 0
  • photo272533.jpg
    photo272533.jpg
    379.2 KB · Views: 0

Nordin

Commander
Joined
Jun 12, 2010
Messages
2,594
The flat side should facing in to the housing.
If you take a closer look at the seal it has a lip and it is made so the water pressure should make the lip to seal even more.

When you assemble the seals the shift shaft seal too be very careful when you start to tapp at the seal to get it back in the Cage.
It is importent that the seal enter straight if not you maybe damage it.
I would suggest you to put a small amount of oil to the seal surface and start tapping carefully and looking at the seal to see that it is not "capsizing".

Use a wrench socket with right size to push it in.

If you have a vise, use it with a wrench socket and press it in instead of tapping with a mallet.
Be careful soo the seal would not capsizing.
 

jerryjerry05

Supreme Mariner
Joined
May 7, 2008
Messages
18,083
Pic #2 is the correct way.
I'm lucky and have a 20T press and use it to install seals etc.
Like Nordin said be real careful not to install at an angle
​Use a liquid sealer under the shift shaft seal.
But not too much.
​It can get on the rod and gum up the works and cause hard shifting.

The mating surface under the seal, it needs to be cleaned and sanded(lightly) before installing the seal.

​The old shift rod seal, the metal in it and the housing, the dissimilar metals cause corrosion and swell and can pinch the seal making it hard to shift.
 

CApTaInGoOfy

Petty Officer 3rd Class
Joined
Aug 17, 2015
Messages
91
The flat side should facing in to the housing.
If you take a closer look at the seal it has a lip and it is made so the water pressure should make the lip to seal even more.

When you assemble the seals the shift shaft seal too be very careful when you start to tapp at the seal to get it back in the Cage.
It is importent that the seal enter straight if not you maybe damage it.
I would suggest you to put a small amount of oil to the seal surface and start tapping carefully and looking at the seal to see that it is not "capsizing".

Use a wrench socket with right size to push it in.

If you have a vise, use it with a wrench socket and press it in instead of tapping with a mallet.
Be careful soo the seal would not capsizing.

Flat side facing in. Thanks. You said that the water pressure would make the lip seal even more. But for the bearing cage the lip would be facing toward the bearings inside the lower so I guess instead of water pressure it would be the pressure of the lower unit oil? The flat side would be facing the prop and water.
 

Nordin

Commander
Joined
Jun 12, 2010
Messages
2,594
Maybe we are misunderstand each other, but if you assebled it as the old was, it will be okey.
The spring that tight the seal around the propshaft shall be facing to the water area, against the prop.
 

CApTaInGoOfy

Petty Officer 3rd Class
Joined
Aug 17, 2015
Messages
91
Maybe we are misunderstand each other, but if you assebled it as the old was, it will be okey.
The spring that tight the seal around the propshaft shall be facing to the water area, against the prop.

When I removed it the flat side was facing in like the second picture and the spring area was facing out. Just thought it was weird as the driveshaft seal the flat side of the seal is facing up and the spring side the side with the lip is facing into the lower. Thanks for the info just wanna make sure I put it in the right way.
 

CApTaInGoOfy

Petty Officer 3rd Class
Joined
Aug 17, 2015
Messages
91
Well finished installing all the seals and reinstalled the lower unit. I always have a hard time installing the lower unit back. Was steady turning the prop and stabbing blindly and kept getting a 1-2 inch gap...smh. Took a break before I did something drastic like throw the lower!

Sat down grabbed a flashlight and looked into the darkness and saw a rubber boot like thing up there. Quick look at a parts diagram and it was a driveshaft spline seal part # 819293. I'm not sure if it is supposed to be glued onto the retainer part # F338271 but I put it back on and went back to turning the prop and stabbing away again. This time I had roughly 1/2 inch gap. Grabbed the bolts and started to thread them on by hand and bolted them back up slowly and the lower buttoned up with no issues. As I sit here and write this I just realized I didn't put any anti-seize on those bolts....

Still have to replace the telltale hose that I had and than I'm gonna fill a barrel up with water and fire it up in the morning! Hope everything works out good. I guess I will remove the lower unit bolts and put some anti-seize on them tomorrow before I fire it up. Might as well change the plugs while I'm at it!

Thanks again for all the pointers! Will add pics later, PIA to resize the photos that my phone took one by one to be able to upload them...has to be an easier way.
 

jerryjerry05

Supreme Mariner
Joined
May 7, 2008
Messages
18,083
Antisieze can get hard if exposed to salt water.
​It was designed to insure head bolts were able to come out after years of torture.
​The torque a head bolt can take is a whole lot more than the screws that hold the pump.
​If the Antisieze gets hard? you'll twist off the heads of the pump screws.
The grease makes sure they come back out.

​Use thread chasers and clean the screws before reassembly.
​A build up of old sealer, dirt and sand, can make the screws hard to go in and can cause problems and even make the threads strip.
 

CApTaInGoOfy

Petty Officer 3rd Class
Joined
Aug 17, 2015
Messages
91
Antisieze can get hard if exposed to salt water.
​It was designed to insure head bolts were able to come out after years of torture.
​The torque a head bolt can take is a whole lot more than the screws that hold the pump.
​If the Antisieze gets hard? you'll twist off the heads of the pump screws.
The grease makes sure they come back out.

​Use thread chasers and clean the screws before reassembly.
​A build up of old sealer, dirt and sand, can make the screws hard to go in and can cause problems and even make the threads strip.


Thanks will take the 4 bolts that hold the lower on and clean them and clean the body where they screw into and than use marine grease. Last thing I want is this thing to be frozen together! On the impeller housing I just used 2-4-C I seem to use it on a lot of things. Just a dab here...dab there...I even grease up the splines on the prop with it not sure how long it will last as water is bound to get on it somehow as it's submerged etc. but it won't hurt. Thanks again for this tip and all the others!
 
Top