


hellion68
Cadet
- Joined
- Jun 2, 2011
- Messages
- 14
:facepalm: So I have already been reading on here about what you all have to say about this, and, I want to start off with a big thanks too all the help I have already recieved from you all!
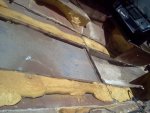
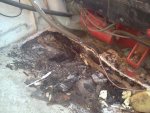
I know what your answers are for the floor and stringers, I am already tearing all the stringers and the floor up. Replacing all the wood, and chopped glass mat with epoxy resin.
Question #1
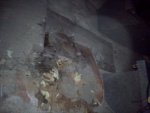
When I get into the engne mounting, how close does this have to be for alignment of the drive. Not sure if it will need replacing as of yet but from the look of things so far im am sure it will need it!
The Transom looks to be in great shape so far but we will see.
Question #2
What kind of wood should I use for the stringers Plywood or solid? I have 1/2 inch 5 ply exterior grade for the floor and to rebuild the engine compartment.
So is this ok, or should I use somthing solid, and what kind of solid wood or thicker exterior grade plywood?
Thanks in advance, ill try to post some pics here. As I enjoyed reading all your resto pics and would like to document this as well!
I know what your answers are for the floor and stringers, I am already tearing all the stringers and the floor up. Replacing all the wood, and chopped glass mat with epoxy resin.
Question #1
When I get into the engne mounting, how close does this have to be for alignment of the drive. Not sure if it will need replacing as of yet but from the look of things so far im am sure it will need it!
The Transom looks to be in great shape so far but we will see.
Question #2
What kind of wood should I use for the stringers Plywood or solid? I have 1/2 inch 5 ply exterior grade for the floor and to rebuild the engine compartment.
So is this ok, or should I use somthing solid, and what kind of solid wood or thicker exterior grade plywood?
Thanks in advance, ill try to post some pics here. As I enjoyed reading all your resto pics and would like to document this as well!
") ).
).