1986 Smoker-Craft Avanti Deck *hoopty alert*

TBigLug

Cadet
Joined
Jul 8, 2020
Messages
18
photo335359.jpg First off, total newbie here. I perused your forums for a week gathering info to help me fix up this old boat. Haven't set foot on a lake in 15 years, haven't even been in a boat in probably 20 so taking on a fixer upper seemed like a great idea 🤣🤣🤣😂😂. My wife has always wanted a boat but due to major major surgeries can't sit to get comforrable in your standard V bottom aluminum bass boat we all grew up in. She also cannot steady herself walking in those. There's only two types of boats we knew she could ever be comfortable in, a pontoon or a deck boat. Either one gives the stability to not rock around when you are repositioning and gives plenty of stretch out room for the two of us to go fishing. We don't live on a lake so a toon was out since they are a major pain to launch and recover on a daily basis. What a coincidence, I happen to prefer a deck boat 😇😇
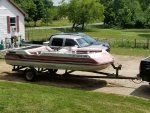
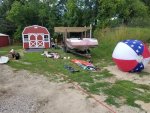
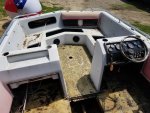
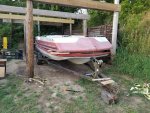
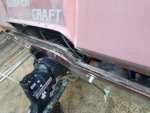
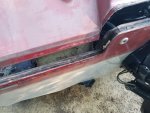
. I happened across this old girl on FB Marketplace a couple weeks ago and jumped on it. Knowing full well it was gonna be a tear down from word go and the most expensive $500 ever. Never wrenched on a boat before but I'm pretty handy so why not. The goal is to get it back together by the end of the summer so my wife can enjoy at least one ride around a lake before her complete shoulder replacement. Also a realistic goal of shoring it up to get 5-10 years out of it. I would expect, given my work schedule, we'll be lucky to get it out 10 times a year and it will be a trailer queen the other 355 days. Here's some pics from the day we brought it home. I'll get some more posts up in the coming days to get everyone up to speed. I am looking forward to the advice and knowledge I hope you are willing to share with a newb. Thanks.
 

Attachments

  • attach10901040.jpg
    attach10901040.jpg
    129.9 KB · Views: 2
  • photo335352.jpg
    photo335352.jpg
    129.9 KB · Views: 1
  • photo335361.jpg
    photo335361.jpg
    217.9 KB · Views: 2
Last edited:

TBigLug

Cadet
Joined
Jul 8, 2020
Messages
18
So, first things first, get it home and clean out ALL the stuff packed tight in every nook and cranny in the boat. Lotsa good stuff, lotsa junk too. Came with 12 life jackets, both lights, dock bumpers, set of skis, ski rope, and a buncha junk. Every compartment was wet. No doubt because with all the equient packed in their nothing was gonna breathe. Next step, up comes the carpet. Bear in mind I have 0 idea how boat floors are constructed. I'm a big dude, 6'5 375 lbs so a solid floor is a must. I fell through this one just looking at it. Me being the naive type I thought, no big deal, tear up some old plywood, lay down some new, throw some outdoor carpet back down, good as new. Boy to be young and foolish again. Luckily, previous owners were straight when they said it didn't run, they weren't mechanics and all they did was take it to local boat mechanic dude to have it winterized every year. A new starter and battery and she purrs like a kitten. Even had to Google what muffs were so I could get it started. Did mention I don't have any boaters in my circle or family?
 

Attachments

  • photo335362.jpg
    photo335362.jpg
    239.7 KB · Views: 1
  • photo335363.jpg
    photo335363.jpg
    249.3 KB · Views: 1
  • photo335364.jpg
    photo335364.jpg
    231.2 KB · Views: 1
  • photo335365.jpg
    photo335365.jpg
    160.3 KB · Views: 1

TBigLug

Cadet
Joined
Jul 8, 2020
Messages
18
So, I joined a FB group for fixing boats and shared my story. It was then I first heard the phrase split your hull and pull your cap. Sounds scary, Googled it, oh man, looks even scarier! Turned out to be the easiest part so far. Pulled rubber, pulled screws, insert wedge, good to go. Someone's definitely been in this hull before. No sealant of anything between the top half and bottom and no rivets, all screws. Turns out you need 4 big guys and some barley pops to actually get the cap off. I had none... First look at delaminated transom, 1/3 shot, close eyes and move ajead. More on that later (that's the part of the story that'll drive the real mechanics nuts).
 

Attachments

  • photo335353.jpg
    photo335353.jpg
    247 KB · Views: 1
  • photo335366.jpg
    photo335366.jpg
    152.2 KB · Views: 1
  • photo335367.jpg
    photo335367.jpg
    138 KB · Views: 1
  • photo335368.jpg
    photo335368.jpg
    172.2 KB · Views: 1

TBigLug

Cadet
Joined
Jul 8, 2020
Messages
18
Next best thing, 4 chain hoists!


Success!


The floor was completely rotten and soft. Not knowing how boats are constructed I was shocked to see the seats and front floor were all molded in together and the entire bottom hull was capped in fiberglass and had a layer of carpet under the fiberglass floor if the top half???


Misc rot everywhere...


Rat's nest of dash wires.


TBigLug

Cadet
Joined
Jul 8, 2020
Messages
18
So here's where the trouble starts, lol.


Floor under the driver's seat. Remember; 6'5 375, lol.


Shoddy patch job someone else attempted at some point.


This was a weird piece of plywood glassed to the botton of the front floor. I don't think it was factory cause it was all lopsided and half assed. Could have been though. Lots of questionable build practices in this. I love it, lol.

 
Joined
Jul 27, 2019
Messages
58
I will tag along! Good luck on the project! My best advice is to get comfortable in a good respirator, eye protection and a tyvek suit. You will definitely need an angle grinder and flap disk to grind the hull. After a lot of work, it will be a great boat!
 

briangcc

Commander
Joined
Jul 10, 2012
Messages
2,398
I haven't done this work but I've read lots of posts on it :)

I don't see it mentioned anywhere so I'll ask...how did you support the hull before you split it? Most build a cradle around the boat to avoid the hull changing shape as you deconstruct it.

Also...takes lots and lots of measurements and pictures as you're bound to have that "oh carp" moment as you don't recall where something goes.

Best of luck!
 

TBigLug

Cadet
Joined
Jul 8, 2020
Messages
18
I actually didn't. I left the motor in and existing stringers intact to hold the hull in shape. They were solid enough to support the boat while I added in my own floor supports to line up with the plywood that would be running across the boat instead of it's length. Took down about 12 measurements and all have stayed true to within the flexibility of the cap. I had one floor support that was broken that I reattached and that seemed to bring everything inline better than it was before.

I have another weeks worth of work already done I haven't put up yet but I will soon to get it up to where it is now.
 

TBigLug

Cadet
Joined
Jul 8, 2020
Messages
18
Next step, foam and deck removal. All the foam was completely waterlogged. Standing water in hull. Rotten everywhere.


This is what was left of the main floor support that ran from end to end down the center.


TBigLug

Cadet
Joined
Jul 8, 2020
Messages
18
Everything tore out. Ready to start sanding the lip off the hull where the deck was tabbed to the hull.


Lip all ground off. What a dusty nasty mess that was.


Next up, floor support templating day. YAY!


Center supports test fitting.


TBigLug

Cadet
Joined
Jul 8, 2020
Messages
18
Just as an FYI, this is why they say not to use standard treated plywood on a fancy boat you want to last forever.


And this is why you don't fillet stringers with PL Premium adhesive on your fancy forever boat if you want properly laid smooth strong fiberglass tabbing. Off gassing while curing causes alot of bubbles.


TBigLug

Cadet
Joined
Jul 8, 2020
Messages
18
These are my throttle control box woes. Some kind of universal unit. Top cap is broken and none of the switches work. If anyone has one for parts cheap I would love to have a new cap (broken screw holes) and switches. Or a whole nother unit.


Also, my fiberglass got here. Ordered the wrong cloth but the spirit was right, lol. Great company but horrendous shipping charges. $50 to ship what you see here.


TBigLug

Cadet
Joined
Jul 8, 2020
Messages
18
Finally to the point I'm at currently. Floor supports are in and bedded. Waiting 2 more days so I know they are good and cured. Then I'll start tabbing them to the hull. I should mention as well it's been well North of 90 ever since I got the boat home. Hopefully I can get the bulk of it done before I go back to work.


mickyryan

Rear Admiral
Joined
Apr 18, 2016
Messages
4,216
just jumped on to check it out , awesome job so far man great job on gantries ! i went lazy route and used 2 3500 lb electric remote controlled winches on mine lol :)
 

mickyryan

Rear Admiral
Joined
Apr 18, 2016
Messages
4,216
that shifter looks like a mercury shifter just missing its tags i bet you can find a replacement on ebay pretty cheap, also there shouyld be a model number on back side of it or inside .
 

TBigLug

Cadet
Joined
Jul 8, 2020
Messages
18
This was the only stamping I could find on it. No tags, I think they all sluffed off sometime in the last 40 years, lol.


Back side.


On another site someone mentioned Morse controls? Another time someone mentioned US Marine?
 

TBigLug

Cadet
Joined
Jul 8, 2020
Messages
18
Fail. How did I screw this one up? First attempt at glassing one of my bulkhead/ floor supports in. When I finished it was completely transparent. Looked like it had good adhesion. I pre wet the wood 2 times so it wouldn't draw the resin away from the glass which is what I'm assuming it did. Sanded, cleaned then wiped with acetone before that. What's the temperature range for glassing? Was in the low 90's yesterday and I did this after dinner. It's gonna be 94°+ today so I won't be doing anything during the day and rain tomorrow. I'll start grinding it off today before it gets too hot to work outside. Any advice before I waste $200 in fiberglass for this part of the project? Thanks.


mickyryan

Rear Admiral
Joined
Apr 18, 2016
Messages
4,216
wet it out and stay with it , it happened to me as well early on due to our heat, i started doing all my glasswork at night watching closely dew points to be sure dew wasn't gonna set in while i applied it. i also used a chip brush cut about a quarter inch from the base to make sure all the air was out , seemed to work better then a roller or anything else .once i had air out it never seemed to be much a problem . i used 4" rollers to wet out sometimes id cut them down to 2" depending on room and stuff.
 

mickyryan

Rear Admiral
Joined
Apr 18, 2016
Messages
4,216
as far as control it very well could be a morse made for us marine either way mercruiser makes a control very much like that or quicksilver
 
Top