Re: 1987 125hp Force Never ending problem
No I have the original shop manuals on CD.
Any way you could send me a copy of that page? PDF / DOC ?
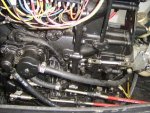
Control cable removal/installation (engine)
Disconnect the negative battery cables. Disconnect and ground the spark plug leads. (safety precaution)
1.To install the cables, route both cables through the lower support plate grommet and position each cable near the respective cable anchor.
2.Install the cable connector to each cable. The throttle cable connector is longer than the shift connector and is spring loaded.
3.Install the throttle cable into the fixed clamp and align the detent in the swinging clamp with the groove in the throttle cable. Close the swinging clamp. Install and tighten the clamp screw securely.
4.Shift the remote control into the NEUTRAL position. Hold the throttle linkage on the engine against the idle stop screw. Pull the throttle connector towards the stud and adjust the throttle connector until the throttle connector will just touch the stud with the slack pulled out of the cable. See Figure 58.
5.Tighten the jam nut securely against the throttle connector.
6.Stretch the connector over the stud, pull back on the outer sleeve and install the connector over the stud.
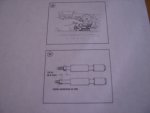
7.Shift the remote control into FORWARD gear, full throttle position. Rotate the propeller to ensure full gear engagement. Return the remote control to the idle position. The throttle connector should stretch approximately 1/4 in. (6.3 mm) when properly adjusted. See Figure 59.
8.Install the shift connector into the fixed clamp and align the detent in the swinging clamp with the groove in the shift cable. Close the swinging clamp. Install and tighten the clamp screw securely.
9.Shift the control box into the NEUTRAL position. Manually shift the engine shift linkage until the interlock switch is activated by the interlock cam. The propeller should spin freely in either direction. If the propeller engages either gear when the interlock switch is aligned with the cam, refer to Gear Shift Linkage Adjustment in chapter nine.
10.Pull gently out on the shift cable to remove slack and adjust the connector until it is centered over the shift linkage stud. Tighten the jam nut securely against the connector.
11.Pull back on the connector outer sleeve and install it over the shift stud.
12.Reconnect the spark plug leads and battery cable.
Sorry for the poor picture, the writing in figure 59 says:
1/4 in.
(6.3 mm)
cable stretched at idle