1988 Bayliner Project

boedekerj

Seaman
Joined
Jul 24, 2017
Messages
71
At the recommendation of kcassels (who has rendedered fantastic advice for me before), I'm jumping in the right way, and posting my project.

Like many, I went out to pick up a "great deal" of a boat. Like many, i found out too late that it wasn't. The outboard had been recently serviced, and was operable, but the owner seemed to not know ANYTHING about boating. (When I looked at it, I asked "where's the bilge plug?" The answer was, "It didn't come with one...") The boat had been (poorly) primed and painted, but the floor seemed very stiff, compared to previous boats I'd examined. After offering what I was sure to be an insult, the gentleman's wife urged the man to accept, and I picked up a boat, trailed and operable outboard for $500.

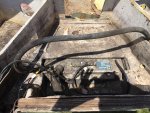
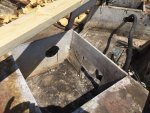
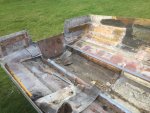
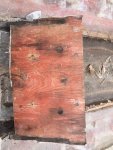
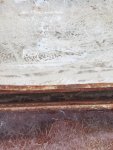
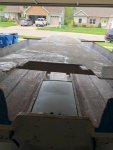
Of course, getting home and pulling some things to thoroughly clean the inside and outside, I found...
and second floor, with nearly identical carpet to the original.

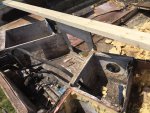
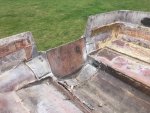
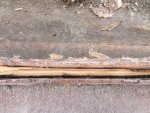
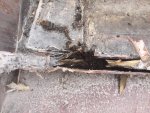
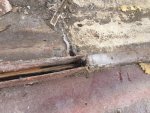
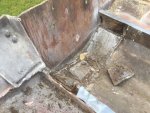
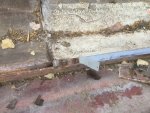
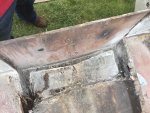
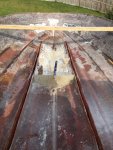
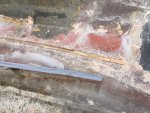
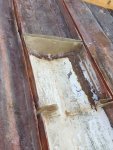
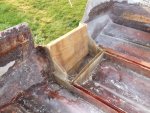
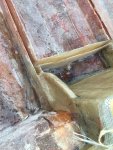
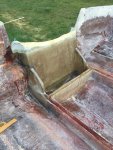
Fast forward; The rot didn't stop at the deck, or the foam, or the transom, or the stringers.

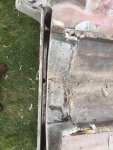
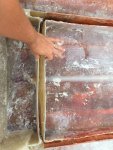
So, I started measuring and gutting.

I'm posting this project about 2 months into the progress. The project started in August of last year, and had to stop in October due to the temps of Iowa. (No more glassin' under 60 degrees.)

As I type this, it's 25 degrees on April 1st, and I can't wait to get out and finish up this project.

Pic's attached are mostly in order of date, however, I don't have any "post seacast pour" yet.

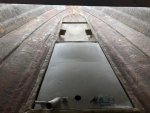
Next steps; Grind back the stringers/bulkheads around the fuel tank, then add a layer of 1708. (Due to having to overgrind the stringers for tank fit.) Then, sand, clean and two-part epoxy prime+paint the tank prior to install. Then install floor, re-cap, and start the "re-install" of the seats and other deck fixtures.

More updates to come, and thanks to the "all over the place" questions I've been popping in other folks threads. It's all been very beneficial to me.
Pics are coming....
 
Last edited:

boedekerj

Seaman
Joined
Jul 24, 2017
Messages
71
[No message]
 

Attachments

  • photo287542.jpg
    photo287542.jpg
    170.3 KB · Views: 1
  • photo287571.jpg
    photo287571.jpg
    665.9 KB · Views: 1
  • photo287572.jpg
    photo287572.jpg
    766.3 KB · Views: 1
  • photo287573.jpg
    photo287573.jpg
    740.6 KB · Views: 1
  • photo287574.jpg
    photo287574.jpg
    707.3 KB · Views: 1
  • photo287575.jpg
    photo287575.jpg
    708.4 KB · Views: 1
  • photo287576.jpg
    photo287576.jpg
    764.4 KB · Views: 1
  • photo287577.jpg
    photo287577.jpg
    807.4 KB · Views: 1
  • photo287578.jpg
    photo287578.jpg
    831.5 KB · Views: 1
  • photo287579.jpg
    photo287579.jpg
    768.6 KB · Views: 1

boedekerj

Seaman
Joined
Jul 24, 2017
Messages
71
[No message]
 

Attachments

  • photo287580.jpg
    photo287580.jpg
    673.8 KB · Views: 1
  • photo287581.jpg
    photo287581.jpg
    649.9 KB · Views: 1
  • photo287582.jpg
    photo287582.jpg
    667.1 KB · Views: 1
  • photo287583.jpg
    photo287583.jpg
    713.2 KB · Views: 1
  • photo287584.jpg
    photo287584.jpg
    756.9 KB · Views: 1
  • photo287585.jpg
    photo287585.jpg
    1.3 MB · Views: 1
  • photo287586.jpg
    photo287586.jpg
    695.1 KB · Views: 1
  • photo287587.jpg
    photo287587.jpg
    760.9 KB · Views: 1
  • photo287588.jpg
    photo287588.jpg
    648.8 KB · Views: 1
  • photo287589.jpg
    photo287589.jpg
    770 KB · Views: 1
  • photo287590.jpg
    photo287590.jpg
    716.5 KB · Views: 1
  • photo287591.jpg
    photo287591.jpg
    545 KB · Views: 1
  • photo287592.jpg
    photo287592.jpg
    687.4 KB · Views: 1
  • photo287593.jpg
    photo287593.jpg
    782.4 KB · Views: 1

kcassells

Fleet Admiral
Joined
Oct 16, 2012
Messages
8,738
Hey Bo...Great to see you posted a thread. I've seen the vid. When are you going to pour the seacaste? So now you can keep all your questions here on your thread.
sphelps has a few threads with seacate. He may be your go to guy. Hi Sam! :D
 

boedekerj

Seaman
Joined
Jul 24, 2017
Messages
71
Hey Bo...Great to see you posted a thread. I've seen the vid. When are you going to pour the seacaste? So now you can keep all your questions here on your thread.
sphelps has a few threads with seacate. He may be your go to guy. Hi Sam! :D

Already done, man. I didn't video the actual pour, because I didn't have enough hands. :)
I'll put up some "after" pour/current state pics when I can get this thing out, finally. I am just bored to death with all of this cold.
 
Last edited:

sphelps

Supreme Mariner
Joined
Nov 16, 2011
Messages
11,475
The pours are usually pretty uneventful .. Make sure you use all the paste hardener as the instructions say .. It helps to have an extra hand for adding the fibers while your mixing .. Other than that just mix and pour ... It;s not as runny as you would think ... Rubber mallet to tap on the skins to release any air .. Boedekerj looks like a great prep job to me ! How many gallons did it take ?
 

boedekerj

Seaman
Joined
Jul 24, 2017
Messages
71
The pours are usually pretty uneventful .. Make sure you use all the paste hardener as the instructions say .. It helps to have an extra hand for adding the fibers while your mixing .. Other than that just mix and pour ... It;s not as runny as you would think ... Rubber mallet to tap on the skins to release any air .. Boedekerj looks like a great prep job to me ! How many gallons did it take ?

Thanks sphelps! 10 gallons. And it was ALL of 10 gallons with no leftover. I have to say, this stuff is TOUGH. After it cured, I took a 5# hammer, and swung it at the bulkhead, and it bounces off it like it's hitting an Abrams tank. I wish I could afford the self leveling SeaCast for the deck, but from what I calculate, it would take another 16+ gallons, and take the budget for this WAAAAAY over.
 

Big Gee

Petty Officer 2nd Class
Joined
Jun 29, 2011
Messages
173
Looks like a great project. :eagerness:

I'll follow along with interest.
 

dezmond

Senior Chief Petty Officer
Joined
Jul 21, 2010
Messages
760
A great tip when pouring seacast for a transom that I did is to us a palm sander with out the sandpaper to help get the bubbles out. It worked great for me when I poured mine years ago on my first project boat.

Have fun with the build. I have a ''89 Capri 1750 that I will be ripping apart in the next few weeks.
 

sphelps

Supreme Mariner
Joined
Nov 16, 2011
Messages
11,475
Desmond I was told by Sabina , the sea cast owner , NOT to vibrate it with a sander .
It separates the fibers from the liquid and they settle down . You want the fibers to be uniform in the mix though out .
I had the same thoughts about vibrating it so I asked . She said deffinataly don’t vibrate ...
 

boedekerj

Seaman
Joined
Jul 24, 2017
Messages
71
Desmond I was told by Sabina , the sea cast owner , NOT to vibrate it with a sander .
It separates the fibers from the liquid and they settle down . You want the fibers to be uniform in the mix though out .
I had the same thoughts about vibrating it so I asked . She said deffinataly don’t vibrate ...

I'm grateful to have the attention of some previous SeaCast users. Even though my pour is over and done, I'll have some questions in the coming weeks you guys might be able to help with.

While I didn't vibrate, surely I have to think that brief vibration would help to get air bubbles out without causing separation?

Sabine is a fantastic resource. That said, there were sometimes that her advice had me like; "Seriously? I'll do it, but dang, this seems a bit much." I dunno. I always followed the advice. I don't know about your experience, but it took some photographic and video PROOF to get her approval for me to even place the order for SeaCast. I'm not sure if it was paranoia, experience, superb quality assurance, or some combination thereof. I guess in the end, it doesn't matter. You can't shoot through the stuff with a .22 (per other users), so I imagine it'll last forever. And even if I thought she was a bit paranoid, she certainly made sure that you cut NO corners.

I will say this; I will probably never gut/re-string a boat differently. That extra $300 (difference between wood or SeaCast transom/stringers) is worth (to me) the peace of mind, even if I don't own it forever. I will never have to worry about a rotten transom busting off of a boat that I re-worked, stranding (or worse, drowning) passengers.

...admittedly, I'm a paranoid dude when it comes to safety. Same reason I can't sell a car with dodgy brakes, or worn ball joints/tie-rod ends. If something happened afterwards, I'd feel horrible, even if I warned them.
 

kcassells

Fleet Admiral
Joined
Oct 16, 2012
Messages
8,738
Did you ever take pics after you poured the stringers etc. Id like to see them if ya have them.
Women and vibrators in the same sentence, can't quite put a finger on it.:joyous:
 

Davetowz

Petty Officer 1st Class
Joined
Sep 19, 2012
Messages
235
Did you ever take pics after you poured the stringers etc. Id like to see them if ya have them.
Women and vibrators in the same sentence, can't quite put a finger on it.:joyous:

Glad someone else went there first. :)
 

boedekerj

Seaman
Joined
Jul 24, 2017
Messages
71
Ay-yoh!!!! Once I get a decent day, I'll take pics and post. It's in the same spot as after the pour. It won't break into 50 until next Sunday.
 

kcassells

Fleet Admiral
Joined
Oct 16, 2012
Messages
8,738
Don't mind KC .. He's just been hanging out with Micky for too long ... :rolleyes:

mickyryan
Hey yo? Micky I dink we just got dunked?:happy: It's the Micky Kev Show. :D

images
 

boedekerj

Seaman
Joined
Jul 24, 2017
Messages
71
Update: Boat floor complete, tabbed/glassed in. Here are pics of post-seacast, pre-floor install. The stock Aluminum tank held 50 PSI of air, so I figured it was still good, although it was showing signs of corrosion due to absolutely CRAPPY factory install. (Water just sat on the top of the tank, causing decent pitting.) I light sanded (220 grit) the tank, hit it with vinegar, then painted it with 2 part epoxy high-build aluminum paint.

Question to any who may still remember this project; When joining the top and bottom hulls, where do I apply the sealant? At the bottom where the caps meet? do I draw a bead on the bottom/inner hull and then drop them together? The factory appeared to use clear silicon, and only under the aluminum trim ring on the outside of the hull seam. I've got plenty of 5200, but don't want to use it if it's not prudent to do so.

ALSO, The cap does not line up perfectly. It's about 1/16" off from the old holes. Any tips for shifting the cap to the stern without cracking the glass?

Thanks ya'll!
 

Attachments

  • photo292234.jpg
    photo292234.jpg
    93 KB · Views: 0
  • photo292235.jpg
    photo292235.jpg
    104.6 KB · Views: 0
  • photo292236.jpg
    photo292236.jpg
    126.9 KB · Views: 0
  • photo292237.jpg
    photo292237.jpg
    119.8 KB · Views: 0
  • photo292238.jpg
    photo292238.jpg
    152.3 KB · Views: 0
  • photo292239.jpg
    photo292239.jpg
    141.3 KB · Views: 0
Top