1989 Evinrude Lower unit

Otte

Petty Officer 1st Class
Joined
Jul 26, 2011
Messages
273
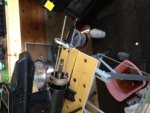
Pulled out bearing carrier and put new seal on it. Lined up reverse gear, put washer on back side of bearing and put carrier back in bullet. I am so close to seating this back in but still 1/8" out from finished. I have very lightly tapped edges without movement of the carrier down. I followed the OMC service manual. Am I missing a step, trick or something here?

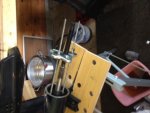
I pulled the carrier out with a $13 gear pulling set from Harbor Freight. The OEM version was in the $200 range. The $13 version seemed to work just fine but I did have to buy 12" 1/4" threaded rod and some nuts to make it work, had the washers in my stock pile already.
 

Attachments

  • photo203644.JPG
    photo203644.JPG
    37.5 KB · Views: 0
  • photo203645.JPG
    photo203645.JPG
    40.5 KB · Views: 0
Last edited:

racerone

Supreme Mariner
Joined
Dec 28, 2013
Messages
38,454
Looks like it should go in a lot further than 1/8".---Pull it apart and have a look in there.
 

Otte

Petty Officer 1st Class
Joined
Jul 26, 2011
Messages
273
I don't see anything that is holding it up. It is in neutral so gears are not in contact. Do I have to fabricate a press is the carrier does not slide back in place?
 

racerone

Supreme Mariner
Joined
Dec 28, 2013
Messages
38,454
You may have to give it a bump to squeeze the o-ring so it goes in.---Then pull it in place with the screws
 

Otte

Petty Officer 1st Class
Joined
Jul 26, 2011
Messages
273
No Title

Well the picture did not load and in the mean time I tapped my homemade, wood, bearing carrier put 'er in 'er with my rubber/plastic mallet and the carrier popped in. So Racerone you were right.
 

Otte

Petty Officer 1st Class
Joined
Jul 26, 2011
Messages
273
No Title

By tapping the carrier in with the flat piece of wood I got the carrier flush with the bullet of the engine housing. But Racerone was right that it needed to go more than 1/8" be to right. I still had some play in the prop shaft with the carrier flush. So I cut a piece of oak dowel and used it to tap the edges of the carrier in a bit more.
 

Otte

Petty Officer 1st Class
Joined
Jul 26, 2011
Messages
273
No Title

So this is how the bearing carrier looked after it was all the way in the engine housing.
 

Otte

Petty Officer 1st Class
Joined
Jul 26, 2011
Messages
273
No Title

Now I have the carrier in and I want to do a bench pressure test the lower unit to see if the seals are holding. I went to harbor freight to buy a pressure gauge but they were sold out. By using the specs in my newly purchased OEM service manual (BTW - it makes everything easier... so spend the $25 and buy one.) I did a bench test on leaks before I put the foot back on the engine. . So I made my own with some help and ideas from folks on youtube.

Here is my solution for a pressure test pump. Another Harbor Freight purchase.
Foot bike pump for $10
A three part inflater kit for $1.99
The fill adapter and tube from my lower unit lube pump set up.

[edit] So I took the tubeless valve from the kit and pushed it in the tubing on the fill adapter side of the pump, hooked the tubeless valve in to the pump and screwed the adapter in to the lower unit fill hole.

Hooked it all up like you see below. The service manual called for an initial test of a 6 psi, watch and listen for leaks. If you past that test then pump it up to 18 psi, watch and listen for leaks. The lower unit passed both tests... nice.
 

Attachments

  • photo203637.JPG
    photo203637.JPG
    49.5 KB · Views: 0
  • photo203638.JPG
    photo203638.JPG
    37.7 KB · Views: 0
  • photo203642.JPG
    photo203642.JPG
    31.3 KB · Views: 0
Last edited:

Otte

Petty Officer 1st Class
Joined
Jul 26, 2011
Messages
273
No Title

Lower unit is back in place.
 

Attachments

  • photo203643.JPG
    photo203643.JPG
    32.5 KB · Views: 0
Top