Robert4Winns
Petty Officer 2nd Class
- Joined
- Oct 28, 2009
- Messages
- 146
Here I go, starting my first boat project.
Background: Last summer the wife and I decided to purchase a boat. It was my first boat so I was looking for something relatively cheap to learn on, so if I messed it up I did not have much invested in it to lose. But I didn?t want to get a full-on project boat. I found and purchased a 1989 Four Winns 160 Freedom toward the end of the summer. The boat appeared in good condition, the vinyl was in great shape and the engine ran fine, just a little rough.

The floor felt very solid throughout and as much as I knocked around in different places on the back of the transom I could not hear any difference. (Do you see where this is going?) I got it home and gave it a tune up and it ran great so we took it out to the lake three times. Then the weather started to turn and it was raining every weekend. I was storing the boat in the driveway with a cover on it, but it was still getting wet in the boat.
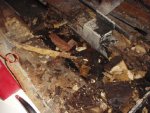
One day after pulling the cover off to let it dry out I notice that the carpet in the ski locker was not drying out. Why would they put carpet in the ski locker? I decided that I would pull out that carpet and put some other surface in the ski locker; maybe bedliner like in a truck. When I removed the carpet I found that the fiberglass at the bottom of the ski locker flexed when I put weight on it and the wood under it was totally rotten.
Then I looked at the bulkhead between the ski locker and the fuel tank and a large portion of it looked black. I hit it with a screw driver and it went right through. I got a cut-off wheel on my dremel and did some exploratory surgery. The wood in bulkhead was mostly gone and it was just the fiberglass skin holding water and mulch.

There was a hole in the bulkhead for water to drain back under the gas tank and to the bilge, but I don?t think it ever really dried out because of the carpet. I vacuumed out the water and mulch where the bulkhead used to be and it kept filled back up with water. This can?t be a good sign. After a number of times it stopped. There could only be so much water in there right. The wood at the bottom of the ski locker was only partially rotten. The top ? inch of the poured-in foam underneath was wet but past that point it looked dry. It has dried out now and still feels solid.
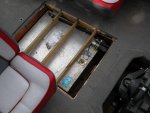
After finding this I decided to see what else was rotten, so I took off the fuel tank cover. There is a large section of deck that is held in place with screws that go into the stringers and can be removed to provide access to the fuel tank. The braces over the gas tank are sitting in notches in the stringers, which probably would be fine as long as they are sealed. But each cross brace was held in place by a screw into each stringer, providing a potential means for water to get into the stringers.

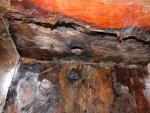
The stringers have large sections where you can see dark wood through the fiberglass. The dark part appears to be rot and makes a hollow sound when I knock on it with a screwdriver.

I also found similar rot at the back part of the stringers in the bilge. Before I knew better I thought the darkness in the bilge area was grease stains but I now know that the stringers have rot back there and that the bottom part of the transom is rotten as well.
So, what started out as a plan to pull the carpet out of the ski locker to help it dry out more quickly has ballooned into a plan to gut the boat and replace the transom, stringers and deck. I have been reading a lot of threads here and am sure I will be able to handle the job, hopefully with timely advice from other members of this forum.
I did not want to take on a project that was this time consuming when I was looking at boats, and actually passed on a boat because I found out that it needed a new transom. Now it looks like I will be replacing a transom anyway. I considered paying someone to do the work, but I want to make sure it is done right. I?m sure there are shops out there that would do a fine job, but unless I am looking over their shoulders the whole time, how will I know they didn?t cut corners. Also, nobody that I pay to do it will care as much about doing a good job as I do. I also thought about getting rid of this boat and buying another boat, but I like this boat and if I got another boat I wouldn?t know what might be wrong with it, although I now believe I am better informed about what to look for. Once I am done I will be confident that I have a sound boat.
So here I go. My plan is to pull out the seats, the engine and the deck and see just how much damage there is. I know I will be replacing the transom, but I may not have to replace all five stringers. Please follow along and let me know if you think I am missing something or am about to make a mistake along the way.
Sorry for the long-winded post. I would have made it shorter, but I didn?t have the time.
Background: Last summer the wife and I decided to purchase a boat. It was my first boat so I was looking for something relatively cheap to learn on, so if I messed it up I did not have much invested in it to lose. But I didn?t want to get a full-on project boat. I found and purchased a 1989 Four Winns 160 Freedom toward the end of the summer. The boat appeared in good condition, the vinyl was in great shape and the engine ran fine, just a little rough.
The floor felt very solid throughout and as much as I knocked around in different places on the back of the transom I could not hear any difference. (Do you see where this is going?) I got it home and gave it a tune up and it ran great so we took it out to the lake three times. Then the weather started to turn and it was raining every weekend. I was storing the boat in the driveway with a cover on it, but it was still getting wet in the boat.
One day after pulling the cover off to let it dry out I notice that the carpet in the ski locker was not drying out. Why would they put carpet in the ski locker? I decided that I would pull out that carpet and put some other surface in the ski locker; maybe bedliner like in a truck. When I removed the carpet I found that the fiberglass at the bottom of the ski locker flexed when I put weight on it and the wood under it was totally rotten.
Then I looked at the bulkhead between the ski locker and the fuel tank and a large portion of it looked black. I hit it with a screw driver and it went right through. I got a cut-off wheel on my dremel and did some exploratory surgery. The wood in bulkhead was mostly gone and it was just the fiberglass skin holding water and mulch.
There was a hole in the bulkhead for water to drain back under the gas tank and to the bilge, but I don?t think it ever really dried out because of the carpet. I vacuumed out the water and mulch where the bulkhead used to be and it kept filled back up with water. This can?t be a good sign. After a number of times it stopped. There could only be so much water in there right. The wood at the bottom of the ski locker was only partially rotten. The top ? inch of the poured-in foam underneath was wet but past that point it looked dry. It has dried out now and still feels solid.
After finding this I decided to see what else was rotten, so I took off the fuel tank cover. There is a large section of deck that is held in place with screws that go into the stringers and can be removed to provide access to the fuel tank. The braces over the gas tank are sitting in notches in the stringers, which probably would be fine as long as they are sealed. But each cross brace was held in place by a screw into each stringer, providing a potential means for water to get into the stringers.
The stringers have large sections where you can see dark wood through the fiberglass. The dark part appears to be rot and makes a hollow sound when I knock on it with a screwdriver.
I also found similar rot at the back part of the stringers in the bilge. Before I knew better I thought the darkness in the bilge area was grease stains but I now know that the stringers have rot back there and that the bottom part of the transom is rotten as well.
So, what started out as a plan to pull the carpet out of the ski locker to help it dry out more quickly has ballooned into a plan to gut the boat and replace the transom, stringers and deck. I have been reading a lot of threads here and am sure I will be able to handle the job, hopefully with timely advice from other members of this forum.
I did not want to take on a project that was this time consuming when I was looking at boats, and actually passed on a boat because I found out that it needed a new transom. Now it looks like I will be replacing a transom anyway. I considered paying someone to do the work, but I want to make sure it is done right. I?m sure there are shops out there that would do a fine job, but unless I am looking over their shoulders the whole time, how will I know they didn?t cut corners. Also, nobody that I pay to do it will care as much about doing a good job as I do. I also thought about getting rid of this boat and buying another boat, but I like this boat and if I got another boat I wouldn?t know what might be wrong with it, although I now believe I am better informed about what to look for. Once I am done I will be confident that I have a sound boat.
So here I go. My plan is to pull out the seats, the engine and the deck and see just how much damage there is. I know I will be replacing the transom, but I may not have to replace all five stringers. Please follow along and let me know if you think I am missing something or am about to make a mistake along the way.
Sorry for the long-winded post. I would have made it shorter, but I didn?t have the time.
Attachments


Last edited: