1990 Four Winns Horizon - Amateur DIY

pantaloonz

Petty Officer 1st Class
Joined
Nov 28, 2014
Messages
237
Hi All,

Been reading iboats forums since I started looking for a boat. Made a good deal ( I think). Picked up a 1990 Four Winns Horizon 190 with a 5.0L OMC and orginal Four Winns Trailer for $1,400.
profile1.jpg

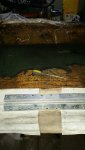
It looks pretty sharp on the outside and the engine is in good shape. The previous owner stored it inside for 20 of it's 24 yr old life. I had it winterized a few weeks back and the boat shop only had to replace a filter and a rusted trim fuse (I knew that was an issue). The inside was rough but I've NEVER done any vinyl or fabric work at all, so I started simple with the cushions that sit next to the engine housing.

This was my very first time working with vinyl, it's a bit rough but they are also removalbe seats that will be stored half the time.
bad_seats.jpg
Then came the forward bow cushion, same deal ... working with corners is tough!
bow-cush.jpg

Then In an attempt to avoid taking of the cushional along the gunwall in the bow.. I tried sewing the seams back together... You ever try sewing 20+ yr old vinyl? It's like trying to sew together ...20 yr old vinyl. it plain sucks, but not much more than ripping them out.

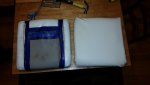
Next came the flip up cushions in the bow. After removing the old vinyl, I reused the plastic and cushion, covered it in white vinyl, then wrapped the whole thing in indoor outdoor fabric (blue) the strip of white vinyl you see is for the hinge.
flipup.jpg

All together they started to look nice! But those darn sidewall cushions!! ICK!!
bow1.jpg

I did end up re-doing ALL the side wall cushions.. Thank Heavens for T-NUTS!!!
I also grabbed some grey vinyl for accent.
bow2.jpg


bow3.jpg

I know it's not perfect, but heck the cushions come together nicely and they are all nicely attached to the sidewalls in such a way..that should I lose my mind .. I could take them out again.

If anyone is interested, I have quite a technique down for those sidewalls, but it does mean you'll drill through fiberglass (not fun) and have to thread screws from behind without seeing them :) .. hahaha

Anyway.. I'm gonna take on the back to back seats next ... they are horrific, I plan to just make flat back and flat butt cushions on a new frame..

I don't see a lot of videos/tutorials on redoing back to back seats.. so any pointers would be great.

Any constructive comments appreciated too!
 

Attachments

  • bad_seats.jpg
    bad_seats.jpg
    52 KB · Views: 1

Woodonglass

Supreme Mariner
Joined
Dec 29, 2009
Messages
25,932
Not too bad but...Buy yourself an old 1950's sewing machine (one of the All Steel one's that are Heavy as heck) and then watch YouTube to learn a bit about sewing, and then sew your vinyl covers. They'll look Sooooo much better. It's not as hard as you might think..

This guy couldn't even spell sewing machine a year ago and now look what he's doing... http://forums.iboats.com/forum/boat-...rebuild/page40

We'll be here to help you if you decide to go for it!!!;)
 
Last edited:

tpenfield

Moderator
Staff member
Joined
Jul 18, 2011
Messages
18,820
It looks like you are attempting to replace seat covers as a single piece of vinyl, rather than cutting out the shapes from the old cushions and sewing them together. It is OK for small/thin pieces, but for larger more intricate cushions, you will want to go the sewing route.

I used the Admiral's household sewing machine to re-upholster the rear seat of my Formula 242. This was my first attempt at vinyl work and I had to hide a few mistakes.

Before
Seat-Before-After.jpg

After

So, you may want to disassemble the old cushion vinyl and use it as patterns for the new stuff. I think you will be happy with the extra effort.
 
Last edited:

Tnstratofam

Commander
Joined
Aug 18, 2013
Messages
2,679
Looks pretty good. I'm sure that bow section was no fun at all. Check out some of the other restos where guys are doing their own sewing. As stated above the results are well worth the extra effort. Woodonglass, Sphelps, Corjen1 all have some good looking interior projects. I hadn't seen Tpenfields work before. It looks great as well. Lots of projects to check out, and get some ideas as well as help.
 

SDSeville

Lieutenant
Joined
Mar 19, 2010
Messages
1,486
It looks great. The long term fix for a real clean restoration would be to learn to sew as mentioned above (or pay someone to sew). However, what you have done will work just fine and I am sure it looks way better than what was in there before.
 

pantaloonz

Petty Officer 1st Class
Joined
Nov 28, 2014
Messages
237
All,

Thanks for all the great replies.

No, the side cushions in the bow were no fun at all. But I did learn ALOT!! and I'm very glad to have pulled them off and re-did them.

I agree with the sewing aspects. Because the bow cushions we so beat up and we didnt have a sewing machine yet, I decided to continue on with the wrap and staple method. I have rambunxious kids too, so I'm not going to go through a tremendous effort only to have them destroy them (they will eventually)

My wife really like the gray cushion on the front and asked me very encouragingly to reconsider the blue flip up cushions... so I agreed. Here's what they look like now:

new_bow.jpg

The gray around the white, looks simple and clean, we like it.

My mother in law just gave us one of her other sewing machines, and we've created a work space downstairs in the basement. I will get a bit of experiece on the machine when we redo these suckers:

back2back.jpg

This picture makes these look WAY better than they are. That leads me to question 1. We all hate the extra poofy sides and the removeal middle cushions are hard like rubber. We want simple (flatter) perimeter cushions and all grey removal cushions (won't be same size as those). I'm rebuilding the wood frames as it's ALL rotten. Would you guys still recommend sewing? Maybe even more so beacuse they are on seats?

My gut is telling me just line the backs and the seats with the cushion depth I want (I bought the new cushion) cover the cushion with vinyl, staple and wrap it to the frame. Then make removal cushion in basic rectangles, similar to what I have done above.

Because we're not reusing the vinyl, we're not replicating the sewing pattern.. so I'm not sure how to proceed.. I think what we'll do it sew the removable rectangle cushions since those are very straightforward...???

I suppose using the wood frame as my guides, plus knowing the cushion depth would allow me to set my own patterns? Maybe I should create the patterns with simpler cloth first?..

Lastly I've got to rebuld the engine cover. Half the thing is duct tape..but this guy has me questioning many things!!! firstly here's a pic!

cover.jpg

Vinyl protected hinge... ok no problem I alreadd did that on the flip cushions.

Foam was lined on the underside, it's dark green not thick, but dense. Is this a special type of foam desiged to be around engines? Heat/noise cancelling?

Lastly this would has been "glassed"; is that the term? The wood is rotting underneath the fiberglass liner(shell). do I have to Fiber Glass the engine cover? ICK!!
I've read on fiberglass/epoxy seams like this box, simple to build out of plywood has just tripled in complexity due to the fiberglass..
 

Attachments

  • cover.jpg
    cover.jpg
    73.6 KB · Views: 1

rickryder

Commander
Joined
Jun 24, 2010
Messages
2,722
Check my resto on my four winns 210...I did all the seats and an engine box for some ideas
 

pantaloonz

Petty Officer 1st Class
Joined
Nov 28, 2014
Messages
237
Thanks Rick

Love your work on the seats and engine cover, very solid and clean.

How long did it take you to get the engine box frame (no paint or insulation)..basically how long to apply the fiberglass and resin

I've been comfortable with all the work I've done thus far on my boat, but I'm super hesitant to do anything with fiberglass and resin.

I've read you can only mix a quart at a time, it has to be perfect temp: between 75-85 degrees, it goes on slow.

It seems like that engine cover would take my 12hrs to get right?

-P
 

rickryder

Commander
Joined
Jun 24, 2010
Messages
2,722
Thanks Rick

Love your work on the seats and engine cover, very solid and clean.

How long did it take you to get the engine box frame (no paint or insulation)..basically how long to apply the fiberglass and resin

I've been comfortable with all the work I've done thus far on my boat, but I'm super hesitant to do anything with fiberglass and resin.

I've read you can only mix a quart at a time, it has to be perfect temp: between 75-85 degrees, it goes on slow.

It seems like that engine cover would take my 12hrs to get right?

-P
Thanks! I think the entire engine cover project burned up the weekend build it,prep it glass it and gel-coat it... Laying glass is really not that hard...you just need to be prepared with all your materials cut to size...a good application process and it goes pretty quickly. I find using the small 1" paint rollers work great to lay down resin and smooth out fiberglass cloth.... As far as perfect temp.... well all my glass work was done in Feb. in NJ outside in a tarp tent... as long as you can warm up what your glassing to get the resin to kick off you'll be just fine.
 

Corjen1

Lieutenant Junior Grade
Joined
Aug 24, 2013
Messages
1,237
Cool Boat, here is a link that has helped me a bunch!!! Along with the folks here!!! I have about 150 in my machine and table...well worth it compared to the quotes you will get to have someone redo them...

http://www.jalopyjournal.com/forum/...nd-rolls-and-pleats-and-a-small-panel.372599/

5 pix from the bottom is a good trick on handling the corners....it a must to get rid of as much excess material and you can......
 

pantaloonz

Petty Officer 1st Class
Joined
Nov 28, 2014
Messages
237
Update incoming:

First off I want to thank Corjen and Rick for the great replies, they are very helpful and I'll be practicing on some material sewing soon. After I get the hang of it a little bit, I'll most likely making a 20 to 40' of welting/piping to encourage myself to use it!!

I built the support boxes for the seats. Pay no mind to the material inside the boxes, it's extra outside fabric we had kicking around and I figured I'd put it to good use. I built the pieces and then screwed them together. I know that's not ideal as you can see the seams and the screws. .. However my back to back seat plans include overlapping sides that will cover the top and middle screws.. so I'll make sure to seal and cap the bottom ones and you'll hardly even see the construction. I made sure to cut a vent hole too which will be covered with a snap or velcro flap.
inside-frame.jpg frame.jpg

I bought some better material for the back to back boat seats, so I'll start building the frames for those in the next fews weeks, while I learn to sew!!!

-Pantz
 

Corjen1

Lieutenant Junior Grade
Joined
Aug 24, 2013
Messages
1,237
Pantaloonz, sailrite has some very good instructional/how to videos. This on stadium seat cushions is the one I started with, used it to make a couple different ones in order to practice with the material, the machine ect.....it lays out the basic techniques that you will use on most of the seat projects.

http://www.sailrite.com/How-to-Make-a-Stadium-Cushion-Video

Also, other than the machine itself, this "piping foot" has shown itself worth its weight in gold.....makes perfect piping and when mating the piping to a top plate or box plate, puts the stitch exactly where it needs to be. ( nice and tight to the welting)

http://www.ebay.com/itm/BROTHER-SHO...949?pt=LH_DefaultDomain_0&hash=item43b07649a5

Good Luck and keep up the great work!!
 

rickryder

Commander
Joined
Jun 24, 2010
Messages
2,722
You can also buy piping online if you dont want to make your own....of course it will be a few dollars more then making it yourself :)
 

pantaloonz

Petty Officer 1st Class
Joined
Nov 28, 2014
Messages
237
Hi!

I cut the basic frames for the backs, seats, and triangle fill boards (space between the seats). I was very happy with my new jigsaw and planer I recently picked up.

I went for more standard lengths and widths ( the former seats had measurements like 14 and 5/8 blah!!) I'll be dry fitting the hinges and stuff in the next few weeks.

Thanks for the info on the foot, I'll definitely look into that I did some practice sewing this weekend, and made some practice piping. My biggest concern using the piping is that for that seam my needle has to go through 4 layers of vinyl to form the seam...

should my piping be made from vinyl? I don' think my sewing machine can handle that :)

-Pantz
 

Woodonglass

Supreme Mariner
Joined
Dec 29, 2009
Messages
25,932
What kind of sewing machine do you have? What needle/Thread size are you using?
 

Corjen1

Lieutenant Junior Grade
Joined
Aug 24, 2013
Messages
1,237
Also, when sewing, use the longest stitch you can...my machine will go to 6 per inch... dont want your material to end up like perforated notebook paper....
 

pantaloonz

Petty Officer 1st Class
Joined
Nov 28, 2014
Messages
237
Hi Woodnglass,

It's a Singer 28/08 Beige Bomber! (ok I added the beige bomber part). It's definately a household style machine, but I have the manual!

According to the manual it can sew "light leather" and vinyl. My mother in law said she put her "leather needle in it" and adjusted the settings to what I should use.

Of course the first thing I did was mess with the settings and tangled up the bobbin... but I got past all that. Here's a little strip of test runs!

sew-test.jpg

So now a piping questions... I've included a visual to make this question easier. I want to use different colored vinyl between the two back to back seats and probably for the overlap on the bottom of the seats (not pictured) would you use piping where the middle vinyl will meet the seat vinyl or just a straight seam?
See arrow: Piping or no piping for the RED-Blue seam?
sew-seats.jpg


Thanks!

Corjen.. I do not understand the long stitch..sorry too new to this.

Pantz
 

Attachments

  • sew-seats.jpg
    sew-seats.jpg
    66.8 KB · Views: 1
  • sew-seats.jpg
    sew-seats.jpg
    66.8 KB · Views: 2
  • sew-seats.jpg
    sew-seats.jpg
    66.8 KB · Views: 43

Corjen1

Lieutenant Junior Grade
Joined
Aug 24, 2013
Messages
1,237
Think of the stitch length as how many times the needle pokes a hole in you material in a given distance........if it pokes a bunch of holes in a short distance (an inch) or only a few holes per inch......Now think of perforated notebook paper....it has a bunch of tiny holes along the spiral (stitch line) in order to tear out the page easy.....on your seat seams/stitches, you want the fewest holes.....not as east to tear....

On your machine, the manual says it has a stitch length selector, the higher the number, the more needle holes per inch....you want the lowest it will do.

 
Last edited:
Top