1990 SeaRay 180 Project

kevtec95

Cadet
Joined
Apr 23, 2015
Messages
9
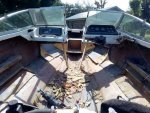
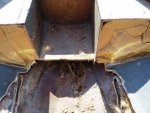
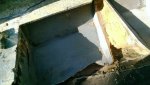
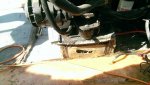
Ok guys, new here.. I've recently purchased a 1990 SeaRay 180 with the 4.3 liter V6.. My wife and i wanted something for the family to enjoy while on a budget (like most people).. We found the boat here in TN for a reasonable price for age etc.. My Father and I go to look at it finding the hull in great shape (love the looks of the boat) also find it had a new Long Block installed back in 2011 (with all paperwork) and which did run great and all. Did notice a soft spot on the floor just in front of the ski locker while looking it over so figured floor work will be involved.. So I end up buying it and all once i got it home is when the "not so much" fun begins.. My father and i come to find the whole floor is rotted along with most of the stringers.. However surprisingly they appeared to be in decent shape near the Transom area.

Ok so now onto a few of my questions.. I have searched and have been reading a lot from here lately but still would like to have a honest answer from the more experienced.

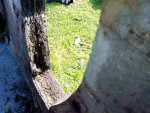
* Is drilling small 1/4 inch holes in lower sections of the transom (inspecting the wood shavings) and tapping with plastic handle the best ways to determine signs of rot in a I/O Transom??

* Been back and forth on the lumber to use for the Floor and Stringers, i know Marine Grade would be best but $$ is a big factor.. Been leaning towards exterior grade 3/4 MDX and sealing well with Resin/Glass

* Epoxy or Poly Resin, my thought is spend more on the Epoxy but won?t have to use as much Fiberglass since the Epoxy is a stronger resin alone.

*Will 7.5oz E Glass Cloth be enough to strengthen and seal the stringers, I will be coating the underside and topside of the new floor with it as well.


I really appreciate any input and or Thoughts regarding this.. Really looking forward to this project and learning as much as possible.
 

Tnstratofam

Commander
Joined
Aug 18, 2013
Messages
2,679
:welcome: Sounds like you've got yourself a nice project. Soft spots in the deck are good signs of rot laying in wait. As far as checking the transom for rot that's correct, drill 1/4 inch holes about 1 and 1/4 inches deep from the inside working your way up from as low as you can get. Dry golden shavings indicate good wood. Wet dark shavings indicate rot. As far as the resin question I'm not sure which is right, but I'm sure someone will come along with the right answer directly.


Post up some pics of your project when you can. And again welcome.
 

kevtec95

Cadet
Joined
Apr 23, 2015
Messages
9
Thanks tnstratofam.. It's definitely going to be a involved project, but looking forward to it! It's hard to decide on the Resin side.. For those who may provide feed back I am looking at the Medium Epoxy Resin from Uscomposites, or the Standard Marine Grade Poly Resin they offer.. Definitely over half the price for the Poly.. Just not sure if we want to have to worry about all the required layers using Poly vs the Epoxy. ha

I plan to get some pics over the weekend when we go to work on it.. should have some posted early next week. :)
 

Mr.Stickney

Petty Officer 3rd Class
Joined
Oct 1, 2014
Messages
94
Hey Kevtec!

I have the exact same boat. If its anything like mine condition wise you're in for transom stringers and floors and to be honest if you're putting a deck or stringers in in its already apart so you may as well do the transom instead of having to cut up a brand new deck in a couple years to do the rest of it. just my .02

http://forums.iboats.com/forum/boat...lding-and-hull-repair/9918254-project-sea-ray

You can check out mine at the above link and see what it looks like stripped apart.

I plan on using 17oz biax w/ csm for the whole project basically.
 

kevtec95

Cadet
Joined
Apr 23, 2015
Messages
9
Hey Kevtec!

I have the exact same boat. If its anything like mine condition wise you're in for transom stringers and floors and to be honest if you're putting a deck or stringers in in its already apart so you may as well do the transom instead of having to cut up a brand new deck in a couple years to do the rest of it. just my .02

http://forums.iboats.com/forum/boat...lding-and-hull-repair/9918254-project-sea-ray

You can check out mine at the above link and see what it looks like stripped apart.

I plan on using 17oz biax w/ csm for the whole project basically.


Oh wow.. definitely looks like how mine is.. We decided to do the Transom after taking some samples last weekend, found lots of wet black shavings. :facepalm: My Father got the motor pulled and everything off the back yesterday.. Its killing me i don't have the time to help him as much as i wish, and it's hard for him just to sit around waiting on me. haha Thats how we are thinking about it all.. might as well just get it done the right way the first time.

If you don't mind, what wood have you decided on using for Transom, Stringers, and deck?
 

kevtec95

Cadet
Joined
Apr 23, 2015
Messages
9
Ok guys, finally got around to posting pictures of the project.. Amazing how many other things come up in daily life to prevent you from doing what we really want. ha Such as the wife's car needing worked on, luckily i fixed the "transmission solenoid code" found it to be just a broken wire. Wew! avoided having to replace sensors or worse a transmission. :)

So on to the boat! I made it to my fathers last weekend to help do some more demolition on the boat.. After further testing the transom more we decided it would need to be tore out as well, so we managed to get the out-drive pulled and motor ready to be removed, this was going to happen in a couple of weeks but I get a message yesterday that the motor is out. My dad loves getting stuff done! All in all i'm happy how much has been done in just a couple of week.. Have been wondering if the very front section of the bow (see boat pic 3) can be patched into.. the wood seems to be good to that point.

I Will try keeping the updates coming.. Any feed back is definitely needed! ha
 

Attachments

  • Boat 1.jpg
    Boat 1.jpg
    31.8 KB · Views: 2
  • Boat 3.jpg
    Boat 3.jpg
    24.6 KB · Views: 2
  • transom1.jpg
    transom1.jpg
    30.1 KB · Views: 1
  • Boat 2.jpg
    Boat 2.jpg
    57.3 KB · Views: 1
  • Boat 4.jpg
    Boat 4.jpg
    69.5 KB · Views: 1
  • motor mounts1.jpg
    motor mounts1.jpg
    59.5 KB · Views: 2

JaCrispy

Petty Officer 1st Class
Joined
Jul 8, 2014
Messages
391
Cut the transom out from the inside, leave the outer fiberglass skin intact. Good luck! Stick with it and it will be done before you know.
 

Woodonglass

Supreme Mariner
Joined
Dec 29, 2009
Messages
25,929
Have been wondering if the very front section of the bow (see boat pic 3) can be patched into.. the wood seems to be good to that point.

I Will try keeping the updates coming.. Any feed back is definitely needed! ha

Yes but... you've got her down to this point, I'd want to do it all NEW unless you think it's going to be a major hassle to remove the front.
 

Mr.Stickney

Petty Officer 3rd Class
Joined
Oct 1, 2014
Messages
94
Oh wow.. definitely looks like how mine is.. We decided to do the Transom after taking some samples last weekend, found lots of wet black shavings. :facepalm: My Father got the motor pulled and everything off the back yesterday.. Its killing me i don't have the time to help him as much as i wish, and it's hard for him just to sit around waiting on me. haha Thats how we are thinking about it all.. might as well just get it done the right way the first time.

If you don't mind, what wood have you decided on using for Transom, Stringers, and deck?

Transom is getting 3/4" cabinet grade plywood. (7ply's vs 5 and less voids.... allegedly lol)

I was going to use 2 x # lumber as opposed to ply initially but my stringers got really dry as I got closer to the consoles and was quite thankful as I was not looking forward to taking the bow apart, still have a little more exploring to do before I make a hard fast decision on that one. The plan at the moment is that I intend on putting a new piece of 1/2" where the existing stringer was and then laminating another piece of 1/2" or 3/4" on the outsides offsetting and tapering the seams to help with load structure. From what I can tell , the main structure in this boat was actually the fiberglass, it was pretty thick. and only 1/2" ply on the stringers.

Deck will get 1/2" exterior grade.

Are you going to take out the old seat bases all the way to the hull? I've started doing that, but holy hell is that fuel fill hose a pain in the a$$.
 

kevtec95

Cadet
Joined
Apr 23, 2015
Messages
9
Transom is getting 3/4" cabinet grade plywood. (7ply's vs 5 and less voids.... allegedly lol)

I was going to use 2 x # lumber as opposed to ply initially but my stringers got really dry as I got closer to the consoles and was quite thankful as I was not looking forward to taking the bow apart, still have a little more exploring to do before I make a hard fast decision on that one. The plan at the moment is that I intend on putting a new piece of 1/2" where the existing stringer was and then laminating another piece of 1/2" or 3/4" on the outsides offsetting and tapering the seams to help with load structure. From what I can tell , the main structure in this boat was actually the fiberglass, it was pretty thick. and only 1/2" ply on the stringers.

Deck will get 1/2" exterior grade.

Are you going to take out the old seat bases all the way to the hull? I've started doing that, but holy hell is that fuel fill hose a pain in the *****.


Oh i see.. sounds like a good plan! I have been eyeballing a nice 3/4 sheet of Oak for the transom, need to figure out the exact thickness we have to reach for it though.. Would you or anyone else happen to know what it needs to be.. I believe Friscoboater used two 3/4 inch pieces laminated together for the transom on one of his boats.

And yes, definitely inspect the wood in the bow really well.. i thought we would be ok at a certain point but it's pretty close to completely cut out now.. Not looking forward to rebuilding that area! And yes we were confused about the structures under the floor as well.. they definitely used a lot of Fiberglass on the "Tunnels" for the ski locker and Gas tank area.. I'm definitely not complaining about it . haha We may try going with 3/4 inch exterior grade for the stringer and the Deck, would be nice and solid but not sure it's necessary for a boat this size.. may go with 5/8 or just 1/2.

We ended up taking out the seat bases completely.. yes, getting that fuel line out is not fun either! ha I am ready to see it come back together, at least see a small light at the end of the tunnel.
 

kevtec95

Cadet
Joined
Apr 23, 2015
Messages
9
Yes but... you've got her down to this point, I'd want to do it all NEW unless you think it's going to be a major hassle to remove the front.


Agree Woodonglass.. it's tempting to try saving a little time but we are this far so might as well do it right the first time.. :D
 

Mr.Stickney

Petty Officer 3rd Class
Joined
Oct 1, 2014
Messages
94
I measured my transom width to be 2-1/8", from what I have read you can be anywhere from 2" to 2 1/4" but I would err towards the high side as the worst thing would be to bottom out the input shaft in the coupler. Although we have the unique advantage of being able to move the motor anywhere we want to (within reason). I have a spare block lying around that should make it easier to mock up the engine mounts etc on the dry fit.

Haven't done the math yet on how I am going to get to 2"+, trying to find something that shows cured fiberglass widths.
 

kevtec95

Cadet
Joined
Apr 23, 2015
Messages
9
Ok guys.. I have put together my order for supplies.. And Wanted to double check the yardage of fiberglass i have planned to order is close.. I plan on using 17 oz biaxial (no mat) for the stringers/Transom, I have planned 15 yards for this.. Also have 7.5 oz Cloth to use on the Deck and possibly capping the stringers, i have 20 yards for this.. Do these amounts seem to be in the right neighborhood??


Thanks again!
 

Mr.Stickney

Petty Officer 3rd Class
Joined
Oct 1, 2014
Messages
94
What widths are you buying 38" or 50"?

Seems to be in the ball park based on the measurements I have taken. 20 yards may be a little overkill on the floor but if you're going to do the stringers as well could be good. Better to have extra than not enough.

How much resin are you buying off the bat? I take it you're using Epoxy?
 

kevtec95

Cadet
Joined
Apr 23, 2015
Messages
9
Going with 38" for the 7.5 oz and 50" for the 17 oz.. That's what iv been thinking "overkill" on the 7.5. It will probably be used just on the floor, figuring the caps will be sandwiched between a bunch of peanut butter when the floor goes down. ha.. I May drop down to 15 yards of the 7.5.

And yes, going with the Epoxy, figured it will be worth it in the long run.. Ordering the 5 gallon kit for now.. Hope it will be enough. What are your plans for resin?
 

Woodonglass

Supreme Mariner
Joined
Dec 29, 2009
Messages
25,929
A layer of 17oz fabric and resin will yield appox. 3/64" to 1/16" in thickness.
 
Top