1992 - 2002 Tohatsu/Nissan 25 Cylinder Boring Question

LukeFishWalker

Petty Officer 3rd Class
Joined
Jul 23, 2015
Messages
95
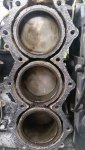
About 8 months ago I picked up a used 1992 Tohatsu 25 which I had intended to use as a part engine for my running 1992 Tohatsu 25. Well, as with a lot of other plans I have had.....I am considering having the parts motor repaired. The parts motor was used in brackish water it's entire life and has suffered some corrosion to the fire deck on the block. I was able to get a replacement cylinder block, head and lower crankcase which has a score in one of the sleeves. My question(s) are:
#1. I can find .020 and .030 piston sets.....If the sleeve doesn't clean up, is it safe to go beyond .030 and are there any aftermarket piston sets larger than .030?
#2. Is it recommended/safe to "Swap" the crank from 1 used engine block to another engine block?
#3. is there a reputable mail order machine shop which would be willing to install new sleeves just in case question #1 is a no?

I gave $35.00 for the complete parts motor and $100.00 for the (cylinder block, head & lower crankcase cover) parts.
If I can get this motor together for under $1,000.00 I would be one happy camper.
I'm pretty sure you're scratching your head wondering Why?
There's something special about this particular model of outboards.
I have very fond memories and experiences spent with my cousin who bought his 1992 Tohatsu brand new.

I saw replacement sleeves for around $90.00 each and piston sets in the range of $80.00 each.
I am taking a ride to a local machine shop tomorrow to determine if they would be willing to accept the work I need done.
I just don't want to get hammered by paying too much for a service.
If anyone could chime in on what they've had done lately with an average price range for machine work, I'd be happy to throw a big thank you.
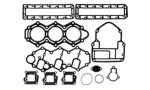
Also, is there a complete OEM set of gaskets/seals and bearing sets?

Here in the Lake Charles Louisiana area there is a business that has a pretty good reputation for doing good work.
I plan to go by there tomorrow and ask them what they'd charge me to do the work.

I appreciate any and all suggestions and comments.
Thanks, Lukus
 

Sea Rider

Supreme Mariner
Joined
Sep 20, 2008
Messages
12,345
Lukus,

Assume it's a 2 strokes model, right ? OM piston and rings go from standar size to next 0.5 mm set, no intermediate sizes available. If crank is good can swap between both engines. Tohatsu has several individual gaskets for them. Check with any Tohatsi dealer. Better enlarge cylinder to next size at a machine shop than replace sleeves..

Happy Boating
 
Last edited:

LukeFishWalker

Petty Officer 3rd Class
Joined
Jul 23, 2015
Messages
95
Sea Rider, yes.....The outboard I am trying to get going is the M25C2 which falls in the 1992 - 2002 Tohatsu / Nissan.
The one they made millions of and are by far some of the best 25hp 2 stroke outboards made to date.

I went to my local outboard repair shop and the guy acted like he didn't want to consider .010 or ,030.
OS pistons. He really didn't give me a reasonable excuse. He acted like all he wanted to do was .020.
Which made me kinda weary of why.
Wiseco still makes all 4 sizes:
happiemacmarine.com/wiseco-3157-series-tohatsu-piston-kit-2-677/
Can you think of any reason why the mechanic wouldn't want to consider anything but .020?
Is there a valid reason why .030 and .040 is not considered as an option?

I am going to speak to my nephew tomorrow.
He knows the machinist personally. The machinist goes into the outboard repair shop to do their machine work.
That's right, the outboard repair shop does not have a full time machinist, they call him to do their work
on their machine(s). In fact, the machinist has such a reputation that he goes into many shops and works
on their machines to bore, shave, line bore, magnaflux and any other removal of metal on engine parts.
That's the guy my nephew knows personally. Maybe I can get a straight answer from him.
Thank You For Your Time,

Lukus
 

Sea Rider

Supreme Mariner
Joined
Sep 20, 2008
Messages
12,345
Lukus,

Assume that techie wanted to go to next 20 piston & ring size, going to first 10 was impossible due to too much cylinder wear. Personally having all those four sizes to choose from would like going for the min size if possible, if not, then for the next larger one. Will have more piston sizes to change in near future. Tohatsu should have OEM piston & rings in different sizes, find a real crime to pass form a standard piston & ring to next 0.5 mm one, that's half millimeter. From there will need to replace sleeve to play with..

Happy Boating
 
Last edited:

LukeFishWalker

Petty Officer 3rd Class
Joined
Jul 23, 2015
Messages
95
Sea Rider, this project is on hold. The mechanic made me a deal I couldn't refuse.
The fact that I am in no hurry for this outboard, I suggested that I could bring him the
motor in his " Off-Season " and possibly save me a couple hundred bucks.
He suggested the middle of January and I told him that's perfect with me.
The total rebuild price will go from $950.00 to $750.00 including 2 sleeves and pistons.

A good friend of mine called yesterday and asked if I wanted a 1993ish Tohatsu M40D 3C8 for free.
I of course said yes. Besides the fact the paint is faded and few scrapes, the inside is clean.
His Mom's Boyfriend was fed up with every year having to haul the rig to get the carbs cleaned.
The previous owner said that after the cleaning....The outboard would perform just like new.
A little research shows this 40 has the same displacement as the M50D.
Are carbs the only difference?
 
Last edited:

Sea Rider

Supreme Mariner
Joined
Sep 20, 2008
Messages
12,345
Lukus,

So the piston & ring kits comes with sleeve included ? If so, just bore the standard cylinder to match say 0.20 piston & ring kit. Why go for a new sleeve if original one can be bored down to 0.5 mm to play with ? Check if you can buy just Wiseco piston & ring set kit without the sleeve ? will lower costs too.

At least on 40 D2 & 50 D2 OB's use same carbs, the 40 is carb & timing restricted which can be unrestricted anytime. A matter to check if D models are same.

Happy Boating
 

LukeFishWalker

Petty Officer 3rd Class
Joined
Jul 23, 2015
Messages
95
In regards to the M25C2:
The mechanic says that his boring machine has a difficult time boring .010.
Evidently his machine is an older boring machine or he's had some sort of failure(s) in the past.
The sleeves are bored already, one is .020 O/S and the second is .030 O/S.
He also did say that he would not be able to warranty his work if he used the existing .030 bore.
He recommends putting 2 new sleeves and just go back standard, and I'm ok with that.
I will haul it to him in mid January when he's not as busy and save me a couple hundred bucks.

The M40D 3C8:
I am not completely certain of the year, the model and serial number are clearly visible.
It is a 3 cylinder, 3 carb model.
I am going to take the carbs off tomorrow and attempt to locate a part number, then try to cross
reference any part that I can find to determine a year model. I know this isn't going to be an easy task.
It is a tiller handle with no starter. Is there any part that would easily point me in the right direction
to help me determine a correct year model?
Thank For Your Time And Patience,
Lukus
 

Sea Rider

Supreme Mariner
Joined
Sep 20, 2008
Messages
12,345
Lukus

Things that don't up
- Both cylinders, sleeves must be bored to same diam. can't have different size piston & ring diams.
- Going for new standar sleeves, when current ones have enough material to be bored to max 0.5 O/S .
- Buy a OEM 0.5 piston, ring set, rebore sleeves to match that size.
- On next future rebuild install standard sleeves, piston & rings.

With respect to convert a 40D to a 50D....

Newer 40D2/50D2 models differences, assume same on the 40D/50D models too.
- Carb jetting are different, carbs models seems too.
- Reed valves are different.
- Inlet manifold is different.
- Air Silencer is different.
A costly upgrade...

As currently loaded, go for a prop maximization if in pursuit of the max HP while at wot. A 40 HP wll outperform your 25 HP.

Quick low cost upgrades can be done on engines whth same CC while sharing same carb, jets, manifold and reed valves with some form of HP restriction.

Happy Boating
 
Last edited:

LukeFishWalker

Petty Officer 3rd Class
Joined
Jul 23, 2015
Messages
95
No Title

This outboard was bought used and obviously was never rinsed of saltwater.
Based on the condition of the fire deck and the corrosion present,
do I need to take the exhaust cooling assembly apart to clean it?
This is the firedeck of the M40D which I had to remove the head.
Evidently a small amount of moisture had found it's way into the
lower cylinder, there's no real damage it was just stuck.
I tried to gently rotate the flywheel with no luck.
After taking the head off, 1 tap with a piece of oak free'd it up.
Thank You For Your Time & Patience,
Lukus
 

Attachments

  • photo250705.jpg
    photo250705.jpg
    284.1 KB · Views: 3

Sea Rider

Supreme Mariner
Joined
Sep 20, 2008
Messages
12,345
Lukus, be my guest.

Although count with smaller HP Tohatsu models, have concluded that doesn't matter how long you flush an OB after use will always collect internal oxidation, rust, salt layers, salt clogs, worse if never or lightly flushed after use. Check this restoration example of the issues found on my 18, Opening it up was a Pandora Box Surpise. Would advise to follow what's posted, works fantastic well, will have a new reaconditioned OB.

http://forums.iboats.com/forum/gener...-i-swear/page8
Post 120 down

Happy Boating
 
Last edited:

LukeFishWalker

Petty Officer 3rd Class
Joined
Jul 23, 2015
Messages
95
I called to find a head gasket locally.
The guy asked if any of the bore(s) had water or light discolored crankcase.
The lower bore does show signs of extremely light colored brown when
compared to the top 2 cylinder bore(s). The interior of the lower crankcase
also shows signs of discoloration when compared to the top 2 crankcases.
The mechanic told me:
"Since the lower crankcase is of a different color, it may mean the exhaust
plates are either damaged or have corrosion preventing water into the crankcase."
He also told me:
"Since the 4 small 10mm head bolts broke off when taking the cylinder head cover off,
there's an extremely good chance that if you were to attempt to remove the exhaust
cover - You will break those bolts as well."

I was able to get the 4 broken 10mm head bolts out by drilling and taping with my metric tap.
But, I sure didn't want to be forced to drill & tap 14 more to remove the exhaust cover.
That would mean I'd have to take the power head off the OB.

This " FREE " motor may end up being more trouble than it's worth.
And yes....I do live by the motto:
Nothing Is Ever Free, Sometimes It Costs More To Fix Than It's Worth.

My next step is to put the head and cover back on, put fuel to it and try to crank it.
If it cranks and runs - Great.
If the carbs need to be cleaned - Ok, I can do that.
Then, put some vinegar (10+ to 1) and water in a drum to see if I can get the crud out.

Thanks For Your Time And Patience,
Lukus
 

Sea Rider

Supreme Mariner
Joined
Sep 20, 2008
Messages
12,345
Lukus,

If already cleaning internal head and crankcase water paths , will advise to clean "all" water paths, exhaust included. If exhaust has some form of obstruction adjacent to lower cylinder discoloration, should be cleared for top water refrigeration. That 40 should have anodes inside exhaust water paths, if excesively corroded, worn change them. When removing bolts should move them gently back and forth with wrench, apply W40 in the process to free stuck threads.

You should clean mechanically all internal water paths, 10:1 (water & vinegar) will only make OB to smile LOL!! Better squirt pure vinegar on all water pathts and with a wooden sushi stick scrape off all salt, rust remains. Check posted link to be aware of what you will find inside exhaust chamber and internal water paths if not immaculare cleaned.

If I got that OB for free, wouldn't mind investing some cash on it. That's a 4,4.5 K $ OB.

Happy Boating
 

LukeFishWalker

Petty Officer 3rd Class
Joined
Jul 23, 2015
Messages
95
Please forgive my complete ignorance when I ask this question:
What in laymans terms is the function of the exhaust plate and chamber?
If I had to make an educated guess....I would assume it's a method of heat
exchange by which water is allowed to flow through a chamber separated
by a plate with the exhaust gas on the opposite side of the water.
If that is the case, how would water be allowed to enter the lower crankcase?
The only way I could figure water would be allowed into the crankcase
was if there was a damaged area. Is this what I am about to face?

Thanks For Your Time And Patience,
Lukus
 

Sea Rider

Supreme Mariner
Joined
Sep 20, 2008
Messages
12,345
Lukus,

Can ask whatever question you need to know, nobody was born with boating skills, it's a learning curve. Exhaust chamber creates excessive heat buid-up, needs to be properly water cooled.

16.JPG

Salt Obstruction.JPG


This pic corresponds to my 2 cylinder OB, although cylinder head and front crankcase water paths were found relatively clean, exhaust chamber all around water passages were not. Was not going to tear exhaust lid off, gladly did, chamber was extremely carbonized, nearly salt clogged around internal anode. That chamber must work fully clean for top water refrigeration.

In reality you must have all water paths, labyrinths immaculate clean for any OB to work and cool down as intended. 99.99% of boaters doesn't know what's going on inside water paths, assumes that flushing any OB with fresh water for extended time period after use will be ok, sorry folks, that's not so...

Exhaust plate hills diverts fumes downwards into exhaust pipe located under crankcase, must work clean with out carbon layers, crusts to dissipate faster heat build up that adjacent water paths cools down and which are responsible for.

About water allowed into crankase, you mean into the lower cylinder, were piston was slightly seized ? If so, that's a head gasket issue, was not sealing, sitting right due to being old, dried, hardened, definitely not retorqued back to specs. No hole, crack whatsoever.

Happy Boating
 

LukeFishWalker

Petty Officer 3rd Class
Joined
Jul 23, 2015
Messages
95
Thank You Very Much.
And you're correct, I wasn't born with boating skills.
I was however born with a keen sense of direction and the ability to fix things.
The pictures you've provided are a clear understanding as to the heat exchange method.
The triple M40D has all 3 exhaust ports in a line but will resemble this example.

I ordered a powerhead gasket kit and it's on it's way.
I tried to remove a few of the bolts on the exhaust cover and sure enough....
3 of the 4 I tried to remove broke in the crankcase.

So, powerhead removal is the next step and total clean up is in order.
I didn't see any signs of head gasket failure when I removed the head.
Which leads me to wonder.....Has this OB been swamped on the boat in the past?
I know that on boats with a low transom if you throttle down suddenly,
the wash can come aboard and enter the engine compartment.
Otherwise, there's only 2 other ways for water to enter:
Carburetor or cracked block.

I live in S/W Louisiana and we are just 40 miles from the affected flood area.
I am getting rain everyday and some days it rains hard 2 or 3 times a day.
It's hot like 2 rats making love in a wool sock and just as steamy.
So, my time outdoors is limited due to my disability.

Don't be surprised when I come back in a few days and ask more questions.

Thank You For Your Time And Patience,
Lukus
 

Sea Rider

Supreme Mariner
Joined
Sep 20, 2008
Messages
12,345
Lukus,

Can you post a pic of the old head gasket condition to have a look. When at full throttle and come to a full stop, there's a gradual rpm reduction, so coming wash will be minimized if wanting climbing upper cowl. OTOH, carbs lives at opposite side from rear powerhead.

Have learned over the years while servicing customer & friends OB's that's is a must do a head gasket retorque to specs starting first 20 hours soon after engine has gone through the break in process. It's done by dealer, but nobody sends OB to them. My OB is working fine, why should I do that it's a typical reasoning. Happens that OB's are not cars..

Do find that new head gaskets cedes, compress with internal combustion heat and use, what was torqued to will need to re retorqued again, out of torque specs is only checkable with a torque wrench. When OB's starts using air cooled water radiators along krpto green stuff inside them will forget all about head gasket issues.

If plan removing power head from pan, order a base gasket as well. Old one has probably some missing parts or is excesively burned out due to use and or exhaust cooling ssues. How do you plan removing broken bolts on crankcase ?

Happy Boating
 
Last edited:

LukeFishWalker

Petty Officer 3rd Class
Joined
Jul 23, 2015
Messages
95
No Title

You will have to accept my opinion as to the condition of the old head gasket.
I worked as a diesel mechanic for many years, tore down thousands of GMC
Jimmy's and I am pretty sure that if there was evidence to indicate a damaged
head gasket on this OB - I would have taken notice of that.

Broken Bolt Plans:
Cut the bolts flat to about 1/16" above the mating surface.
That way you can see the exact center of the broken bolt(s)
I plan to start with a 1/8 drill bit to center the bit into the broken bolt(s).
Then using the next 3 drill sizes, gradually increase the size of the hole.
Once the holes are decent sized but not into the factory threads, use a
flat 1/8 flat chisel punch to collapse the hole and then rotate counter clockwise
with either a needle nose or vise grip pliers.
If the remainder of the bolt does not turn, use a square easy-out.
If I damage too many factory threads....I am going to drill to the next size up,
thread and get a stainless all-thread and make some all-thread studs.
Then, I can use stainless lock nuts with a brass washer to seal the outer plate.
I was pretty lucky with the 4 head cover bolts, they all came out without damaging the threads.

But even the best laid plans has flaws and accidents.
There is another way to repair the damaged thread holes.
Using brass pipe thread fittings, drill and tap pipe threads.
Any straight through 1/8NPT brass fitting works. Not a 90.
Insert the brass fitting and drill to the correct size and tap the original metric threads.
Then, cut the excess and draw file smooth to the mating surface.
Do Not cut the fitting after installing.
Why you ask?
Because the full length of the hole in the fitting is your dead center.
Not only center, but vertical level as well.
You have to be very patient when taping and use a square jig to insert the
pipe tap to ensue a perfectly vertical thread.
We used to repair damaged/stripped holes in the aluminum blower housings
with a great deal of success

Here is a picture of the gasket set I purchased.
I see a part number and name:
Engine Base Gasket 3C8-01303-0 that matches the gasket in the picture.

Thank You For Your Time And Patience,
Lukus
 

Attachments

  • photo250774.jpg
    photo250774.jpg
    17.9 KB · Views: 0

Sea Rider

Supreme Mariner
Joined
Sep 20, 2008
Messages
12,345
No boubt about the old head gasket condition found. If its ok, it's a non retorque issue. Being a used OB won't know how many worked hours it has and if correctly serviced. Did you managed to remove complete exhaust cover ? If so, what was its condition ?

Happy Boating
 
Top