Re: 40 horse evinrude..(selectric shift) button rebuild
Re: 40 horse evinrude..(selectric shift) button rebuild
push button rebuild resolved.
After reading about the damage that could occur using a toggle switch, I decided to take the selectric shifting pushbutton switch on my boat apart.
The final decision was made after trying to dock the boat and being unable to make reverse work so I ended up driving to the ramp and loading the boat, ( using a paddle in wind is no substitute for a working reverse).
Be patient and relaxed while doing this job. If your buttons don't work, you can't break it cause it's broke already, so, no pressure.
I have posted pictures. Mine wouldn't work in reverse and you had to push the buttons many times to get fwd to work.
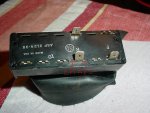
A brief discription of my switch. The part number on my switch is 0279091 in the microfich it's item 13. This switch has 3 terminals, one for power, one for fwd and one for reverse. The lower unit on my 40 hp 1969 evinrude lark uses magnet clutches with a spring that grabs the shaft when actuated as opposed to a different scheme with 2 solonoids and a internal pump that still uses a 3 button switch but has different contacts and terminals.
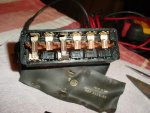
After you have removed the switch from the control all the tools you will need are, needle nose pliers, a thin blade knife and super glue.
The whole assembly is covered by a rubber boot that has stainless steel staples holding it together. Bend the staples up and lift the rubber back cover off the 3 terminals, leave the staples in one end and fold the rubber inside out back toward the button side and out of the way, there is no need to remove it all the way. you will now see the 3 terminls and several blank terminals. Take the needle noses and at the base of the blank terminals and the 3 terminals you need to squeeze in the crimped brass on both sides of each terminal and the blank terminals too. Those crimps are what holds the fiber board cover over the internals.
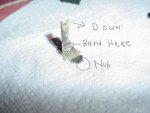
after you bend in the crimps some you can use the knife edge to lift the fiberboard cover a little at a time and use the blade as a lever around each crimp to ease off the fiberboard cover and remove it. With the cover off you can see the 2 contacts that allow fwd and rev to operate. Mine were not worn at all but had a black residue (from old age I guess) that was easily removed after removing the contact.
Be gentle with the buttons at this point with the cover removed. If you push the buttons it lets the contact open too far and you will lose the spring tension maintaining the contact closure. To remove the contact I used the needle nose pliers on the edge of the switch to the bottom of the contact on the plastic step of the switch body, flip the switch over and you will see the contact holder protuding . Use this nub to force the contact up and out. with the contact out you can clean the contact pads. While you have it out , bend the contact arm down some so you have good spring pressure to maintain the contact, it dosen't take much.
Using the pliers again push in the contacks after cleaning both sides till they are spotless. I just used the knife blade and paper towel to removed all the blackness on them.
Use a ohm meter and check the continuity while holding the fiber board on with your fingers. The meter should have a reading from the single terminal to one of the other terminals when the button is switched and no reading when in nutral
With the fiber board cover back on and set in place put a few spots of superglue at each side of the places where you used the pliers to squeeze in the crimps on the sides of the blank blades and the 3 wire spades.
Next was to pull the rubber boot back over the buttons and insert the staples back in their same holes and bend them over.
good luck, hope this helps, the new part is over 145.00


") . I'm pretty handy, and with the help of my dad, got the motor running, and it runs really, really, well. However, I can't seem to get it to shift into gear and get the prop to spin. I've read a little about how bad and complicated these selectric shifts are, but I would really like to get it going. If anyone has any specs on the motor itself or any insight on the situation I would really appreciate it. Even if there is a way to turn it into a manual shift it wouldn't bother me, I just want to get it out on the Mississippi and catch some fish! I appreciate your help in advance.
. I'm pretty handy, and with the help of my dad, got the motor running, and it runs really, really, well. However, I can't seem to get it to shift into gear and get the prop to spin. I've read a little about how bad and complicated these selectric shifts are, but I would really like to get it going. If anyone has any specs on the motor itself or any insight on the situation I would really appreciate it. Even if there is a way to turn it into a manual shift it wouldn't bother me, I just want to get it out on the Mississippi and catch some fish! I appreciate your help in advance.