'78 17' Crestliner Nordic Restore (First boat project)

Status
Not open for further replies.

Weirdboymike

Seaman
Joined
Apr 9, 2015
Messages
59
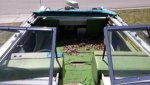
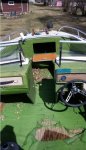
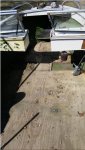
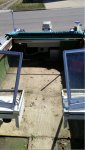
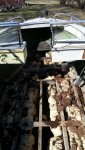
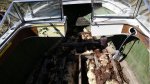
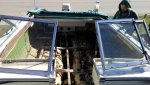
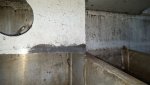
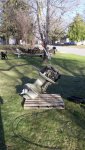
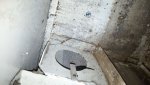
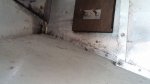
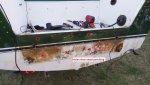
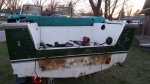
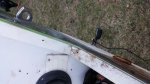
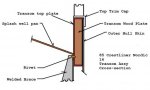
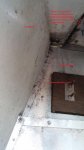
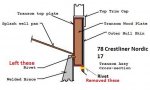
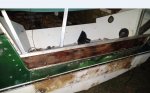
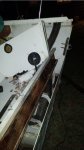
Hi there, I have been a long time follower and fans of the posts here and found a lot of them very helpful. I am however just starting to plunge into a BIG project I have been putting off for quite some time now. About 5 years back I purchased my boat from a friend who just needed it gone. Got the 17' Nordic (1978 vintage), with trailer, and motor (1977 70hp Evinrude) for $450 bucks!! The motor has been running like a champ after some initial tuning. Anywho the flooring has been rotting for quite some time now as they stored it out side (no cover). I knew this going in that I would need to redo the whole thing but thought it would be good to customize it a bit anyway. I LOVE Deep V's. I just tore out the floor and consoles and looking for advice along the way. I was surprised to see that the foam wasn't saturated and pretty relieved too as I am trying to do this on a budget (student loans are beating me up). I am now looking at replacing the transom before I get the new floor in. I haven't tore into it too much yet as weather has been a little wet and I need to do this out doors as my garage isn't big enough for this beast (the pics with it in the garage are from when I rented a house with a large garage). Anyway just looking for advise and any tips that anyone might have for me. My first and most urgent question is... How difficult is it going to be to remove the transom? Any tips? If I remove the transom cap will the wood be exposed? Will I need to remove the splash well and if so, how difficult would that be (is it just riveted/screwed, or welded under the transom cap? Anyone restore one of these before? I was following eyes4u can I attempt to message him directly here? He has almost the exact same boat and would like to pick his brain a little. Boat 1.jpg
 

jbcurt00

Moderator
Staff member
Joined
Oct 25, 2011
Messages
25,111
Unfortunately, not a lot of Crestliners getting done around iboats, but welcome to the tin dry dock!

Before you replace the deck (floor) you need to make sure that a boat that was left outside and uncovered does in deed have dry foam below decks. If you've pulled up any of the deck, and found the surface of the foam dry, that's a false inspection. It could appear to be in good shape and that it hasn't had any water intrusion, on the surface.

Get a piece of 2" pvc pipe, and cut some teeth on 1 end so you can take a core sample of the foam, all the way down to the hull. Once you remove that core, and have a 2" hole all the way to the hull, give it a little bit and I'd be extremely surprised if the newly cored hole doesn't collect water.

If it doesn't immediately fill, give it 12-24hrs and check again. Based on the 1st core results, you may still need to take more cores if the 1st doesn't produce water. 1 positive test in a 2" hole isn't significant on a 17ft hull. Several dry cores, which IMO is extremely unlikely, would make yours the 1 in a million, so to speak.

IIRC, the Crestliners that have been started here had some challenges to getting the transom out and new ply installed.

Post some more pix of your boat, it's interior, the foam and the transom (from several different vantages)

Good luck w/ your project and welcome again
 

Tnstratofam

Commander
Joined
Aug 18, 2013
Messages
2,679
:welcome:. That's a nice looking hull. Looking forward to following along. I replaced the transom in our Starcraft last year. There is a link to it in my sig line. I don't know much about Crestliners other than they are cool boats. You are in the right place for advice though. There are lots of knowledgeable people here who will hime in with good advice when they can. Till then like jb said post up some pics of the transom, and the rest of your project. Also like jb said check the foam very carefully for water intrusion. It is more likely than not that it got wet or is wet. Just be sure to check it really well.
 

Weirdboymike

Seaman
Joined
Apr 9, 2015
Messages
59
Thanks guys, I have a few more pics but for some reason having trouble loading them here. I will change formats and try again. The Core sampling is a real good idea. Haven't heard of anyone trying that but seems like an obvious thing to do. I'll give it a shot Thanks! Do you happen to know where to get ahold of some foam at a reasonable price? That stuff is not cheap. I have seen people use the pink insulation boards but I would think that would be a little "squeaky" but could be wrong. Like I said I am trying to do this on a budget but don't want to cut too many corners. In the Attachments you'll see I was lucky and had an extra floor Ha. Looks like the last owner had just put another layer of wood on top of the original floor which had to be shop vac'ed out (all that was left on top of the stringers was the original vinyl). I haven't taken any further pics yet as the weather has been pretty poor lately. It snowed yesterday. Good ole MN spring weather! I have cleaned out most of the original floor (all decayed and dropped to the bottom) and found the reason why the passenger side always seemed heavy. The passages in the back (to allow water to drain from the chambers to the center) were completely clogged with the original floor and keep all the water in there. The vinyl sides are also out at this point but need to figure out a way to get the old glue off. Any good tips on what kind of adhesive remover I should use? A co-worker suggested gas but that didn't seem to do anything. The previous owner had also used regular screws on their cobbled together floor that were completely rusted so I ended up just grinding them off. Glad to see aluminum stringers like I thought there was though. I consider that a win.
 

Attachments

  • boat 2.GIF
    boat 2.GIF
    14.7 KB · Views: 10
  • Boat  3.jpg
    Boat 3.jpg
    87.7 KB · Views: 10
  • Boat  4.JPG
    Boat 4.JPG
    83.9 KB · Views: 10
  • Boat  5.JPG
    Boat 5.JPG
    80.3 KB · Views: 8
  • Boat  6.JPG
    Boat 6.JPG
    91.3 KB · Views: 10
  • Boat  7.JPG
    Boat 7.JPG
    170.2 KB · Views: 8
  • Boat  8.JPG
    Boat 8.JPG
    177.9 KB · Views: 8

Weirdboymike

Seaman
Joined
Apr 9, 2015
Messages
59
Just wanted to add that I would actually like to tear out all the foam for a few reasons; 1) so I can make sure to get all the original floor out (some of it is tucked into the crests of the foam and stringers 2) To give the entire hull a real good once over and repair any pitting or other imperfections I find, and 3) if it does have any water saturation I can remove all that weight and maybe be able to actually pull a tub with the 70 hp. I found a 1 gallon kit of the foam on line from aeromarine that produces 8 cubic 3 of 2lb foam. I realize I would need to do some math but do you think that would be enough or am I going to need to drop $200 on foam?

Just had a thought. To get the most bang for my buck and still not cut corners on floatation. Assuming I need more than 8 cubic feet, could I use a combination of the pink foam board and the pour in foam? My idea is to get one maybe two boards and cut them to fit in the bottom of the cavities and just drop in whats left over to take up space. Then pour in the foam to fill up and seal the remainder. Would this work or would the pour in foam eat away the pink boards some how? Probably a novice question but I think it has potential.
 
Last edited:

eboat85

Petty Officer 2nd Class
Joined
Sep 1, 2013
Messages
121
Hi Mike, thanks for linking to my post from last winter's project, it's good to see another Nordic project. Crestliners are similar and different from the other tin boats out there. One thing that is common is that these boats were designed to be bought and used with no consideration for second and third lives via restoration. The biggest milestone for me with my Nordic was to put your mind in the direction that you don't have to do it the original way because you can do it better!

It would be a big help if you can snap a few pictures under the splay pan in the bilge and at the transom mounting area. On mine it was not possible to remove the splash tray to get at the transom board. I had to remove all the rivets from the pan and slide it forward to lift out the rotten wood.

If your transom has any bow to it or screws that are striped out in it, be prepared to see some rot. Crestliner designed my boat to take water into the pan and drain throught the tubes AND run down the corners over the transom ends and into the bilge to be pumped out. Mine is now sealed so the only way in and out is through the drain tubes.

Once you have the engine removed it will be easier to access and dig in.

Good luck with the tear down and lay you hands on everything. Being in the LaCrosse area I know what you mean about the winter onslaught but it looks like that is starting to go away.

Eric
 

Weirdboymike

Seaman
Joined
Apr 9, 2015
Messages
59
Might call it progress. Spend a couple hours on the boat last night and got all the rivets out of the splashwell and just need to cut 4 small welds (which I plan to replace with rivets) and waiting for the room mate to get back from vaca to help with the nuts and bolts as my arms aren't 20' long. So 4 small welds and about 8 bolts I think then I can lift the splashwell enough to take the old wood out of the transom. I do however need to plug up some small holes and some very large holes (about 1/2" is the biggest) any suggestions for the large ones? I plan to just rivet the small ones. Not sure what the previous owner was thinking. I have attached a few pics (some more interesting and helpful than others. I have been reading the thread started by eboat85 and gotta say it has been EXTREMELY helpful. He even drew a sketch of the how he thought the transom assembly looks like. It is spot on! just a few extra bolts that need to be removed and being that my boat is the same model just a few years older the only real difference was the splashwell supports. I am currently waiting for my order of marine grade plywood to come into menards. Its been about a week and should arrive in a few more days but that will give me time to finish prep work before cutting.

Hey eboat85!! really glad to found this. I may need your guidance on this at some point. I hope you follow my project. My goal this year is to get it structurally sound and in good condition. I will continue this next year (with paint and maybe adding a deck and livewell in the bow as I normally use it for fishing). DO you have any pics of yours sitting in the water before and after? I'm curious as to how much higher it sits now.

Thanks,
 

Attachments

  • Inside Transom  1.JPG
    Inside Transom 1.JPG
    161.1 KB · Views: 11
  • Inside Transom  2.JPG
    Inside Transom 2.JPG
    169.7 KB · Views: 9
  • Motor  Tree.JPG
    Motor Tree.JPG
    125.6 KB · Views: 10
  • Spashwell support  (side).JPG
    Spashwell support (side).JPG
    192.5 KB · Views: 10
  • Splashwell  side.JPG
    Splashwell side.JPG
    101.2 KB · Views: 11
  • Transom 1  holes.JPG
    Transom 1 holes.JPG
    164.7 KB · Views: 12
  • Transom  2.JPG
    Transom 2.JPG
    163.2 KB · Views: 12
  • Transom  weld.JPG
    Transom weld.JPG
    143.7 KB · Views: 13
  • Transom Sketch.jpg
    Transom Sketch.jpg
    15.2 KB · Views: 13
Last edited:

Weirdboymike

Seaman
Joined
Apr 9, 2015
Messages
59
Here are some marked up photos to better see what I did and will do. Let me know how close this is to what you did eboat. I think I should be able to slide the splashwell towards the bow and remove the old rotten wood. There were some differences in how I understood you went about it. Again any weld I cut I am thinking of replacing with multiple rivets. I am also thinking about using just the pink foam (i might be repeating myself here), but I am on a budget and I think $200 in pour in foam isn't worth it. Just thinking that IF I ever have to do this again it would be much easier to take out and replace.
 

Attachments

  • Splashwell  side weld.jpg
    Splashwell side weld.jpg
    70.8 KB · Views: 6
  • Transom weld Cut.jpg
    Transom weld Cut.jpg
    19.3 KB · Views: 8
  • Transom Sketch 2.jpg
    Transom Sketch 2.jpg
    39.5 KB · Views: 7
  • Transom inside mark up.GIF
    Transom inside mark up.GIF
    3.9 KB · Views: 8

UConnMRB

Petty Officer 2nd Class
Joined
Jul 18, 2014
Messages
119
Hey Mike, Love the boat, good luck, hope you dont mind me tagging along. I am curious to see what peoples responses will be to your foam question.
 

Weirdboymike

Seaman
Joined
Apr 9, 2015
Messages
59
Not a problem the more the merrier UConn. Just checked out your thread and boat. Looks like we have about the same amount of work ahead of us and we are about at the same spot?
 

UConnMRB

Petty Officer 2nd Class
Joined
Jul 18, 2014
Messages
119
Yeah very similar...I will race you to splash! I will lose that, so we aren't going to place any wages.
 

Weirdboymike

Seaman
Joined
Apr 9, 2015
Messages
59
Well my goal is to just remove the foam, coating the interior with gluvit, replace foam with pink board, put in all new wood (including transom obviously), carpet, and redo all the wiring (there isn't much in this boat), but do it all so it is easy for next year's project of installing a livewell. I will also hold off on redoing the paint until next year. Hopefully if I spend a couple hours everyday after work and all day on the weekends (when I can) I can have it all buttoned up by early/mid June just in time for vacation to Hayward WI. (fingers crossed). Also need to replace the shift and throttle cables, and the fuel gauge. I'm sure I'll find things here and there but that's the tentative plan thus far. Right now I am in process of removing the Transom and vinyl adhesive from the sides of the hull. I will also begin removing the foam in the next day or two. Wood should arrive Friday hopefully, but need to order the Gluvit, rivets, and 5200 as well as pick up some resin. The "To DO" list is a lot longer than "The Done" list and is a little taunting but one step at a time and we should be moving right along.
 

Weirdboymike

Seaman
Joined
Apr 9, 2015
Messages
59
Alright on a roll. Got the Splashwell apart from the Hull. Took samples of foam. Despite popular belief the foam actually wasn't bad at all (IMO). I'm no expert so feel free to chime in on this but in the pics attached you will see that only about the bottom 1/4" of foam had water in it. The rest was very dry and hard. Looked good to me but I'm no expert. The top of the foam is dirty and looks wet but if actually very dry and just dirty from the old rotten floor falling on it over the years. This transom seems very small! Can anyone tell me why the transom wouldn't extend down to the bottom motor mounting holes? Eboat85 has also noted that his newer model had a very narrow transom. I will be beefing up the wood that was on the outside shell of the transom from what looked like 1/4" plywood to 5/8" (I will use the left overs from the floor pieces as I will have plenty). I don't need to worry about thickness as the power trim mount is a bolt through and doesn't attach to the top lip of the transom. Eboat85 also mentioned that his mounting holes were very close to the bottom of the transom as are mine. Eboat... If you are still following how did you go about this?

Thanks,
 

Attachments

  • Center Foam Sample.JPG
    Center Foam Sample.JPG
    67 KB · Views: 7
  • Side Foam Sample.JPG
    Side Foam Sample.JPG
    85.2 KB · Views: 6
  • Transom Lifted 1.JPG
    Transom Lifted 1.JPG
    135.2 KB · Views: 9
  • Transom Lifted 2.JPG
    Transom Lifted 2.JPG
    56.9 KB · Views: 9

Weirdboymike

Seaman
Joined
Apr 9, 2015
Messages
59
another update with needed insight.... A guy at work just offered me (what I consider a steal), a 1988 125 hp Force outboard for $400. He says it runs like a top, has power trim, comes with the controls and I am thinking would be a huge step up from my 1977 70 hp Evinrude (which runs really well but lacks the power for occasional tubing... not possible to pull it just bogs). The issue may be in the transom rating... It is only rated for 120 hp. I am not able to find any laws against going over and it would only be over by just over 4% If I Attempt to beef up the transom (since I am in there anyway) would there be any implications? How should I go about beefing up the transom? Are those good motors in your opinion? I only have experience with Johnsons and Evinrudes. Are parts hard to come by if I need them?
 

UConnMRB

Petty Officer 2nd Class
Joined
Jul 18, 2014
Messages
119
Dont quote me on this, as I am just stating what I remember reading, but the Force parts are harder to come by. As far as the HP rating, you can use whatever motor you want, but insurance (if you need it/want it) will have an issue with the motor being over the max rating for the boat. I say that as a licensed insurance broker. You might also run into some trouble if stopped by the Coast Guard/Harbor Patrol/Water Po-Po....however, not that I am advocating this, but you can always get a decal that says 120 on the Force so it passes the visual inspection.
 

Tnstratofam

Commander
Joined
Aug 18, 2013
Messages
2,679
Beefing up the transom may solve the design issues that come into play with going up in hp, but the CG or Harbor Patrol or Wildlife Resource Officer may not have as much faith when they write you your ticket. Not to mention an insurance adjuster's attitude towards overpowering might not be nice if you end up trying to file a claim. 4% overpowered in my opinion isn't stretching the bar to much until you figure in the extra weight the motor/tilt and trim setup will add.

All stuff to be mindful of when you are considering your buddies motor offer.
 

Weirdboymike

Seaman
Joined
Apr 9, 2015
Messages
59
Update, I have been back and forth on removing the flotation foam in the hull and replacing... But in the end I decided since I am already in there and wanted to remove as much weight as possible I might as well, plus it gives me a chance to check for leaks (found one and pluged it), might need to bring it to the welder if the stuff I used doesn't hold but appears to be doing the job (out of the water with the hull filled anyway). Rivets I ordered are due to arrive today and hopefully I can get the Transom cut sealed and installed tonight after work. I am just using the pink insulation foam for flotation, to prevent any ports from clogging again.
 

eboat85

Petty Officer 2nd Class
Joined
Sep 1, 2013
Messages
121
Hi Mike,

Sorry for not following a bit closer. Kind of a crazy week. Lets see if I can catch up.

I don't have before and after pics in the water of my boat. My guess is that the waterline at dock is about the same since it doesn't change much when I load it now vs empty.

The transom board holes are right on the edge of the wood so I drilled the holes and then used a small hand saw to make "U" shaped slots and then epoxied it thoroughly.

Congrats on getting the transom out! As you have found out, it's a trick to slide it out. Very closely inspect the inside surface of the aluminum that contacted the transom. I found many areas of pock marks where the plywood chemical And the aluminum reacted and ate away at the aluminum. At some points there were pin holes through the aluminum. I cleaned and sanded the inside surface and used acetone to clean the crevices then filled with JB Weld and sanded smooth. Follow up with aluminum primer and paint. The new transom with the epoxy coating should never have the same issue but better to go overkill than skimp.

I would highly recommend replacing weld with weld and not rivets. I have a local aluminum welder here that was able to hit the areas that I need and believe it or not, this is nothing new to them. A good welder has touched his share of tin boats. I doubled up on rivets in some areas but never replaced weld with rivets.

More to come... Eric
 

eboat85

Petty Officer 2nd Class
Joined
Sep 1, 2013
Messages
121
Had to switch from iPad to the pc to continue..

I removed the foam starting at the back and working forward. At the very back I found some mushy, heavy foam along the transom line but after moving ahead a few feet it all turned to dry and encapsulated foam like what you showed. I just replace what I tore out and refilled with spray foam. Be careful not to fill the center drain channel while re-foaming.

As for the transom construction. Take your time since your not going in the water this week. After gluing and screwing the three pieces together. (I stacked 3/4", 1/2", 3/4" to make the original 2" thickness) would epoxy a side and let it sit over night, then flip and do the opposite the next. To do it right you will need to do both sides and ends a couple times. Slide the pre-epoxyed transom board in and mark your mounting bolts so you can drill those prior to the epoxy coat.

One thing I learned during the process is that Crestliner drilled all the holes after the transom board was in place and then bolted and installed drain tubes. I assumed that the holes would be 90 degrees to the face of the transom. I was wrong and had to modify things a bit.

Lastly, As for the engine. mine is rated for 90 HP on the 16' hull and it is a heavy beast. I have been informed that the V-4 used to make the Johnson 90 VRO is the same basic engine that is used in the 115 VRO. I think that mine might be a bit better balanced with a newer 75. Your hull looks a bit more like a 17' Starcraft SuperSport that I had as it is a bit wider and a foot and a half longer than mine so more power might be a good thing but still watch the HP rating.

Mine is a Northstar Nordic where I believe yours might be the Mirage and can hold a bigger engine. Check your plate or look at this link to the Crestliner archives.
http://www.crestliner.com/pdf/catalog-archive/Crestliner-Catalog-1987.pdf

Hope this helps.
Eric
 
Status
Not open for further replies.
Top