89 Chaparral 198 XLC Restorationl

198XLC

Cadet
Joined
Jul 7, 2015
Messages
9
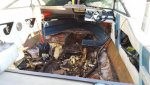
hey guys i'm Nick Im 26 and my father gave me the family boat. i grew up on this thing. It runs great, mechanically sound other than a fuel pump. i was going to look at buying a used boat. but what i like about the chap is that i know everything about it. father bought it new in 89. unfortonately, it has sat in storage for most of its life. never abused just neglected. the rear sunpad is all dried out rear seat cushions and seatboxes are junk. most of the floor was soft, engine mounts do not tighten, stringers are rotted. i have all the cockpit flooring and foam removed, which wasnt saturated completely, more so about an inch from the bottom.i have the cuddy walls removed and all lower carpet in the cuddy removed, things seem solid toward the front but the stringer rot goes into the cuddy... so i guess only option i have is to rebuild in there as well? my father insists we can rebuild the motor mounts without pulling the motor but i do not see as in how, because if you block it up wouldnt that put too much weight on the hull and said point? one thing i am looking for is information on how far those stringers go up to the bow. i do not want to put a hole though my hull, which is in pretty nice shape! either way i've been lurking this forum for a while and thought id try and share my little project


tpenfield

Moderator
Staff member
Joined
Jul 18, 2011
Messages
18,151
Hey Nick, welcome aboard iBoats.

Looks like a nice project. Definitely take the engine out as you will be able to do a much better job with the restoration and also be able to get a 360 degree view of the engine for any work that it may need.

We like pictures, so keep those coming. It really helps us see what you are seeing.

You will probably want to take some core samples of the transom when the engine is out so you can see if you need transom work as well. I would also expect that your fuel tank may be sitting in wet foam ( or water ) and may have some corrosion ( pits) in the aluminum. So pull the tank to get a good look, plus it will make the stringer work easier.

Take lots of measurements for stringer heights engine mounts, etc as you will want things to be as close to original as possible as you rebuild . . . Otherwise you may have to rework some things in order to get proper fit. Use the pour in foam to fill the structural chambers, similar to what Chaparral did originally, but more is also better. The boat relies on the foam for structural integrity as well as shock and noise absorption.
 

198XLC

Cadet
Joined
Jul 7, 2015
Messages
9
What I did notice is there was very little foam around the gas tank area. My dad redid a section of the floor over it about 12 years ago. So that could have been how he did it. What I want to do is put pvc through the low spots of the new strings directing water that seemed to collect in those sealed side sections that had nowhere to go wich I think is what escalated the rot process. Another thing is do you think there is water trapped towards the bow in the cuddy as well. The core seems solid sounds good when you tap it with a hammer. I guess what I'm saying is if it ain't broke don't fix it. I'll know more when I find where those stringers end in the bow. And I asume it's all packed with foam up there as well
 

WOEISMEIGOTTA470

Petty Officer 1st Class
Joined
Aug 31, 2012
Messages
375
Welcome to iboats! your boat is very similar to mine, and like most boats that size/type built in the 80's. My resto has been a long drawn out one, but hoping I'll hit the water soon for a good part of this season. I have an '87 Thompson Cuddy 198, and my project started out much the same; soft floor, partially rotted stringers & transom, soaked foam, etc. You're off to a good start, removing the floor and all the foam will shed light on exactly what's good and what needs replacing.
My cuddy/bow section turned out to be in very solid shape, likely because it is well protected against all the elements. The stringers on mine ran up all the way to where the cuddy cabin side-by-side seats end, i.e. stringers stopped before porta-potti cutout. If you like here is my old introductory thread to iboats, some of the photos may help.
 

tpenfield

Moderator
Staff member
Joined
Jul 18, 2011
Messages
18,151
One thing that you could do on some of the forward areas is to take a 'core sample' Kind of like what scientist do drilling into the polar ice caps, etc. . . .

Here is a core sample that I did on the main bulkhead of my Formula 330 . . .

IMG_1438-filtered.jpg
IMG_1430.jpg


It showed that I had moisture in the foam within the fuel bay. If it had been dry, I could have just epoxied the sample back in place with no harm done. as it was I left it open and took some addition sample from above to get a better sense of how much water was in the foam. It turned out that there was about 2" of moisture, then dry further up.

I also got a good look at the wood of the bulkhead and could see that it was still solid. ended up replacing it and re-bedding the fuel tank anyway.
 
Last edited:

198XLC

Cadet
Joined
Jul 7, 2015
Messages
9
Ok so I'm doing this from my phone so bare with me.... I'm an auto body tech and with rust you bang it out with a hammer.... well I've come to the conclusion that every piece of wood has gone to crap. But that's ok. Haha. I have wet foam at the bow like I thought I would. Now how the f*** do I get this stupid gas tank out it has less than 5 gallons in it .I know this because I siphoned it out before I got her running.this thing is in there
 

tpenfield

Moderator
Staff member
Joined
Jul 18, 2011
Messages
18,151
This tank is foamed in right???

Try to get all of the gasoline out of it . . . a gallon or less is OK, but 5 gallons is a bit much. Disconnect all of the hoses and wires . . . mark things accordingly. Seal off all of the fittings with duct tape or something.

You need to remove as much foam as possible from all sides . . . take off any straps or other mechanical fasteners too. If you are going to try to save the tank, go easy on the foam removal, be aware that cutting tools can cut into the tank.

It looks like you have decent access to the underneath portion of the tank from the stern end. The key would be to loosen as much foam from underneath the tank as possible. You may be able to hammer in some bevel cut boards (1x3 strapping) along the tank's width to break the foam loose from the tank.

I have used a couple of approaches in the past to actually get the tank to come out . . .

1) lifting strap as pictured below . . .

TankRemoval-07.jpg


2) Wedge blocks , I don't have a picture . . .

Take 2 small pieces of plywood (3/4" thick +/- . . . 12"x12") place 1 up against the under side of the tank and the other against the hull. Then drive a 2x6 in between those 2 pieces, creating a wedge. Make sure both the top & bottom piece are ample size (at least 12"x12") to distribute the load, otherwise you can punch a hole in the hull or damage the tank.

In either case, you may need several thousands of pounds (yes thousands) of upward force to break the tank loose. When I used my lifting strap approach, I broke the strap that is shown in the picture and had to go with a bigger strap.

Keep in mind that his may take a while . . . several days of foam removal and wedging or lifting. Once the tank 'pops' from the foam it will come fairly easily. If the adhesion of the paint on the tank and the foam itself is good, the foam will probably separate at the hull, not the tank.

Here is my tank after I got it pulled. much of the foam came with the tank, separating at the hull . . .

TankRemoval-48.jpg


Post more pictures as you go.

:thumb:
 
Last edited:

198XLC

Cadet
Joined
Jul 7, 2015
Messages
9
ok heres the end of today.... got the tank out,no foam anywhere around it, what i did was the little bulkhead boxing in the step down to the cuddy was rotted so i sawzalled it out piece by piece. then my foot went through the lower step and cut that out... then i was able to get underneath the center of the tank with a big flathead, it moved so i did it more... grabbed that sucker like a bat out of hell and slip! out it came. after that i went to town cutting out the rear bulkhead and floor system towards the front. everything in this boat is rotted. youll see in the pictures.... i really am not sure if im up for this id like some opinions


cuddy
 

tpenfield

Moderator
Staff member
Joined
Jul 18, 2011
Messages
18,151
My opinion is that you are doing fine. The demolition phase is where you start to lose your will to live, but it gets better once everything is cleaned up and you are putting it back together.

That boat does look rotted stem to stern. So, it would be interesting to see what the transom is like.
 

Mark72233

Ensign
Joined
Jul 11, 2014
Messages
926
198, if the boat means that much to you then hang in there and get it done but be forewarned this is going to take a year or more depending on how much time and money you have to spend on it. If time and money are an issue then just plan on it taking 2-3 years to get it done but at the end you will have a rebuilt boat that you know bow to stern that will last for 30 more years and you will have spent a fraction of what a newer 19 footer will cost you. You could throw in the towel now and go look for a used boat that seems fine until after you spend good money on it and find out that boat has similar problems with rotted wood and your right back in the same boat :eek:. Pun intended. Check out Friscoboater youtube vids. He has some good informative stuff and the major project he documented was from a used boat that he bought that he thought was in good shape but turned out it wasn't.
Do you like working with your hands, getting dirty, itching from fiberglass dust, sweating off 10 lbs from wearing a tyvek suit :painkiller: during the summer while you grind fiberglass then we have the perfect thing for you, restore an old boat. I am 1 year into mine right now and very happy I finally started mine, no regrets. If your not sure, keep digging into this one, ask questions and as you progress you will be able to make a more informed decision to continue or cut your losses. Good luck and I will be tagging along if you don't mind.
 

198XLC

Cadet
Joined
Jul 7, 2015
Messages
9
No Title

Got the port side stringer completely removed just now. Gotta work on clearing out the remainder of the foam before the cuddy. Then the other stringer followed by the potty potty floor.
 

Attachments

  • photo225069.jpg
    photo225069.jpg
    19.7 KB · Views: 0

198XLC

Cadet
Joined
Jul 7, 2015
Messages
9
UPDATE.... Couldnt figure out how to edit so sorry for double post....

today when i called it quits i felt really good about it because ALL THE ROT IN THE COCKPIT IS GONE. im down to the hull! :) other than the engine mounts, which ill be pulling the motor this weekend.

drumroll.....


now... the stringers end right there in front of the, im going to call it the cuddy bulkhead... its rotted, but there is no fiberglass on it... just wedged in there it seems. and also a much thinner ply?? is all this just for the shape of the cuddy and not structural?. starting on the inside is anotherwhat it looks to be stringer system and then ends at the end of the cuddy walkway and thats the last bulkhead?


something like this


my plan is to remove the sides, the "walkway" floor of the cuddy and keep the most forward triangle section t. thhe way it is, ill try to seal it up real nice, and gut as much moisture as i can out of the area, and leave it alone tiull one day my ass goes through the bottom lol the reason being is its so close to the hull that im afraid to cut it out. im honestly afraid of doing anything in the cuddy knowing that the hull is really close.
 

tpenfield

Moderator
Staff member
Joined
Jul 18, 2011
Messages
18,151
It looks like they transition the stringers to a more narrow layout going towards the bow, as dictated by the shape of the hull. I would keep going with the demolition, as things look equally bad up in the cuddy. The bow of the boat needs a lot of impact resistance, so it is best to do it up completely.

In terms of cutting a sawz-all type of tool with the demolition blade would be the thing to use, because you can go along the surface of the hull and avoid cutting into the hull. We see some folks going after the deck sections of the hull near the edges with a circular saw and that is when the errors of cutting into the hull itself can occur. You can safely cut some of the cuddy decking out with a circular saw to better expose the edges by just setting the depth to about 3/4" and cutting about 4" or so away from the edges of the hull.

It is always nice to leave a little bit of tell tale sign of where the deck meets the hull so you have good reference points on the rebuild. We have seen a couple of rebuilds where the reference points and/or measurements were off and things did not go back together as nicely.
 

198XLC

Cadet
Joined
Jul 7, 2015
Messages
9
Thanks. Yeah I was going to leave the side tabbing for reference I'll finish cutting and defoaming the cuddy today and take some messurments before cutting. I need insight on how to measure the motor mounts correctly. Everything else seems pretty straight foreward. Thank you for all the help I should be grinding tomorrow and cutting templates for the new pieces Saturday. Can probably have the stringers bulkheads and mounts done by next weekend. Might have water time in early august. I have allot of free urethaneindustrial coating to goover everything after I glass too
 

198XLC

Cadet
Joined
Jul 7, 2015
Messages
9
heres a little update. been at it all afternoon and have the cuddy gutted, the water logged foam was mostly big round blobs which came out in one piece. i really hate foam. and i saw some really dodgy construction in the cuddy, no glass on the undersides at all. boo chaparral
 
Top