90 HP 3 cylinder 2 stroke - suddenly running very rough, puffing air/fuel from lower carb

jim_s

Petty Officer 2nd Class
Joined
Sep 12, 2013
Messages
105
90 HP 3 cylinder 2 stroke - suddenly running very rough, puffing air/fuel from lower carb

Was out skiing w/ the boat early this morning. Started right up, ran as normal (very well) for most of the session, but started stalling out at idle and when adding throttle from idle at the pull-up - seemed like a little water in the gas line or such. Would start back up, but needed some throttle and choke to do so. Also wasn't running as strongly as normal at skiing speed of 32-33mph toward the end. Went back out on the boat this afternoon, and from the start, it was running very rough, stalling out at idle, etc. Was having trouble getting it over 4k RPM, seemed almost to be running on just 2 cylinders. Boat was on the water, so not much diagnostic could be done, but I did confirm that all 3 plugs are sparking. Carb pushrods are all in place, and are all moving when throttle lever is moved. Pulled the air intake cover, and the lower-most cylinder is sort of chuffing/puffing out air/fuel while the engine is running at low RPM. (The top 2 are only sucking air in.) It seems to spit less at higher RPMs, but still runs like crud.

Engine also seemed to be running a bit hotter than normal (pee stream draining after shutting engine off was warmer than normal, and while I could put my hand on top of the block, it was more uncomfortable than normal. No heat alarm went off or such.

Have not had a chance to try a compression test yet.

Thoughts? Could this be a reed valve problem of some sort? (I'm no mechanic, but that's the only thing that I could think of in a 2-stroke engine that might lead to this type of behavior...)

I appreciate any/all input - would love to get the boat back in service soon! :)

Jim
 
Last edited:

joeanna

Petty Officer 2nd Class
Joined
Jun 5, 2016
Messages
108
i'd take a look at the reed valves, mine i can see through the carbs, A compression test would be the easiest.
 

batman99

Petty Officer 1st Class
Joined
Sep 13, 2012
Messages
393
If gas spitting out the carb, then most likely reed / reed leaf problem.

If you need to buy Reed Leaf replacements, do investigate CCMS ( http://www.chriscarsonmarine.com/reed-valves.htm ). If you install Boyesen brand, you may have to rejet its carbs. CCMS reed leafs are direct factory replacements.
 
Last edited:

jim_s

Petty Officer 2nd Class
Joined
Sep 12, 2013
Messages
105
Thanks for the tips, guys! How big of a job is this on this engine, does anyone know? (It looks like a matter of removing the carbs and reed blocks, then replacing the reeds and putting it back together, is it worse than that? (I also don't know the realities of how much of the system you need to deconstruct to get the carbs off... <:)

I'll call CCMS tomorrow, and see what they have to offer vs the standard reeds (standard reeds seem to be part 43018A1, as per the Mercury online parts catalog).

I assume I'd also need gaskets for carb-to-reed-block and reed-block-to-engine? Any others?

Thanks for the help!
 

Texasmark

Supreme Mariner
Joined
Dec 20, 2005
Messages
14,778
Reeds on the malfunctioning cylinder......... #3 hat in the ring.
 

jim_s

Petty Officer 2nd Class
Joined
Sep 12, 2013
Messages
105
So, all 3 cylinders showed 80 psi on the compression test. This was done cold/dry, with a Harbor Freight tester, so who knows if they were actually 80 psi, and I don't know how much doing the test at operating temperature, with wet cylinders, would change things. (I can only assume the values would go up, though by how much, I have no idea - anyone with some experience have a reasonable guess?) The boat was in my garage, so I didn't dare run it to warm it up in there. :)

I take the fact that they're all reading the same to be a good sign that no reed bits got ingested by the bottom cylinder. (I obviously am a little concerned that they're only reading 80 psi, but again, there are several variables at work here that make the actual value of the reading a little suspect...)

Thoughts??

I went ahead and ordered CCMS 'Sport' reeds and the necessary gaskets, on the assumption that the reed is where things are headed.

I'll obviously need to pull the carbs to change the reeds - is there anything that I should do to the carbs while they're off the engine, or should I just leave them the heck alone altogether? Anything else that I should do while I have the front bits of the engine off?
 

Texasmark

Supreme Mariner
Joined
Dec 20, 2005
Messages
14,778
Ouch! 80# on that engine? Looks like Racerone nailed it, or at least one area that may need attention. Get yourself a new compression tester (second opinion....investment justified) and remove all the plugs.

I like to remove the plugs and then put the caps back on and wrap a piece of wire around the threads and ground the wire to the engine block...no painted area.....this ensures that the plugs will fire at a lower voltage and not damage your ignition with Merc's advertised 40kv high voltage (unloaded) pulses. Get a fresh (good ,condition charged) battery. Run the test again and record the data. Get a squirt can and squirt some OB engine oil (TC-W3) all around the cylinders and run the test again. Record the data. Come back.

Since all were identical and you had the problem on one cylinder, if your readings were good, you may have 2 problems.

If it was the gauge and the new one puts you in the green then you can go back to the reed problem and as Batman said, change the high speed jets in the carbs which is a mundane task as is removal of the carbs and reed plates. You will have to do a link and sync when finished which does best with a manual.....link and sync is a term referring to alignment of the butterflies, and the ignition timing to the throttle lever. The timing on that engine is around TDC at idle but up around 20-22 at WOT.

When I had my 90, I had the service manual and it said: Compression readings should be close, like 10% of each other. "If any cylinder is below 120 psig expect problems!" If you get a new gauge, use it correctly, and come up with the same answer, you need some new rings or yours are stuck from too much carbon. To get that question solved, after you post your compression numbers again we can talk about doing a "decarb" to see if in fact rings are stuck or worn out.

So far you haven't spent any real money nor invested any real time. Let's see which way the wind blows.

We'll wait.
 
Last edited:

jim_s

Petty Officer 2nd Class
Joined
Sep 12, 2013
Messages
105
Well, that's a little deflating... ;->

When I run the test again, should I warm the engine up on muffs first, or is it Ok to still do it cold?

I pulled all of the plugs, and tripped the emergency stop switch, which I'd previously been told would prevent the coils from firing - is that a correct and safe procedure? (vs tying the plugs to ground, which I can still do, if necessary)

I'll try dragging the boat down to an auto shop that I know someone at, and have them stick a (presumably) quality tester on at least one of the cylinders, to get some idea of how far off the HF tester might be (or to confirm that its not actually far off). I had a devil of a time trying to find a compression tester locally that got decent reviews online. Any suggestions on what I could get at a Napa, Advance Auto or AutoZone? (They had a few $100+ models on there, but most had only 1 review, or no reviews.)

I did a de-carb using Mercury/Quicksilver PowerTune a month back. All kinds of black crud came out as a result, which I assumed was a Good Thing. The engine certainly seemed to run smoother and better as a result.

FWIW, I've got a low-pitch prop on the boat, for the sake of improved pull-up on a slalom ski. Its a 4-blade, 12.8x19 Mercury Nemesis. Even w/ the lower-pitch prop, the motor only turns 5200-5300 lightly-loaded at WOT on smooth water. I'd kind of have expected it to rev a bit higher w/ the lower-pitched prop - not sure if that's a sign of anything significant or not. Also FWIW, prior to this problem, it has run and pulled quite well, considering its modest size. (It pulls someone up on 2 skis pretty much instantaneously, and it pulls me (granted, only 140 lbs) up on decent (ie, fairly narrow) slalom ski in about 3 seconds. So, if 80 PSI is as catastrophic as it sounds, I'm wondering how much its the gauge and the temperature, as the motor has historically seemed to run quite well. (fingers crossed...)

Thanks for the help and advice!

PS - as a quick sanity check, I just hooked the HF compression tester up to a good quality bike floor pump (with pressure gauge) that I have - the two appeared to read pretty much identically, so it may be the case that the HF tester isn't too far off...

PPS - when I did the compression test - I had the throttle lever in the neutral/idle position. IIRC now, I think the test is supposed to be done w/ the lever at WOT position, is that correct?
 
Last edited:

racerone

Supreme Mariner
Joined
Dec 28, 2013
Messages
38,412
Throttle position simply does not matter on a 2 stroke motor like yours when doing a compression test !!
 

jim_s

Petty Officer 2nd Class
Joined
Sep 12, 2013
Messages
105
Apparently not - I re-ran the test on one cylinder (family is asleep - was trying to do it quickly enough not to wake anyone! :) - WOT throttle position, still cold, and with a squirt of oil in the cylinder, and it measured the same as before. I fear this is headed toward a deeper level of work than I was planning for... <:)
 

jim_s

Petty Officer 2nd Class
Joined
Sep 12, 2013
Messages
105
Ok, I've recalled the hounds! :) I borrowed a Snap-On compression tester from an auto mechanic friend, and the cylinders tested 115-115-120 (cyls 1-2-3, top to bottom). Did each cylinder 3 times, and got the same results for each cylinder each time. This was cold, with about an inch of oil blown from a soda straw into each cylinder.

So, it sounds like I'm merely facing a reed problem, which is way more in line with what I'd been anticipating.

Lesson learned - buy good tools if you want good results. Will be making a trip back to HF today...

Thanks a bunch for everyone's input and concern regarding the compression numbers. Had it actually been 80 PSI, it sounds like I'd have been headed for a very different journey.

Talked to Chris at CCMS (who was highly skeptical of all 3 cylinders being at 80 PSI), who also recommended ditching the oil injection loop, and going with direct mix in the gas. (Given that we primarily ski, kneeboard and tube with it, he pointed out that you go from a 200:1 mix at idle, to a full-on hole shot, and then it finally gets to the needed 50:1 once you've already loaded the engine up w/ the pull-up of the skier/boarder/tuber.)

My day is looking much brighter! :)
 

jim_s

Petty Officer 2nd Class
Joined
Sep 12, 2013
Messages
105
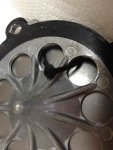
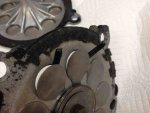
This might explain the sudden turn for the worse, eh?? (guess which reed block it is :)
 

Attachments

  • IMG_1754.jpeg
    IMG_1754.jpeg
    245.4 KB · Views: 6
  • IMG_1755.jpeg
    IMG_1755.jpeg
    200.2 KB · Views: 6

Texasmark

Supreme Mariner
Joined
Dec 20, 2005
Messages
14,778
Cause and effect.......smoking gun.......you found the smoking gun......great. Let's back the truck up to "cause and effect". How did a zip tie wind up in there especially considering it had to go through the carb venturi and to get there had to come in through an opening in the sound box?

Glad you found it. Best part is you're getting out fast and no big bucks repair.
-------------------
On the premix, I did mine that way too and put a note adjacent to the tank filler opening to remind me to add oil.

All I did on mine was to remove the oil pump, 3 screws and one hose as I recall, turned the pump so that I could get to the protruding drive gear, pull the gear and it's integral drive shaft, check for any loose parts (were none) and put it back. Worked just fine. Left what oil in the tank that was there so I didn't need to fool with the oil alarm wiring and if I wanted to change back all I had to do was to stick the gear back in. The oil will remain in the tank since this is a gear pump and no turn, no flow.
 
Last edited:

jim_s

Petty Officer 2nd Class
Joined
Sep 12, 2013
Messages
105
That is unquestionably a zip tie that I put around a bundle of wires in there, myself. (The ties that are original to the engine are a different style.) It appears that through vibration against some metal part, the zip tie was worn through and came loose. At that point, it somehow managed to get sucked into the airbox and began its trip to the lowermost reed valve. (Makes one respectful of the airflow that must occur inside the cowling!!) Good lesson learned there - I'll be much more cognizant of what I put under the cowl from now on, and how its secured.

I'm kind of thinking that I might try to find some plastic screening, and somehow cover the openings to the air box. I suppose this was a once-in-a-lifetime type of event, but if something less-fortunately shaped (its really lucky that the zip tie was whole enough that it just got hung up in there!) were to make it through the reed valve, it could cause all kinds of havoc. Has anyone covered their airbox openings before? I assume that something like screen door material, provided it'd hold up to the heat and vibration, wouldn't restrict airflow appreciably? I've always been a little surprised that there is no air filter on these outboards - not sure if its an airflow thing, or just an economy thing (ie, cost of adding an air filter to the system), or something else. The marine environment isn't a dirty/dusty one, but there are bugs, etc. (and, apparently, zip ties...)

On the oil pump, Chris' suggestion was just to loop the pump back on itself, cap off the oil inlet at the fuel pump, and just disconnect the oil sensor from the tank, then if I ever had a desire or need to return to the injection setup (such as selling the boat, etc), it'd be easy to just re-route the tubing, hook up the sensor, and be good to go. I've read a few other accounts of folks talking about removing the gear from the oil pump. CCMS apparently makes and sells a plate that can bolt over the oil pump mounting hole, itself - completely removing the pump from the system.

The other thing that comes to mind is to just hard-wire the oil flow valve into the full-on position (removing the linkage to the throttle) - that'd ensure that the highest oil:fuel ratio was being delivered all the time, and would allow the convenience of just continuing to add oil to the oil reservoir. (I actually find it much easier to keep that thing filled up, than to worry about getting the right mix of oil:fuel when I fill or top off the tank, which sometimes happens at a gas pump, sometimes happens from a portable tank that I have, etc - I suspect that I'm much more likely to screw up the mix, than I am to have an oil pump failure.) The down-side of that being, if/when the oil pump ever fails, I'm still subject to the engine burning itself up, and not really knowing until the overheat sensor goes off, which will likely be way too late. :) I'm not sure how much of an actual issue/frequency there is of the oil pump failures, vs how much of it is people just worrying about it. Anyone have any insights into the actual frequency of oil pump failure on these engines?

The other thing that occurs to me, would be to try to figure out how to add an oil pressure or flow sensor to the system, to detect if the oil pump fails, though I've given that no actual thought beyond, "Hmm.. I wonder if..." Even something that just detected the rotation of the pump could do it. (I suspect that if this were a do-able thing, however, the good folks at Mercury likely would have already done it...)
 
Last edited:

batman99

Petty Officer 1st Class
Joined
Sep 13, 2012
Messages
393
WOW! Not too sure how / why that plastic pull tie got sucked into the reed leafs. Very strange. I would simply remove and since its torn apart, replace Reed Leafs with new Reed Leafs from CCM (Chris). If wondering, I by-passed the oil side of my boat's VRO system (on 1985 Johnson 115), mixed gas at 50:1 and it works great since. Followed instructions from a few U-Tube clips. Good luck with your current mods / tweaking....
 
Last edited:

ondarvr

Supreme Mariner
Joined
Apr 6, 2005
Messages
11,527
Do not cover the opening with screen door material, it will restrict the airflow and make it run rich. Just leave it as is and chock it up to a very odd ocurance, if it was an issue people would be reporting problems like this more often.
 

Texasmark

Supreme Mariner
Joined
Dec 20, 2005
Messages
14,778
Inspect the reeds for cracks and check gap as specified in the manual. If gap is accurate and no damage to the reeds involved, why buy new unless you just want to? I agree that this was a fluke event and really doubt that any corrective action is required. However, screen would keep dirt dobbers out of your sound box and around here they love to build nests in engines.....dirt nests.....I can't imagine anything worse that having one of those in a sound box, coming apart and being sucked into the carb venturis.

If you are worried about volume with a screened input, check out the size of the inlet ports on the box vs the size of the venturis. If that still bothers you , double or triple or what suits you the area of the screen vs the area of the box input holes.
 

jim_s

Petty Officer 2nd Class
Joined
Sep 12, 2013
Messages
105
Yeah, I've already ordered the CCMS reeds, anyway, along with the various needed gaskets, so I'm going to go ahead put the new reeds in before putting it all back together - they'll allegedly improve all-around running of the engine, so it seems worth a shot. (The reeds and gaskets arrive today, so I'll find out this weekend if they make a noticeable difference - I'll report back with whatever anecdotal evidence I find.)

I found some somewhat wide-spaced wire mesh - larger than screen door, but small enough to keep things like zip ties out - made for rain gutters, but very sturdy material. I'm going to experiment with trying to shape that so that it covers the inlets, and see if/how it affects things. (I like Texasmark's idea of expanding the mesh out a bit, to improve flow rate!) It'd be simple enough to remove, if there were negative effects. I'm sometimes a Murphy Magnet, so while this episode is statistically unlikely to recur, I could see the possibility of it or something similar happening again. :)

Does anyone know offhand the torque specs for the intake manifold/reed-block bolts? (I've got the Seloc manual at home, but sometimes finding things in there is a bit iffy, it seems, so if anyone has that info, I'll hedge my bets on finding it in the manual tonight. :)
 
Last edited:

Texasmark

Supreme Mariner
Joined
Dec 20, 2005
Messages
14,778
Having learned the hard way, anytime I work on alum I am careful. One thing you might consider is blue thread sealer which will lubricate the threads going in, allowing for tighter holding power with less torque, will help to prevent corrosion between the bolt and the alum, and keep the bolt from backing out. Blue is for hardware that may be removed again....red is permanent. Seeing a ⅜ bolt with 1" of threads in an aluminum casting is pretty bullet proof following ASME thread gauge/temper-torque specs. But on large diameter bolts and thin castings, I get things "heavy snug" and be on my way. Never had a call back and the thread locker plays a big part in that.....I guess.
 
Top