Another major ask - Pedastal seat installation pictures in any starcraft please

shagdrrotten

Seaman Apprentice
Joined
Apr 17, 2014
Messages
30
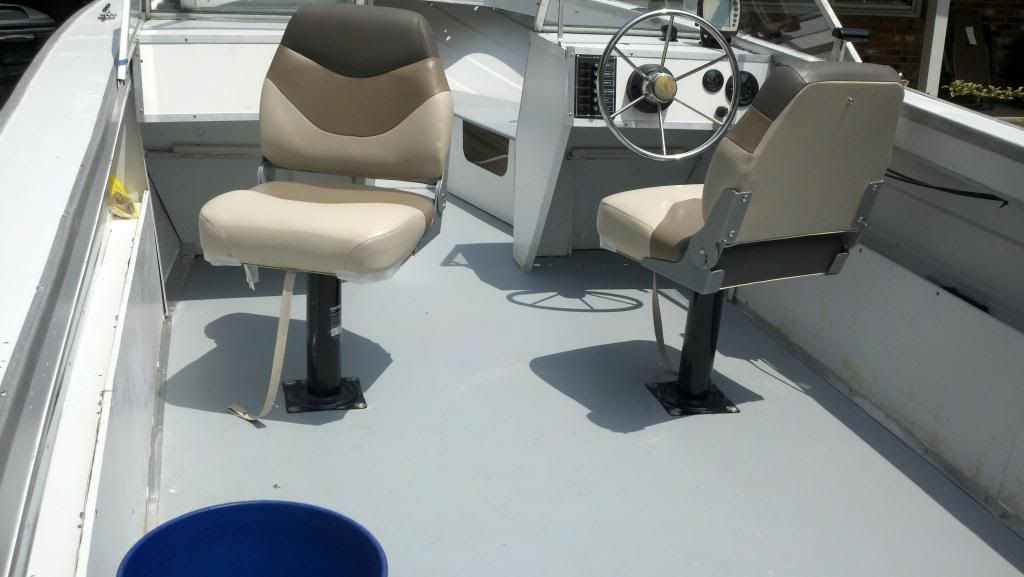
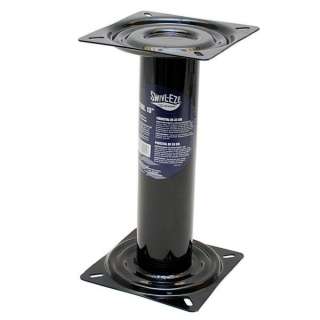
As I said in other threads, I will be using my 18 ft Holiday as a fishing boat 98 % of the time so I want to put 2 pedestal seats in as the main seats, back to backs are on the way to the dump.

My brother seems to think that this will put too much torque on the floor. He may be right. opinions and suggestions are welcomed.

I will be using at least one set of aluminum brackets under new floorboards but am willing to build a fort underneath if it enables me to safely install the seats.

Thanks for any and all replies.
 

dozerII

Admiral
Joined
Oct 25, 2009
Messages
6,527
Re: Another major ask - Pedastal seat installation pictures in any starcraft please

All of the Starcrafts I have redone get pedestal seats without a problem. Where ever you want to mount a seat install a doubler to the underside of the floor, this gives you almost 1 1/4" of ply to support the seats, way more than enough. If you go to my 18SS rebuild starting on post 136 http://forums.iboats.com/boat-resto...tarcraft-18-ss-here-we-go-again-476671-6.html
It shows how to do the floor with doublers. They not only stiffen the floor for seats but positioned right they join your deck sheets instead of the little aluminum strips. When placing your doubles watch the clearance needed for stringers and out at the edges hull ribs.
 

ctswf

Chief Petty Officer
Joined
Aug 7, 2012
Messages
424
Re: Another major ask - Pedastal seat installation pictures in any starcraft please

I actually never added backing under my floor at all, I think i rushed though it with a plan to make pedestal bases out of plywood with beveled edges, epoxy coat it, then epoxy glue and screw it to the top of the floor, sealing and painting it the same color as the floor.

I think it would have looked nice and be almost as good, giving you the same thickness to screw the pedestals in to.

In the end I wanted to test the seat locations, I screwed them directly in to my 5/8" floor with some fat screws and they seemed rock solid so I left them that way. I did caulk the screw threads, heads, and under the metal base with 5200.

I also was worried they would rip right out but that doesnt seem to be an issue, unless your floor rots

As far as pedestals to buy, I hit my budget so I ended up getting a fixed position trailer trash version found at wallmart :)
For the price I'm quite happy with them. I think they were $15 for the pedestal, and $10 for the swivel. Bringing a total of only $50 for 2 sets. I plan on getting a few years out of them before I upgrade to adjustable stainless steel pedestals.

2013-06-29_12-00-44_806_zps05983102.jpg


103230938_attwood-swivl-eze-91320-black-13-inch-economy-boat-seat-.jpg


414XzWaX2rL.jpg
 
Last edited:

jigngrub

Fleet Admiral
Joined
Mar 19, 2011
Messages
8,155
Re: Another major ask - Pedastal seat installation pictures in any starcraft please

If you use 1/2" decking you will need to install backer plates, if you use 5/8" or 3/4" decking you can use stainless steel "T" nuts:


"T" nuts are the easiest installation and they're OEM for new boats with 5/8" or thicker decking.
 

shagdrrotten

Seaman Apprentice
Joined
Apr 17, 2014
Messages
30
Re: Another major ask - Pedastal seat installation pictures in any starcraft please

Thanks for the posts guys. I think I will adopt a version of dozerll 's double boards, cross braces and mix in my aluminum plates. Raining all week here, must be nice to have a garage or work shop !! LOL
 

shagdrrotten

Seaman Apprentice
Joined
Apr 17, 2014
Messages
30
Re: Another major ask - Pedastal seat installation pictures in any starcraft please

Went through your entire 1986 Starcraft SS201 rebuild there dozer11, phenomenal work !! Wish I had the time, skills, money , workshop that you are blessed with.
 

dozerII

Admiral
Joined
Oct 25, 2009
Messages
6,527
Re: Another major ask - Pedastal seat installation pictures in any starcraft please

Went through your entire 1986 Starcraft SS201 rebuild there dozer11, phenomenal work !! Wish I had the time, skills, money , workshop that you are blessed with.

Thanks Shag, glad I was able to help.
 

airshot

Vice Admiral
Joined
Jul 22, 2008
Messages
5,373
Re: Another major ask - Pedastal seat installation pictures in any starcraft please

I do not have any current pics, however I do have the exact set of seats and bases that "CTSWF" has shown in his post. I use my Islander for both pleasure and for fishing, when I go fishing I remove three swivel seats to give more fishing room. I have attached my bases or pedestals to a piece of 3/4" plywood, beveled the edges and painted 12" sq for ea seat. I have a 3/4" plywood floor in my Islander so I installed 4 wood/machine screw nuts into the floor for ea seat. The ones I used are 5/8" wood screw that bores into the wood floor and has a 3/8" machine thread in the center. I have 4- 3/8" hand (knob) screws in each seat base to attach them to the floor. They have been in the boat for 3 years and no problems. They have held some rather large persons, I can put them in or take them out in 10 minutes and they look nice. I will try to get a pic posted of them. When the seats are removed they wood insert is flush with the floor so nothing is sticking up to trip over. The inserts are steel so on occasion I add a little grease to the bolt to keep them from rusting but "O"
issues with them at this point. Hope this explanation makes some sense to you all.
 

shagdrrotten

Seaman Apprentice
Joined
Apr 17, 2014
Messages
30
Re: Another major ask - Pedastal seat installation pictures in any starcraft please

Thanks for the reply airshot. Some pics would be good. Unfortunately I purchased 1/2 inch marine plywood.I do like the removability of seats as 95 % of the time the boat will be for fishing only 1 or 2 people on board. I was thinking of getting a marine cooler, salmon size, and attaching two seats to that for tubing etc. I want room when I fish, that is why I took out the back to back seats in the first place. It's coming along, gas tank and floor are out.
 

shagdrrotten

Seaman Apprentice
Joined
Apr 17, 2014
Messages
30
Re: Another major ask - Pedastal seat installation pictures in any starcraft please

Hey dozer11, You like that urethane spar varnish you put on the floors obviously, is it the same as epoxy ?? I will google it now. Where did you get all the pool noodles, $1 store !!
 

dozerII

Admiral
Joined
Oct 25, 2009
Messages
6,527
Re: Another major ask - Pedastal seat installation pictures in any starcraft please

Hey dozer11, You like that urethane spar varnish you put on the floors obviously, is it the same as epoxy ?? I will google it now. Where did you get all the pool noodles, $1 store !!

Epoxy is very expensive in Canada, and hard to get at least out west here. StarCraft never put any sealer on the wood in the boats and if the original owner looked after the boat it last for 35 to 40 years, so wood sealed with spar in a boat that is covered and looked after should last 60 to 70 years. Canadian tire sells both Helmsman and there own brand, have used both with similar results, the Helmsman has a little less odour than the Cdn tire brand. When you use the spar make sure you clean the grove for the lid out well, put the lid on tight and store the can upside down, Spar tends to skin over in an open can, storing it upside down will but the skin on the bottom.
Pool noodle I got from a place in Missisauga On in bulk for $1.25 each, I don't recommend them any more as blue or pink rigid foam board.
 

tgp***

Senior Chief Petty Officer
Joined
Oct 18, 2009
Messages
768
Re: Another major ask - Pedastal seat installation pictures in any starcraft please

Well Nuts. I've seen these use on new boats, and I just picked some up. I'm going to test them this week, before I put down my flooring. 6 per pedestal. 1/4" - 20 x 1" long. 1/2"hole. With the stainless steel screws came to $12.50 to do 2 pedestals. Picked them up at the areas boat supply house, they recommended them over t-nuts.

This is what they look like.Well Nuts : Hanson Rivet
 
Last edited:
Top