weeniehutjr
Recruit
- Joined
- Apr 29, 2025
- Messages
- 4
Hey guys,
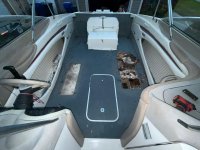
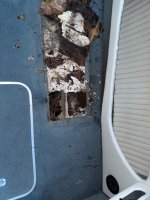
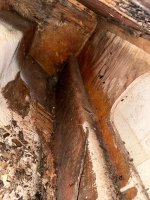
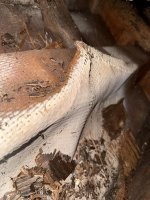
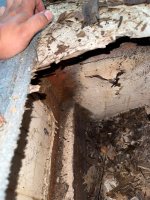
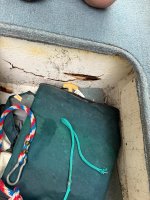
Just recently bought a 2000 Bayliner Capri 2350LX, with the dreaded soft floor. But, on the bright side, it's got a brand new motor (with straight pipes!) Got a decent deal on it. Planned on just avoiding the area, but the first mate wants that seat where it's soft. And you guys know, gotta keep the first mate happy... I'm really hoping the stringers are alright, if not I'm gonna try to keep what I can and stitch in good stringer where it's rotted out.
I've watched friscoboater's youtube series a bit on his project (still watching as I write this) as well as Ryan Rutter's series on it. I'm gonna get some 1708 with poly on order tonight, along with some gel coat. There's a few places near me that I can get marine plywood at. Gonna start ripping the floor out this weekend before it starts to get too hot here in Florida.
My plan is this: rip the floor out, check stringers, stitch new stringers if needed, glass and gel coat stitched stringers, put down new floor, tab in, pour foam, glass and gel coat floor, put EVA decking down.
I think I will use Ryan Rutter's method of using surface sealer (wax) on the last coat of gel coat.
My questions are this:
Unfortunately I don't have a garage to do the project in, so my driveway/front yard will have to do (when is isn't raining).
Just recently bought a 2000 Bayliner Capri 2350LX, with the dreaded soft floor. But, on the bright side, it's got a brand new motor (with straight pipes!) Got a decent deal on it. Planned on just avoiding the area, but the first mate wants that seat where it's soft. And you guys know, gotta keep the first mate happy... I'm really hoping the stringers are alright, if not I'm gonna try to keep what I can and stitch in good stringer where it's rotted out.
I've watched friscoboater's youtube series a bit on his project (still watching as I write this) as well as Ryan Rutter's series on it. I'm gonna get some 1708 with poly on order tonight, along with some gel coat. There's a few places near me that I can get marine plywood at. Gonna start ripping the floor out this weekend before it starts to get too hot here in Florida.
My plan is this: rip the floor out, check stringers, stitch new stringers if needed, glass and gel coat stitched stringers, put down new floor, tab in, pour foam, glass and gel coat floor, put EVA decking down.
I think I will use Ryan Rutter's method of using surface sealer (wax) on the last coat of gel coat.
My questions are this:
- What's your overall advice for taking on this kinda project?
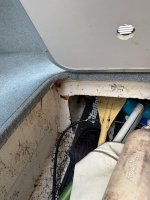
- Do I need to remove the gas tank to check underneath? It's currently full (65 gallons)
- Do I need to glass the bottom side of the plywood floor before putting it down? Or is resin enough?
- Is the pour foam really needed/worth it?
- Which is better? Structural polyester putty? Or make my own peanut butter (thickened poly resin)?
- Use 5200, PL glue, or putty/peanut butter for the surface between the stringers and floor?
- Do I need to tab in the floor if using 1708 across the whole thing?
- 1/2" or 3/4" plywood for the floor?
- When going to put the seats back in, do I screw them in over the EVA decking? Or put the seats back in before the EVA, and if so, Is there anything that needs to go between the seats and the floor?
Unfortunately I don't have a garage to do the project in, so my driveway/front yard will have to do (when is isn't raining).
![IMG-20250501-WA0060[1].png](/data/attachments/407/407317-01a9d810734274e9410256abcfac9950.jpg)
![IMG-20250501-WA0061[1].png](/data/attachments/407/407318-f50f632498d75d11ce036d290e7e31fe.jpg)