Bilge stringers and decking - material check and advice needed

vetting

Petty Officer 2nd Class
Joined
Dec 9, 2012
Messages
196
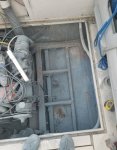
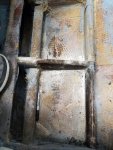
The decking in the bilge was getting a little soft so I decided to make it my spring project to cut it out and inspect. The stringers have some bad spots but they arent completely shot. There was no water under the decking but the glass work was pretty shotty from the original manufacturer. The stringer and floor supports run from the transom to the first bulkhead. As long as I have everything open, I'm going to head and replace everything. This will be my 3rd glass job so I have some experience. I want to make sure I'm doing this right so need so thoughts on my game plan.

There is one main structure stringer against the hull and then the floor support stringers.

Game plan:
Finish cutting the glass off the stringers.
Remove the wood and grind the hull
Replace the main stringer with laminated ACX plywood. Overall size 2"x4". Round over the sides. Or should I use a 2x4 of a particular wood?
Embed with West Epoxy and 406 to make epoxy peanut butter.
Create epoxy fillet on the sides
Let it cure
Replace the floor supports with 1/2 ACX plywood embedded with West Epoxy and 406 and create epoxy fillet on the sides.
Coat main stringer and floor support with epoxy and 17oz biax no mat cloth. Not sure if I should do 2 layers or not.
Then for the decking, take a sheet of 1/2 ACX and coat the backside of the plywood with epoxy and 6oz cloth.
Install the decking once the backside is cured and use 17oz biax no mat cloth over the face and join it to the existing glass along the sides.
 

Attachments

  • photo312014.jpg
    photo312014.jpg
    838.6 KB · Views: 8
  • photo312015.jpg
    photo312015.jpg
    978.9 KB · Views: 8

kcassells

Fleet Admiral
Joined
Oct 16, 2012
Messages
8,738
Technique and approach are right on the money. I would think to look at the other stringers/bulkheads. Ply not dimensional.
Rot starts from the bottom up. You're call to open other areas and check out.
 

vetting

Petty Officer 2nd Class
Joined
Dec 9, 2012
Messages
196
The stringers arent horrible - looks like there has never been water in the compartment so it was just condensation from 30 years of northern climate. They just have some rot where they had gaps in the glass. I already replaced the stringer in the cabin a few years ago because someone decided to cut a drain in the cabin floor and let it drain right into the stringer.

The bulkhead is solid as well as the transom. I'll probably put some extra glass in a few places as long as Im in there. The transom is 3 1/2" thick and a good portion of that is glass. I drilled 6 large bolt holes in it last year to mount a kicker bracket and everything was dry.

Should I fully glass in the main stringer and then cut the floor supports to match or should I embed everything first and then glass everything all at once?

How many layers of 17oz biax should I do with the epoxy? 2 on the main and 1 on the floor supports?

So 2x4 of douglas fir for the main stringer or 2 x 3/4 acx ply?
 

kcassells

Fleet Admiral
Joined
Oct 16, 2012
Messages
8,738
tabbing plus 2 layers of 1700, glass .
I always DID WET ON WET ON STRINGERS.
Typically the glass recovered the bottom of the boat.

PLY..............................Stronger
 

vetting

Petty Officer 2nd Class
Joined
Dec 9, 2012
Messages
196
Some progress pictures. Cut out the glass and removed all of the wood today from both sides. Then a whole bunch of grinding. The right side needs some work yet since they dumped all of the leftover resin on that side.

Bilge7.jpg
After removal and grinding

Bilge8.jpg
 

Attachments

  • photo312295.jpg
    photo312295.jpg
    578 KB · Views: 1
  • photo312296.jpg
    photo312296.jpg
    512.8 KB · Views: 1

vetting

Petty Officer 2nd Class
Joined
Dec 9, 2012
Messages
196
Finished up about an month ago put a few hundred miles on her since. Overall, the project took around 100 hours.

Lifted the motor with 2 2x4s and a small hoist. Lifted it only a 1/4 or so in order to take the weight off the glass for the mounts. Then took a handheld router and slowly removed all of the wood from under and around the engine mount. Saved me from completely removing the motor and rebuilding the stepped up glass.
fetch
wAAACH5BAEKAAAALAAAAAABAAEAAAICRAEAOw==
 

vetting

Petty Officer 2nd Class
Joined
Dec 9, 2012
Messages
196
One side mostly cleaned up and some minor glass repair on the mounts.

photo317598.jpg
 
Last edited:

vetting

Petty Officer 2nd Class
Joined
Dec 9, 2012
Messages
196
Next I took some 1/2 plexi and built a mold/dam against the engine mount/stringer. Surrounded it with plumbers putty and some tape. The used CarbonBond and poured through a 1 inch hole in the top of the engine mount. The engine mount bolts were inserted with wax release agent around them. Let it dry for a few hours and it dried solid as a rock. Used around 7 gallons on each side.

photo317596.jpg
 
Last edited:

vetting

Petty Officer 2nd Class
Joined
Dec 9, 2012
Messages
196
Glassed in 2 marine plywood stringers and a cross member support for the floor. Used multiple layers of 17oz biax and West Epoxy.

photo317595.jpg
 
Last edited:

vetting

Petty Officer 2nd Class
Joined
Dec 9, 2012
Messages
196
Took a 1/2 piece of marine ply and glassed the backside of it. Once dry, then laid it in a generous fillet of thickened epoxy.

photo317597.jpg
 

vetting

Petty Officer 2nd Class
Joined
Dec 9, 2012
Messages
196
Glassed the top side of the floor and then faired it out with thickened epoxy.

photo317599.jpg
 

vetting

Petty Officer 2nd Class
Joined
Dec 9, 2012
Messages
196
Let everything cure really well and then a few quick coats of paint and some cleaning. The entire area is solid as a rock now and I plan on putting some circle hatches in so that I can monitor the condition below deck in the future.


Attachments

  • photo317600.jpg
    photo317600.jpg
    647.4 KB · Views: 2

vetting

Petty Officer 2nd Class
Joined
Dec 9, 2012
Messages
196
Good thing I took pics and documented. Im about to put some 5" holes in the deck to put in some circle hatches and I dont have the pics on my phone anymore. In regards to the pourable compound - its been rock solid so far and the engine hasnt moved a bit with the bolts mounted in it.
 
Top