sangalanga
Cadet
- Joined
- Apr 14, 2009
- Messages
- 12
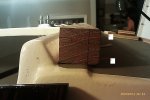
I need some advice on a simple solid solution that I am sure I am making too complicated. The old companionway hatch rail on our 1983 Starwind was a piece of plastic track that the original hatch slid along inside with a small flange. I may have made a mistake by cutting this flange off to pursue another idea. I have replaced the flange with some 1/8" aluminum angle mounted on beveled douglas fir with brass screws (#4 and #3). I plan to have this flange run inside two pieces of doug fir (pictured uncut #1). However, when dry fitting, the brass screw bolts #3 just clear the rounded edge of the companionway if I cut the channel as marked in the picture (#1). I am talking 1/32 of an inch. However I want to I shape the bottom of the rail to match the contour of the deck (#2) which will drop the hatch by at least another 1/8th of an inch or so. I could cut the channel a little closer to the top and raise the hatch but I am worried about the channel collapsing with so little wood between it and the top of the rail if it was stepped on etc. I have also considered cutting the excess screw length but this does not buy much as the holes for the bolts have been drilled at level, not perpendicular to the surface of the hatch so the bolts are not laying flat against the inside surface of the hatch but are 90 degrees to level. (Sorry, I know that was a lot of words to say something simple) and will hit the companionway edge as well. I could glue some additional wood on the top or bottom of the hatch rail but again I feel that might impact the integrity as well . Can anyone suggest a simple inexpensive solution to this. Thanks.......