controls for force by mercury 1998

oxbeast1210

Petty Officer 1st Class
Joined
May 14, 2010
Messages
309
Can someone point me in the right direction for getting controls for my 1998 force by mercury (tracker series) outboard?
its a 1998 40 hp . i cant seem to find controls that will install on the right side of my center console..
thank you
 

Frank Acampora

Supreme Mariner
Joined
Jan 19, 2007
Messages
12,004
Re: controls for force by mercury 1998

The Mercury Quicksilver 3000 will install on the right side. I just did one. Since your Force uses Mercury control cables, it is an easy retro-fit.

You must pull out the center button on the handle to access the nut. The button will break and you will need to order another. Remove the control handle and outside trim and drill a center hole to clear the inside box. Drill three radial holes to clear the trim to box mounting screws and drill three or four holes through the holes in the trim plate for mounting screws. The control box itself will be flipped so you must use the other side of the shift and throttle levers.
 

oxbeast1210

Petty Officer 1st Class
Joined
May 14, 2010
Messages
309
Re: controls for force by mercury 1998

Great Frank! that's actually the controls that came with my motor.
Do you have any pictures of the procedure I'm having trouble picturing what you are describing..
thank you!
 

oxbeast1210

Petty Officer 1st Class
Joined
May 14, 2010
Messages
309
Re: controls for force by mercury 1998

this is as far as i got so far haha
 

Attachments

  • 20120707_212704.jpg
    20120707_212704.jpg
    142.6 KB · Views: 1

Frank Acampora

Supreme Mariner
Joined
Jan 19, 2007
Messages
12,004
Re: controls for force by mercury 1998

That box appears to be already set up for right hand console mount but I don't remember if the cables should be in the bottom or top position on the control box. No major problem, after determining position of box and handle it can be changed quite simply

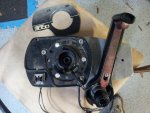
Remove the three phillips head screws and save them: They are for mounting the outside of the box (black cover plate) to the console.

Now remove the three 7/16 (or 11mm) bolts and separate the box from the cover plate and handle. You will need to open the box and disconnect the trim wires (three smaller phillips screws on the back). Take a photo so you remember how everything goes back: there are a lot of wires inside the box and they are packed tightly.

Now, in the console drill a center hole to clear the center of the box--I forget, around 2 inches. You must also have clearance for the trim wires--- Be certain you leave enough room inside the console to clear the box. Also be certain that the handle will clear the console and any obstructions at full travel both forward and reverse.

Drill three holes for the phillips head screws in the position you want the cover plate attached to the console

Note the radially spaced holes in the cover plate. Drill the three that match the box in the approximate position that the box will have inside the console while the cover plate and handle are in the position you want outside. Drill them large enough to allow the bosses on the box to protrude through and contact the cover plate.

Drill a square hole to clear the kill switch on the bottom rear of the cover plate.

Now, mount the cover plate, assemble the wires inside the box, mount the box to the cover plate, insert the lithographed 3000 aluminum trim, and attach the handle. You will already have run the control cables down through the console to the engine. Put the rear cover back on the box. Before finishing, check that control cables have the correct movement. If not, attach them to the other side of the levers inside the box. (In a console, this is much easier to do with the box unattached and hanging outside the console.)

Attach external wiring. The kill switch connects to the stop wire (black with yellow trace) and ground. Thus, when tripped it will ground the stop wire and kill the engine. A lanyard with a looped end fits over the kill switch and clips to the driver. Man overboard will automatically stop the engine. A good safety device but if you do not want it simply do not attach the wires to anything.

If all goes well, it will take about an hour, or maybe an hour and a half. If by some chance the controls are reversed, simply remove the rear cover and switch cables to the other side of the box.
 

oxbeast1210

Petty Officer 1st Class
Joined
May 14, 2010
Messages
309
Re: controls for force by mercury 1998

Thanks for the detailed post frank would the aluminum with the Forward and Reverse just be backwards when installed for the right side?
thanks
 

Frank Acampora

Supreme Mariner
Joined
Jan 19, 2007
Messages
12,004
Re: controls for force by mercury 1998

There is no right or wrong. The kill switch will be facing the rear of the boat when mounted on the right side of a console. When mounted on the right side of a standard runabout, the kill switch is forward. The aluminum plate can only insert into the mounting plate one way. Simply cover or black out the "F" and "R" printed on the plate as the direction will be reversed.
 

oxbeast1210

Petty Officer 1st Class
Joined
May 14, 2010
Messages
309
Re: controls for force by mercury 1998

Anyone know what model controls these are?
 

Attachments

  • 5Ec5Ke5Ma3E43I93Mcc6de992f5b617c7105c.jpg
    5Ec5Ke5Ma3E43I93Mcc6de992f5b617c7105c.jpg
    15.7 KB · Views: 0

oxbeast1210

Petty Officer 1st Class
Joined
May 14, 2010
Messages
309
Re: controls for force by mercury 1998

Bump..
m going to do what frank recommended for now but still looking for. other ideas..thank you
 
Top