Exploded View? Carb on '73 Johnson 9.5hp

MrGED05

Seaman
Joined
Jul 25, 2008
Messages
50
Rebuilding a '73 Johnson 9.5 hp Carb. Ordered the manual a week ago but it hasn't arrived and I've a three day weekend in which to complete the task. Figure it should be "doable" without the manual.
I have the proper rebuild kit (PN 0382048).
Float, needle valve and seat, those are now as they should be. Float set to be level with carb top when inverted, 1/4 inch drop opens the valve nicely. The kit contains carb top to float bowl gasket and carb to intake gaskes that match what I've removed.
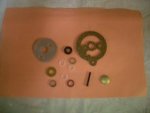
However, oddly enough, I've one package of replacement bits and pieces that don't match with anything I've found inside the carb. There is a circular screen, several small round gaskets, and a cork plate gasket that don't match anything inside the carb. One black plastic rod, about 1/16 inch diameter, about an inch long, slotted and hollow head is a real interesting piece, no idea where it belongs.
A "exploded view" of the carb would really help me identify and properly replace these.
Anyone have an "exploded view" or diagram of the carb they'd care to share with me? Or a hit about where these parts are located in the engine?
Thanks in advance,
Gary
 

joho5

Chief Petty Officer
Joined
Aug 14, 2008
Messages
456
Re: Exploded View? Carb on '73 Johnson 9.5hp

you dont use them...i came across the same problem. the kit was made for different variations of this carb and they dont use these parts. Here are the parts I used from that kit for my 9.5

1. Oring for slow idle spring / screw
2. float assembly with arm and float needle / seat with red washer
3. the 2 large main gaskets

I believe that might be all. There were some cork parts that were left over, and a screen piece, and some plastic washers that werent used.

I do have a manual and these pieces werent on it.

you can look at http://shop.evinrude.com/ under the parts section and see your carb blown up.

hope that helps
 

joho5

Chief Petty Officer
Joined
Aug 14, 2008
Messages
456
Re: Exploded View? Carb on '73 Johnson 9.5hp

ohh and the main thing is that when you have it apart clean every single little hole, jet, orfice, etc...

after I did this, mine ran like new.
 

MrGED05

Seaman
Joined
Jul 25, 2008
Messages
50
Re: Exploded View? Carb on '73 Johnson 9.5hp

I have a picture of the mystery pieces. I can email it but not attach it in this forum. The "Attach" icon only allows me to enter a URL, not to browse and attach "JPG" files.
Additional question, I removed the external plug that leads to the fuel feed in the venturi. Spooky thing to do. The replacement plug leaked until tamped down with a small ball peen hammer. Do I also, REALLY, need to remove the larger plug on the side of the carb?
Picture of parts in the carb rebuild kit:
 

MrGED05

Seaman
Joined
Jul 25, 2008
Messages
50
Re: Exploded View? Carb on '73 Johnson 9.5hp

Found a way to attach the picture
 

Attachments

  • Carb Pieces.jpg
    Carb Pieces.jpg
    6.2 KB · Views: 1

MrGED05

Seaman
Joined
Jul 25, 2008
Messages
50
Re: Exploded View? Carb on '73 Johnson 9.5hp

Joho5,
Thanks buddy. I am much relieved. I've thought (in the past) that I was pretty handy with motors and such. Working on outboards is a new venture for me, I was deeply disturbed that I couldn't find the appropriate places for such a great number of highly specific "O" rings, gaskts, filters and such. I'm delighted to know that they're designed for a different engine !!!
GAry
 

James R

Commander
Joined
Feb 1, 2007
Messages
2,679
Re: Exploded View? Carb on '73 Johnson 9.5hp

To clean the carb, any carb, dont use "spray" carb cleaner. That will destroy any finish and plastic parts and will not remove shelac.
A 1gallon carb cleaner by the makers of Gunk products is available from Advance Auto and others. Follow the instructions and this will do the job.
I have never known it to damage carb plastic parts.
Do not use anything to probe thru the jets. You will destroy them
 

joho5

Chief Petty Officer
Joined
Aug 14, 2008
Messages
456
Re: Exploded View? Carb on '73 Johnson 9.5hp

that red washer goes in between the plug and bowl, but you havent removed this. If I am not mistaken, the high speed jet is in there and you can clean that by removing the plug. I would suggest removing the plug and cleaning that area, plus you are replacing the red washer that goes in there and probably will prevent leaking. The doughnut looking oring goes on the idler adjustment pin up against the motor. If you unscrew the idle adjustment pin, you will see that one. That black plastic bar is just the bar that holds the float. If your float looks good and is functioning properly, dont worry about that one. Those cork pieces and that screen along with those nylon washers I didnt use either. So basically out of the parts you have left, I used the doughnt Oring, the red washer, and I actually replaced the float bar.

make sure and get some carb cleaner and squirt in all holes / jets / orfices until the cleaner comes shooting out somewhere else. thats how you know its clean. It wouldnt hurt letting it soak in carb soak also.
 

stl

Petty Officer 1st Class
Joined
Jan 22, 2005
Messages
346
Re: Exploded View? Carb on '73 Johnson 9.5hp

I believe those cork pieces are to service the fuel pump. I used them when I did my 9.5
 

joho5

Chief Petty Officer
Joined
Aug 14, 2008
Messages
456
Re: Exploded View? Carb on '73 Johnson 9.5hp

the thing is that the original fuel pumps for this engine are no longer available, so some, like mine are the newer fuel pumps and those parts dont appeal to them. But check to see if you have the original fuel pump, because these could fit to that.

good catch.
 

MrGED05

Seaman
Joined
Jul 25, 2008
Messages
50
Re: Exploded View? Carb on '73 Johnson 9.5hp

Wrap up.
First, heartfelt thanks to those who offered their advice and knowledge!
Some hints were invaluable. Some a tiny bet less so. But, just a tiny bit.
I am amazed and delighted by the responses and the knowledge of the people in this forum.
For any others who face the same issues I faced in this thread, here are my findings:
There are a LOT of parts in a Johnson carb rebuild kit that have no relevance to many of the carbs for which they offer that product. The exploded view site offered earlier in this thread is PRECIOUS to determine what is really applicable.
In my particular case, the low speed mixture needle valve needed to be turned out TWO and a half turns from closed to get the mixture correct for my particular outboard. Most of the advice (no doubt based on personal knowledge) suggested one and a half turns. Thus, if the blasted engine won't start at one and a half turns, try my setting.
I never did find out what is the proper setting for the gap on the points. I just tried several different settings and found that twenty thou at full cam opening let me start, run, idle and run at WOP for my particular 9.5 hp "73 Johnson outboard. A hint for beginners, tightening the "clamp down" screw on the points plate will decrease the points gap by about four thou, enough to mess things up unless you know that's going to happen. Check the gap again after you've tightened the points, make sure you have the appropriate gap.
After having drilled, tapped and removing the two exterior "press" seals visable on the starboard side of the carb, I do not belive it necessary to remove and replace those parts, a solid spray of carb cleaner should be more than enough to clear any obstructions. If carb cleaner sprayed into the tube from the float bowl also sprays out of the venturi fuel tube, you should be good to go without removing and replacing the seals.
When I removed the float, needle valve and seat from my carb, there was no "tiny spring" clamp holding the needle valve to the float. The rebuild kit had a "tiny spring" clamp that seemed obvious to me as far as its intended use. I clipped the clamp to the float and the needle before installing them into the carb. It worked.
Two original carb leaks went away when I put the carb back together. I used a VERY thin coat of Permatex "Formagasket" on all gasket surfaces during assembly. I also used a new straight edge razor to insure that all gasket surfaces were perfectly clean before re-assembly.
Use the pre-tapped and threaded holes in the top of the flywheel with a gear puller to remove it. Don't try to pry or hammer the flywheel loose. Don't. Just don't. A cheap three jaw puller from Autozone, with the puller plate upsidedown works great with 2" bolts of 1/4 slash 20 threads.
A long rubber strip type pipe clamp works great for holding the flywheel in place while removing the nut that holds it down.
Replace the fuel line from the tank to the pump when doing this job. My fuel line was old and soft, it compressed under load, cut of the fuel supply, made things much more of a "challenge". Just remove and replace it, dirt cheap to do.
You can't easily buy Benzine. Make do with carb cleaner and remove all plastic parts, rubber parts, cork gaskets, then spray and let soak overnight. In the morning, spray again, blow clean and put things back together.
The transmission will not go into neutral with the throttle fully open. Turn the throttle back to less than half before trying to shift to neutral.
A fine tooth file will allow you to SLIGHTLY taper the "key" that locks the flywheel to the crankshaft, that makes re-assembly much easier.
Final note:
THE ENGINE RUNS AT LEAST AS GOOD AS WHEN NEW. It starts with one pull. It runs at low idle and is happy doing so. Crack the throttle and it jumps to full power. My twelve foot Jon boat, my girlfriend (130 pounds), my dog (150 pounds), her dog (25 pounds), myself (160 pounds), six gallons of fuel (48 pounds), assorted gear and a cooler full of food and beer, all go onto plane and zip right along now. HURRAH and thanks to all who helped me.
A post script, I really enjoyed doing this task. And I'm delighted with the results. Even more important, I'm greatly thankful for those who shared their wisdom and knowledge with me.
Thank you,
Gary
 

joho5

Chief Petty Officer
Joined
Aug 14, 2008
Messages
456
Re: Exploded View? Carb on '73 Johnson 9.5hp

man its glad to see you have it going good. I have never touched the magneto, points, timing, etcc part of an outboard as it is intimidating to me. I have no clue if it is challenging or not, but I have just about done everything else on an outboard now to this point and all learning on a johnson 9.5.

chime back if you need any more ideas and I will do the same.

Matt
 

Tim Frank

Vice Admiral
Joined
Jul 29, 2008
Messages
5,346
Re: Exploded View? Carb on '73 Johnson 9.5hp

If it works for you, keep doing it!
But....a couple of your suggestions could cause someone else a real problem.
1)"Tapering" the crankshaft key is not something that I think anyone would recommend. If you mean a slight bevel on the top edge that is first into the flywheel, maybe. But don't "taper" the whole length.
2) Nothing wrong with using the Permatex, but if surfaces are properly cleaned, and new gaskets, you shouldn't need anything else to get a good seal. But if you have to dismantle again, the Permatex will not be your ally. It can be a pain to break joints and cleaning is a PITA.

Two comments:
1) Point gap. I don't think that I have worked on a pre-1980 OMC outboard under 20 Hp that did not have the breaker gap etched or cast into the flywheel. Just about the universal number is 0.020", so you should be fine.
2) 2-1/2 turns on the slow speed needle does sound like a lot. There may be some deposits or restriction in the jet which is why you haver to open it up so much...that may cause you problems eventually.

One thought, when I first started working on carbs, when adjusting the jets I counted each crank of my wrist/the screwdriver. My father kindly pointed out that I was only getting 1/2 actual turn of the jet per "crank" of the wrist.

Sounds like you have this well in hand! Those are nice motors.
 
Top