


Boat is a 17' Hourston Glasscraft.
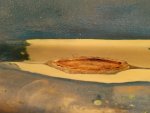
My roller trailer came apart on a rough road and one of the roller mounts ended up digging into a strake. By the time I was home and saw the issue it had worked it's way well into the hull.
I've removed all the damaged material. The section measures about 4" long, 1" wide and is approx 3/8" deep at most (measured from corner of strake). The damage extended all the way to the stringer which seems to be nice solid wood. Between the tapered profile of the fiberglass strake and the stringer there was a gap about 1/16" to 1/8" thick with a hard rubber substance; I figured maybe some sort of polyurethane or adhesive that is used when bedding the stringers? I picked out the section where the repair will be with an exacto blade. The pictures might make it look like there is some bowing around the damaged section but the surrounding area appears true when measured across with a straight edge.
I have some marine-tex epoxy that I've used for other much smaller repairs. It seems to have worked pretty well. My original plan was to use this marine-tex product in this application but I'm having second thoughts.
If it was your boat and you were planning on keeping it would you be hesitant to use the marine tex? Do I need to feather this area out further and repair with fiberglass?
Thanks in advance or any suggestions.
Cheers


")