Floor, Stringer & Transom Replacement - 85 Doral TRX

Matrex

Seaman
Joined
Aug 2, 2008
Messages
54
I bought my first boat this summer. Rookie mistake #1 (there have been many): I bought it without bringing a boat-savvy friend. Anyway, found out that A) it leaks through the transom and B) the floor was rotten in the back.

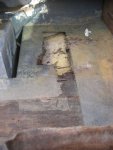
Looks like the previous owner knew there were problems. He had peeled back the carpet under the back seat and cut a hole through the fiberglass floor. Put your hand through a it comes out with rotted plywood.

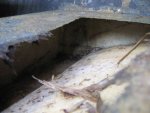
So fine. I like the boat, so want to fix it. I started to tear it apart today. The plywood under the fiberglass floor is completely gone, so I will have to replace it. From the looks of it so far, there are no wooden stringers or foam. It looks like the stringers supporting the floor are molded fiberglass - part of the hull. Am I correct in the assumption then that marine grade plywood, epoxy on the bottom, tabbed into the sides of the hull will be *all* I have to do?

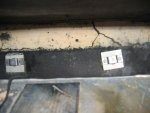
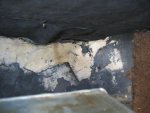
More worrisome is the transom. I know it leaks through the hole that have been drilled - engine mounts, splashwell drain. It looks like someone already tried to fix the fiberglass around the splashwell - but it is not a good job. Water is still seeping through any cracks in the white stuff and around the edges. Any ideas on if that really is a fiberglass "patch" of some sort on the transom (see the white stuff on the transom photos) and suggestions for fixing that up? I have never done anything like this before. Also, how do you seal the engine mounts? Is there a method to that?

Many thanks!
 

Attachments

  • Rotting Floor.jpg
    Rotting Floor.jpg
    87.4 KB · Views: 0
  • Stringers1.jpg
    Stringers1.jpg
    88.3 KB · Views: 0
  • Stringers.jpg
    Stringers.jpg
    46.9 KB · Views: 0
  • Trans1.jpg
    Trans1.jpg
    41.7 KB · Views: 0
  • Trans2.jpg
    Trans2.jpg
    45.3 KB · Views: 0

Matrex

Seaman
Joined
Aug 2, 2008
Messages
54
Re: Floor replacement - Doral TRX

Re: Floor replacement - Doral TRX

Pulled more of my floor out tonight. Still perplexed by this repair job...can anyone shine light on what this stuff is? It looks like a patch of some sort, and goes all the way around the splash well. It has become brittle and separated from the original hull material. Water does trickle through where it has lifted from the hull.

Trans1.jpg


Trans2.jpg


crack.jpg


Any idea what it is and what it was used for?

many thanks
 

ondarvr

Supreme Mariner
Joined
Apr 6, 2005
Messages
11,527
Re: Floor replacement - Doral TRX

Re: Floor replacement - Doral TRX

Not sure how this one slipped through the first time with no responses, sorry about that.

That looks pretty bad, the white stuff is most likely Marine Tex, an epoxy putty that people believe can perform miracles, as you can tell it was a poor attempt at a repair. I think this will turn into a much bigger project than you expect it to, most of the wood, or I should say all of the wood will need to be replaced.

Read some of the other posts about rotten floors or transoms, then sit down and cry for a while, after that get out the demolition tools and go for it.
 

74SkeeterHawk

Seaman
Joined
Oct 11, 2008
Messages
73
Re: Floor replacement - Doral TRX

Re: Floor replacement - Doral TRX

You and I have the same issues. What I have found is there is probubly wood under the fiberglass stringers. If the fiberglass looks in tacked then more than likely the wood has been spared, but that is only an assumption. from what I have been learning from is youll have to replace the transom. what youll probubly end up having to do is cut the inner fiberglass skinn from the transom and remove the rotted wood from there. Then cut a new piece to fit then fiberglass over that. Sould be nice and strong. But Im not expert and there is probubly details you can find from other posts here. Oops is a plethera of knowlege in the boat repair and restoration area. Check out some of his threads.
 

Matrex

Seaman
Joined
Aug 2, 2008
Messages
54
Re: Floor replacement - Doral TRX

Re: Floor replacement - Doral TRX

I got most of the floor - up to the console - out with a combination of a circular saw and grinder with a cut-off blade. In one of the posts I read while working up the nerve to tackle this I remember Ooops mentioned that almost everybody slices the hull at least once in their life. I can cross that one off my list of things to do before I die. Just a little slip of the grinder and a neat little line through my hull. Something else to fix. Sigh.

My boat is a runabout and I don't really want to lift the cap. When I am looking at the innards it looks to me like everything in the rear is mush and the front looks pretty good. The flooring, for example is mush or disintegrated in the back, but gets better the farther forward I go, cutting sections out toward the front.

The stringers in the back are a mess, mainly I think, because someone used nails to hold the deck in place. Wherever there was a nail-hole in the floor, water entered and rotted the stringers. There are only nails in the back section, mainly around the ski locker and "cooler" that had been framed in. I think the nails were added to keep the floor in place after the cut outs were made.

Long description to get to a simple question... would it make sense to only replace the back 3/4 of the deck and stringers? For ease of getting at them forward for one thing, and since I think the front part is pretty solid. I drilled some holes in the 3 stringers going forward. The debris comes out on my bit golden and mushy in the back, but powdery & white up near the console... I was thinking of cutting the stringers ahead of the rot and replacing aft. Any advice along these lines?
 

Matrex

Seaman
Joined
Aug 2, 2008
Messages
54
Re: Floor replacement - Doral TRX

Re: Floor replacement - Doral TRX

Took out the gas tank and rear part of stringers today. The stringers were butted up to the transom and then glassed in. Water has wicked from one to another.

What is the process for building out the transom when it is not flat. Mine has 3 pieces. The middle under the motor is flat; either side flares in a bit. I searched and saw a short discussion on using saw kerfs as a bend technique.Is this what is recommended?


Photo 1 shows transom bend form outside, photo 2 shows inside.

Thanks for your suggestions and advice

IMG_01261.jpg

IMG_0128.jpg
 

fuzzeywiggler

Petty Officer 1st Class
Joined
Feb 17, 2008
Messages
357
Re: Floor replacement - Doral TRX

Re: Floor replacement - Doral TRX

What is the process for building out the transom when it is not flat. Mine has 3 pieces. The middle under the motor is flat; either side flares in a bit. I searched and saw a short discussion on using saw kerfs as a bend technique.Is this what is recommended?

If your transom has 3 pieces I would suggest replacing it with 3 pieces. That would probably be the eaisiest.

Now If you want the bend I would recommend using 1/4-3/8 " pt ply and placing them in a mold then laminating them onto the transom, I had a similar issue and ended up kerfing the wood because I had already bought 3/4' pt ply. If I was to do it agin I would do many layers of 1/4' to build it up to the thickness I wanted.

Good Luck!

Fuzzy
 

Matrex

Seaman
Joined
Aug 2, 2008
Messages
54
Re: Floor replacement - Doral TRX

Re: Floor replacement - Doral TRX

Thanks Fuzzy. Just to clarify, I have not taken it apart yet - so not sure what I will find - 1 piece or multiple built up. Anybody know?

Actually thinking this might be biting off more than I can handle time and experience wise. Floor was one thing, but this is a whole other kettle of fish.
 

Matrex

Seaman
Joined
Aug 2, 2008
Messages
54
Re: Floor replacement - Doral TRX

Re: Floor replacement - Doral TRX

Anybody? Does this style transom make things more complicated?

Without having lifted the cap yet, I am wondering if the same methods apply. I was going to cut transom out from inside, fabricate coat and glass in the new. Does having a transom with multiple angles make this more difficult? Will it likely be 3 pieces, or still one, but shaped?

I am a bit worried I am getting in over my head...
 

jserb

Chief Petty Officer
Joined
Nov 29, 2005
Messages
406
Re: Floor replacement - Doral TRX

Re: Floor replacement - Doral TRX

no no your not over your head! i ask mysle fthe same question about 3 weeks ago on my 30ft scarab, now i look back at my transom and smile. I cant belivei thought it was goingto be too diffcult to repair, it goes quite quick and you learn a lot about how your transom gets its strengh. Read Oops or Jserb's thread on transom replacement. It is easy and no its in 3 pieces the glass work will no be any more diffcult. I know on my thread(jserb) someone had this exact issue and they use coring on thier transome to fit the curvature on the transom. That might be fast and easyer for you to use since it is easy to bend on the transom.
 

Matrex

Seaman
Joined
Aug 2, 2008
Messages
54
Re: Floor replacement - Doral TRX

Re: Floor replacement - Doral TRX

Thanks for the encouragement JSERB. I have decided to soldier on. So, in order to get at the transom I need to raise the cap. Does anyone know what a cap weighs (16' runabout).

I was thinking a 2X4's at each end and one under the windshield, tied together with one running lengthwise on each side should support it. Was thinking of lifting it with some pully contraption just high enough to grind around the splashwell.
 

oops!

Supreme Mariner
Joined
Oct 18, 2007
Messages
12,932
Re: Floor replacement - Doral TRX

Re: Floor replacement - Doral TRX

cap weight can vary depending on what it is.....open bow or closed ect.....

a simple pully system will help immencely......if not......some 2x4's across the gunnels from underneath after the cap is loose will do just as good......

after the cap is loose.....just slide it forward if possible....(about 4 feet) give your self room to work easily....dont be cramped....the difference between the frustration level is alot.
 

Matrex

Seaman
Joined
Aug 2, 2008
Messages
54
Re: Floor replacement - Doral TRX

Re: Floor replacement - Doral TRX

Sun is out melting the snow so I am diving in while the weather holds.

Got the motor hoisted off this morning and loosened the cap. It is pretty ugly. Looks like the previous owner tried a variety of methods to stop/fix/hide problems. Bottom line is that the transom is coming out very easy - it is mush.

I notice the bottom motor mount is depressed into the transom and outer skin quite deep. I imagine that is because the wood is so soft. Will the stiffer new transom alone solve this problem. It doesn't look like it has gone through the skin.

Boat003.jpg


Boat002.jpg


Boat001.jpg
 

Matrex

Seaman
Joined
Aug 2, 2008
Messages
54
Re: Floor replacement - Doral TRX

Re: Floor replacement - Doral TRX

Another day, another problem...

Pulled the transom out today. The wood came out easily. 2 pieces of plywood in the middle; one on each side.

However, the cracks from the motor mount mentioned in my previous post do go through the hull. The hull seems to be made of two materials - an inner and outer skin. I think these should be bonded as part of the molding process. They have separated beneath the motor mounts - I believe because of the water getting in there. What is the approach to take to fix this?

What looks like wood grain below is actually hull material - the wood grain has simply transferred to the plastic or whatever it is. I think I need to fix the cracks, then build up the bottom part with something, then add plywood, then fibre glass....


IMG_0145.jpg
 

Matrex

Seaman
Joined
Aug 2, 2008
Messages
54
Re: Floor, Stringer & Transom Replacement - 85 Doral TRX

Any ideas? I would like to spend Sunday on this....

Thanks
 

racinrc14

Petty Officer 2nd Class
Joined
Oct 29, 2008
Messages
162
Re: Floor, Stringer & Transom Replacement - 85 Doral TRX

Matrex,

I am new to the forums and also to boating (just brought home a NTM '77 Glastron 18.5ft open bow). I am experienced, however, in repairing bonded structures (thanks USAF). This is what I think I would do:

1. Cut out the damage skin, and don't leave any sharp corners. These can crack and migrate over time, especially at the transom. Round the corners of the cutout.
2. Make yourself some patch pieces larger than the cutouts using heavyweight 'glass cloth, or matt, laminated together to roughly equal the thickness of the skin. Let these patches cure overnight (or however long it takes for the resin matrix you are using). Do this on wax paper and lay them flat to they don't get permanently stuck to your workbench. We use pre-preg cloth for this at work, much easier if you have access to some. After they are fully cured, cut them to fit into the cutouts you made in the transom skin. Sand them smooth and make sure they are a nice fit into the cutouts.
3. Proceed with the rest of the transom rebuild. When the interior of the transom is 'glassed in and done, glue in the patch pieces with epoxy resin, or whatever resin you chose to lay up the inside of the transom. When these are dry, sand smooth and paint.
4. When you re-install the transom fittings over the patch pieces, they will be 'sandwiched' between the mount and the replacement wood in the transom and solid as a rock.

That's what I would do, but others may have better suggestions.
 

Matrex

Seaman
Joined
Aug 2, 2008
Messages
54
Re: Floor, Stringer & Transom Replacement - 85 Doral TRX

Thanks racinrc14. Your suggestions for the crack make sense.

One thing I am still unclear about is preparing the inside of the transom. If you look at the last picture above, below the motor mounts the outer skin has separated from whatever composite material the inside of the hull was lined with. That material is very brittle and what is off came off with minimal impact - just knocking it with a screw driver handle. I planned on grinding it lightly to rough the surface but now I am wondering if it all should come off or if I have to fill in the lower part to match the depth of the upper, still solid part. Right now there is a depth of about 1/4 inch.

Looking forward to starting to put this thing back together....
 

erikgreen

Captain
Joined
Jan 8, 2007
Messages
3,105
Re: Floor, Stringer & Transom Replacement - 85 Doral TRX

There's basically no way to glue the "skins" back together. I'd grind off the inner skin carefully, then probably put a layer of glass on, then layer in the new transom.

Be warned that if the skin is separated all the way to the sides of the hull, there may not be much strength left in it, and it will be very hard to keep intact.

Are you really attached to this boat? If the glass itself is splitting there may not be much worth saving, and repairs won't be cheap.

Erik
 

Matrex

Seaman
Joined
Aug 2, 2008
Messages
54
Re: Floor, Stringer & Transom Replacement - 85 Doral TRX

Thanks Erikgreen,

I spent today and tonight cleaning up the leftovers from the old transom and cutting the plywood for the new one. I was able to use the old as a template. My old was in multiple pieces - smallest piece directly under motor, larger pieces butting this to left and right sides and then a larger piece - a second layer that the covers the seams of the first layer - essentially going the width of the splash well.

I bought some West Systems epoxy resin and am ready to install the transom parts tomorrow. I have read in these threads that the method to follow is to coat the plywood with a couple of coats of resin, then install.

To install, I plan on using Peanut Butter around the edges, then using fibreglass to cover the transom and tab it into the sides of the hull.

The question I have that I can't find an answer to is how to bond the existing hull skin to the new transom... what is the procedure for this....
 

racinrc14

Petty Officer 2nd Class
Joined
Oct 29, 2008
Messages
162
Re: Floor, Stringer & Transom Replacement - 85 Doral TRX

We re-bond aramid skins back together frequently. The process is simple,
1. Ring test the area to determine where the boundary of the delam ends. A dull 'thud' indicates separated layers, a crisp 'crack' or 'ring' indicates solid substrate. A quarter can be used for this, or a very small (4oz) ball peen.
2. Draw a border to guide, and drill 1/16" holes through the first layer of skin all along the area of the delam. This can be accomplished with either a drill stop attached to the drill bit, or masking tape wrapped around the drill bit to keep you from drilling too deep. I would do this from the inside, where the holes would be hidden behind the new wood. This is the tricky part, drilling holes deep enough, but not too deep and through the transom, although you could still make it work by 'damming' the through holes with tape, piece of sheetmetal, etc...
3.Go to TSC (Farm and home store) and buy an Equine medication injector. Fill it with polyester or epoxy, pref. slow-setting epoxy, and inject the mixture into the holes you drilled. If you could figure out a way to clamp them together while curing, that would be money. Maybe some really large woodworking clamps over the top of the transom if there's room? Sand smooth when cured.

Note: This will not fix a completely delaminated transom. Erik is correct, if the delam has progressed to the edges of the transom, you are in for a much larger repair. I imagine you would have to replace the entire transom, exterieor included, and tie it in to the hull sides. It doesn't look to me like this will be necessary from thie pictures you provided. It looks to me like the delam is only around the motor mounting areas.
 
Top