Hoosmatroos
Petty Officer 1st Class
- Joined
- Jul 11, 2011
- Messages
- 250
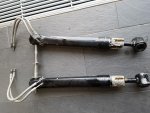
Recently I've rebuild my trim cylinders and took some picture to show you how to do this. It's a fairly simple job and requires simple tools. Only special tool to use is to screw of the end cap.
Part numbers 25-87400A 2 Trim cylinder O-ring kit. This is for one cylinder only.
First clean the outside of the cylinders.


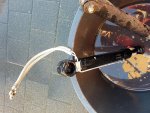
Unscrew the hoses. Remove the anodes. Then use special tool 91-821709 or equivalent to remove the end cap.

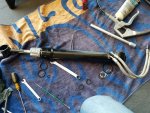
Pull out the piston rod. Be careful with the oil inside. Discard the oil.

There is still a floating piston in the Trim cylinder. I've used some compressed air in the to blow out the piston. Use a cloth at the open end to catch the piston and hold the cylinder down so the piston can't fly out and hurt someone. Be very careful!

Unbolt the bolt at the end and remove all the components. Clean them out. Look for the small o-ring. It could be stuck in the piston rod. Don't lose the 3 check balls.

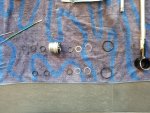
Time to disassemble the end cap. There are more components in there then you think. With a small hook you can pry out the 2 o-rings on the inside and also a small continuity spring. Use a flat screw driver to remove the retaining ring and remove washer and rod scraper. Old parts on top and below the new seals.

Clean and put in the new stuff. Use some oil on the o-rings to lubricate them. Replace all the old o-rings with new ones. This kit is also for another type of cylinder I guess because in both kits there was 1 bigger o-ring left. use some loctite 271 on the bolt and torque with 15-20 lb.ft. or 20-27 N.m
Prior to reassembly of trim cylinder(s), lubricate all internal parts with Quicksilver Power Trim and Steering Fluid or (if not available) 10W-30 or 10W-40 motor oil.
On the treads of the end cap use a little Quicksilver 2-4-C Marine Lubricant with Teflon (92-825407A12) and torque with 40-50 lb.ft. or 55-68 N.m


This is a really easy job and for 2 cylinders you don't need more then one hour to complete.
Part numbers 25-87400A 2 Trim cylinder O-ring kit. This is for one cylinder only.
First clean the outside of the cylinders.
Unscrew the hoses. Remove the anodes. Then use special tool 91-821709 or equivalent to remove the end cap.
Pull out the piston rod. Be careful with the oil inside. Discard the oil.
There is still a floating piston in the Trim cylinder. I've used some compressed air in the to blow out the piston. Use a cloth at the open end to catch the piston and hold the cylinder down so the piston can't fly out and hurt someone. Be very careful!
Unbolt the bolt at the end and remove all the components. Clean them out. Look for the small o-ring. It could be stuck in the piston rod. Don't lose the 3 check balls.
Time to disassemble the end cap. There are more components in there then you think. With a small hook you can pry out the 2 o-rings on the inside and also a small continuity spring. Use a flat screw driver to remove the retaining ring and remove washer and rod scraper. Old parts on top and below the new seals.
Clean and put in the new stuff. Use some oil on the o-rings to lubricate them. Replace all the old o-rings with new ones. This kit is also for another type of cylinder I guess because in both kits there was 1 bigger o-ring left. use some loctite 271 on the bolt and torque with 15-20 lb.ft. or 20-27 N.m
Prior to reassembly of trim cylinder(s), lubricate all internal parts with Quicksilver Power Trim and Steering Fluid or (if not available) 10W-30 or 10W-40 motor oil.
On the treads of the end cap use a little Quicksilver 2-4-C Marine Lubricant with Teflon (92-825407A12) and torque with 40-50 lb.ft. or 55-68 N.m
This is a really easy job and for 2 cylinders you don't need more then one hour to complete.