Lund trim button/throttle control assembly removal

jimjimmers

Recruit
Joined
Aug 2, 2020
Messages
3
Hi there,

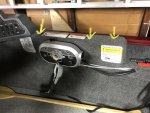
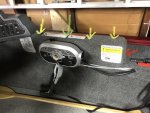
After my swivel seat backrest took out the trim button on my side console Fury Xl throttle handle (I can't be the first to have this happen), I'm trying to remove the button to fix/replace it. Unfortunately the entire throttle control box looks like it has to be removed from the side of the boat and opened up (I've got the throttle handle off, but the trim button is tightly wired and connected down and into the box). It's a Mercury control box on a 2017.

So I'm stuck at what should be a the easy part... The three mounting screws that secure the control box to the side of the boat have nuts on the underside of the thin "mounting wall". Does anyone know how you are supposed to reach these nuts? I may be able to MacGyver a wrench into the tiny access hole enough to just hold the nuts from behind and unscrew the front, but no way will I be able to get them back on...

Is there an easier way to get at the back? I imagine its similar on other Lund models.

Thanks for any help, much appreciated
 

GA_Boater

Honorary Moderator Emeritus
Joined
May 24, 2011
Messages
49,038
I have to remove the side panel to get to back of my control. Maybe the same on yours?
 

jimjimmers

Recruit
Joined
Aug 2, 2020
Messages
3
Thanks a lot, i think you are right. Theres three machine screws buried into the carpet in the top edge of the side panel that i think may be holding the it onto some other support underneath (see pic).
Sucks to have to remove them as it seems its fiberglass or something and the screws wont go back in as secure i’m thinking...
ha, please stop me if you think these screws are something else...
i will update with more details on my full repair if im succesful. Thanks.
 

Attachments

  • photo336915.jpg
    photo336915.jpg
    899.5 KB · Views: 8

jimjimmers

Recruit
Joined
Aug 2, 2020
Messages
3
Successfully repaired my trim switch, thanks very much for the help. For future reference if anyone needs it:
First remove control box from side panel:
1. see photo, remove screws from top edge (3 on top-yellow arrows, plus one more hidden under warning plate -green arrow)
2. Remove two screws on side (red arrow)
3. Slide off side panel to access rear
4. remove 3 control box mounting philips bolts while securing rear nuts with wrench on back of panel. These Bolt ends have had the end mashed by Lund to prevent them from vibrating off apparently. Either cut off the ends or prepare to torque the &$#* out of them to screw them out. I believe i will have to buy replacements or you can try to cut the warped ends off if they are ling enough...
5. Access rear of control box
6. red green and blue wires towards front run to the trim button. Disconnect the waterproof connectors.
tjis will give you slack in the trim button wites to proceed with the throttle removal steps below...

1. Remove neutral throttle button by prying off with small flathead screwdriver
2. remove Gold bolt to Remove throttle from control box.(Carefully, as theres a white bushing That will attempt to fall out)
3. Remove the two torque screws on bottom back of throttle to slide out the red shift trigger (slowly, note position of spring at top)
4. remove screw underside of throttle top near trim button. The black throttle casing can slide up and off enough to pull out the trim button.
5. button has two clips on each side. Pry off with screwdriver to open switch casing.
6. in my case i knocked the switch hard enough to knock the inner brass spring plate sideways. This little piece creates the rocker effect of the button. I just repositioned it flat side and bump upwards and the button worked properly again.
7. replace all parts To manufacturer specified torque and specifications! If you are not knowledgeable in repairs have a mechanic complete your repair. See attached throttle maintenance excerpt for additional cautions when repairing a throttle and control box...
 

Attachments

  • photo336952.jpg
    photo336952.jpg
    901.9 KB · Views: 10
  • photo336956.png
    photo336956.png
    560.9 KB · Views: 9
Last edited:

Mattyg495

Recruit
Joined
Jul 6, 2021
Messages
1
I broke the plastic piece of the rocker. Would anyone happen to have the part number for the switch?
This is the most info I’ve been able to find on repairing this myself.
 
Top