Chris in Indiana
Petty Officer 3rd Class
- Joined
- May 29, 2008
- Messages
- 82
I thought I should post an update here on my floor board project for my Achilles LS-5 since I spent so much time doing research, and there aren't very many posts on the subject.
The material I wound up selecting was SeaBoard, an HDPE (High Density Polyethylene) plastic. No clue if I spelled Polyethylene right, probably not. I compared this to just about every other material out there and it seemed to be the best for cost and weight. There are other brand names such as BoatBoard that are similar but more expensive. I paid $245 for a 4x10ft sheet from Meyer Plastics in Fort Wayne Indiana.
Regarding weight, the new plastic boards are definitely heavier than the originals but my wood floor was very dried out and rotting away so it's hard to make a fair comparison. I don't think SeaBoard is much heavier that pressure treated plywood. One thing I should point out is that HDPE is more flexible than plywood, so I used 1/2" sheet instead of the original 3/8ths which added more weight to the floor. For anyone making an inflatable boat floor, I wouldn?t go thinner than ? inch thickness. If you have a big boat with ? inch boards, I would recommend going up to ?. I definitely do NOT recommend UHMW (Ultra High Molecular Weight) polyethylene as it is considerably denser, very heavy, expensive and may even be too stiff and wear through the floor or tubes.
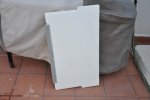
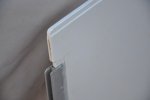
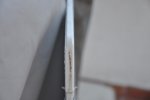
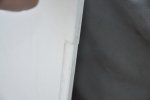
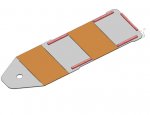
As to the design, I was lucky enough to have access to CAD software at work and was able to model each piece up and print out dimensioned drawings. If anyone wants a copy just let me know. Since I reverse-engineered it myself not every radius is exact but the floor works great. My original intent was to have Meyer Plastics do the work for me but with all of the specialized edge work it was too expensive. The challenge was getting the ? inch material to work with all of the Achilles 3/8ths joints and Stringers. Chamfering (I think that?s the right term) the edges with a router did the trick, but without the CAD work and drawings it would have gone very slow as some edges needed to be rounded and some needed to be chamfered and it gets confusing after a while. The big decision was: Should I just cut the chamfer on one side and be done with it, or take the time to cut both sides and thereby allow the boards to be flipped over if they start to warp? That?s what I did with my original wood boards, flip the forward ones over each time since they bow up and warp when the keel gets inflated. Ultimately I took the time to router both sides, which you can see details of in the pictures, and was very glad I did. It was a pain, but the forward boards do flex and warp slightly, despite the extra 6 inch wide board I added underneath the floor in the forward section.
Actually cutting and routering the material was easy with woodworking tools, but messy. The white fuzz stuck to everything including me. It?s best to do something like this out in the yard. One nice aspect of the plastic is that the stringers go on a lot easier now, they just slip right on with hardly any effort at all, and they stay on. Also, once I was finished cutting that was it! No sanding, no staining, painting. One afternoon of work and I was ready for the lake! The micro-pebble finish on both sides really works pretty well at keeping people from busting their buts too.
That?s all I have time to write down right now, but will try to respond to any questions as they come up. Have a look at the pictures.
The material I wound up selecting was SeaBoard, an HDPE (High Density Polyethylene) plastic. No clue if I spelled Polyethylene right, probably not. I compared this to just about every other material out there and it seemed to be the best for cost and weight. There are other brand names such as BoatBoard that are similar but more expensive. I paid $245 for a 4x10ft sheet from Meyer Plastics in Fort Wayne Indiana.
Regarding weight, the new plastic boards are definitely heavier than the originals but my wood floor was very dried out and rotting away so it's hard to make a fair comparison. I don't think SeaBoard is much heavier that pressure treated plywood. One thing I should point out is that HDPE is more flexible than plywood, so I used 1/2" sheet instead of the original 3/8ths which added more weight to the floor. For anyone making an inflatable boat floor, I wouldn?t go thinner than ? inch thickness. If you have a big boat with ? inch boards, I would recommend going up to ?. I definitely do NOT recommend UHMW (Ultra High Molecular Weight) polyethylene as it is considerably denser, very heavy, expensive and may even be too stiff and wear through the floor or tubes.
As to the design, I was lucky enough to have access to CAD software at work and was able to model each piece up and print out dimensioned drawings. If anyone wants a copy just let me know. Since I reverse-engineered it myself not every radius is exact but the floor works great. My original intent was to have Meyer Plastics do the work for me but with all of the specialized edge work it was too expensive. The challenge was getting the ? inch material to work with all of the Achilles 3/8ths joints and Stringers. Chamfering (I think that?s the right term) the edges with a router did the trick, but without the CAD work and drawings it would have gone very slow as some edges needed to be rounded and some needed to be chamfered and it gets confusing after a while. The big decision was: Should I just cut the chamfer on one side and be done with it, or take the time to cut both sides and thereby allow the boards to be flipped over if they start to warp? That?s what I did with my original wood boards, flip the forward ones over each time since they bow up and warp when the keel gets inflated. Ultimately I took the time to router both sides, which you can see details of in the pictures, and was very glad I did. It was a pain, but the forward boards do flex and warp slightly, despite the extra 6 inch wide board I added underneath the floor in the forward section.
Actually cutting and routering the material was easy with woodworking tools, but messy. The white fuzz stuck to everything including me. It?s best to do something like this out in the yard. One nice aspect of the plastic is that the stringers go on a lot easier now, they just slip right on with hardly any effort at all, and they stay on. Also, once I was finished cutting that was it! No sanding, no staining, painting. One afternoon of work and I was ready for the lake! The micro-pebble finish on both sides really works pretty well at keeping people from busting their buts too.
That?s all I have time to write down right now, but will try to respond to any questions as they come up. Have a look at the pictures.