My Trim

thakang67

Seaman
Joined
Mar 1, 2011
Messages
69
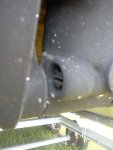
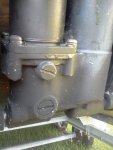
Thank you for checking out my post. I have a 1989 50hp Evinrude and about 2 months ago had the trims o-rings and all seals replaced. After getting it back, it will not hold the motor up. It trims up but after 30 minutes, its down. I was told that there may be air in it. I have a knowledge of hydrolics but not of trim. I have posted a few pics. How and what do I need to do to bleed the air out? Thank you all in advance.
trim.jpg trim 2.jpg
 

thakang67

Seaman
Joined
Mar 1, 2011
Messages
69
Re: My Trim

In the pics I assume in the second pic is the bleeder screw? What are the other screws in the other pic?
 

RRitt

Captain
Joined
Mar 30, 2006
Messages
3,319
Re: My Trim

picture #2 is your manual release valve. It can cause bleed down. However, it doesn't just start bleeding off. That version is a steel cone driven into the aluminum housing. It doesn't develop problems on its own. Someone has to loosen it and then forget to tighten it.

More likely, your check valve poppets are either wearing out or have debris. If debris the problem will be intermittent. If worn out check valves then the problem is always there and slowly getting worse.

It could also be water in your fluid has rusted one of the ball bearings and it is now bleeding off.

Most likely suspect is certainly check valve poppets or check valve seats.

******************
added note
*****************
i knew I forgot something. Your MRV location was bugging me.
Your system might be one of the very early systems before OMC settled into using a one piece debris filter and 5mm poppet seats. It may not be as easily rebuilt as a typical single ram system. If you decide to DIY, then measure the diameter of the hole drilled into your poppet seat with a digital caliper. If it is over 5.25mm then send me a p.m. and I might be able to tell you how to deal with it.
 

thakang67

Seaman
Joined
Mar 1, 2011
Messages
69
Re: My Trim

RRitt thank you for the info. In pic #1 what exactly are the two screws on the unit? Also, where are the check poppet valves located?
You also mentioned the MRV location. Again what are you talking about? I apologize if I seem, well stupid, about this I just have never had to deal with repairing the trim on most of the boats I've owned. Thanks again for your time.
 

RRitt

Captain
Joined
Mar 30, 2006
Messages
3,319
Re: My Trim

RRitt thank you for the info. In pic #1 what exactly are the two screws on the unit? Also, where are the check poppet valves located?
You also mentioned the MRV location. Again what are you talking about? I apologize if I seem, well stupid, about this I just have never had to deal with repairing the trim on most of the boats I've owned. Thanks again for your time.

there are four phillips screws that hold the motor down. One slotted screw just below motor is a filler cap. Two slotted screws exactly opposite each other front and back are your poppet covers. One slotted screw on side is your Manual Release Valve (MRV). If you loosen the MRV then you should be able to raise and lower the engine by hand. Then you just re-tighten the MRV and engine should only move by trim motor. After 1992 the MRV was moved to the front of unit (facing towards your camera). In the very early years some of the parts appear to have been made to metric tolerances using 1/128th inch machinery. I don't know of any way to tell other than take the thing apart and measure it.

Your MRV looks slightly larger and higher than the typical side mount MRV. It could just be the picture ... or it could be that you have one of those units with 5.4mm bore in the valve seat. If you do have 5.4mm then DIY is going to be tough. Up until this week I have been making custom poppets one by one and hand matching them to older units when required. However, one of my projects for this week is to turn 40-50 valve seats on the lathe. OMC wants $42 each for them. A pair plus shipping is $90. That's just a bit too steep since it drives the parts cost of rebuild to $300 plus trim motor.

But I ramble. If you decide to rebuild then unscrew that front cover. Inside you will find a spring, and a plastic valve. The spring and valve should come out easily. Use a hook and gently pull out the steel valve seat. Measure the diameter of the hole drilled through the seat. If it is 5.4mm then DIY is not good option. If it is 5mm to 5.3mm then DIY is a great option. If you have 5mm then you can do the rebuild for under $100 using parts off ebay.
 

thakang67

Seaman
Joined
Mar 1, 2011
Messages
69
Re: My Trim

Thank you Commander for the info...I will tackle that project after summer when i'll have more time to really get into it. The trim does work as of now under low rpm's which is well enough for me to get into skinny water and to beach the boat without fear of grounding motor. Thanks again for the info. I'll let you know how it goes.
Dewey
 
Top