Necessity is the mother of invention

harringtondav

Commander
Joined
May 26, 2018
Messages
2,450
First, sorry about cloning my original post https://forums.iboats.com/forum/eng...d-some-general-direction-for-my-neighbors-kid on fixing my neighbor's '88 Cobra bent prop shaft which hasn't been generating any 'latest updates' activity. I need the input and advice from the Cobra experts. Thanks to Scott Danforth , kenny nunez , Lou C and others for the guidance so far.

Update:
The Boatinfo OMC manual states: "Reach in and remove the two retaining rings with circlip pliers." I saw the impossible long reach so I bought a set of GearWrench Double-X snap ring pliers. Cool. I never pass a chance to buy new tools.
Step one:
Bend the pliers' pins so they grab and hold.
Step two:
Figure out that no man has the strength to compress these internal snap rings by bare hands.
Step three:
Consider throwing in the towel. Go inside, beer and supper. Go to bed and ponder.
Step four:
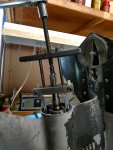
Fabricate a C clamp to get enough grip to close those snap rings and get them out. Done.

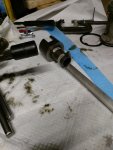
Good news: My Merc Alpha II prop shaft seal carrier puller worked fine, as well as the pinion nut adapter. I (neighbor) bought the OMC 311875 drive shaft wrench. Prop shaft will be out tomorrow.

As far as that water filled DS bellows,...I'll be back for more advice.
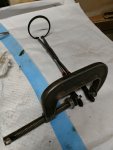
Cobra snap ring cobble.jpgCobra carrier pull.jpgCobra pinion nut loosen.jpg
 

Scott Danforth

Grumpy Vintage Moderator still playing with boats
Staff member
Joined
Jul 23, 2011
Messages
50,599
I have used bluepoint snap ring pliers in the past that I borrowed from a bud (who lives in WI). It worked perfect

I also bought the double-x pliers a few years back, and between the two, the force needed with the double-x is about 2.5 x what it would be with the ultra-long bluepoints

love the creativity.
 

Lou C

Supreme Mariner
Joined
Nov 10, 2002
Messages
13,199
I like the pondering part. That's when I get my best solutions!
The bellows on the OMC is not bad at all. Just make sure you get the ridge in the sealing surface in the groove on the gimble housing. I used OMC gasket sealer on the flange, some don't, the OE shop manual says to use it....
 

harringtondav

Commander
Joined
May 26, 2018
Messages
2,450
I'm again invoking Scott Danforth , kenny nunez , Lou C for Cobra know-how. So far this 31 yr. old outdrive has looked very good.....until now.

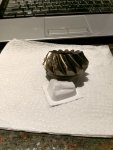
The propshaft pinion is at the point of catastrophic failure. I'll deliver the bad news to my neighbor when I'm finished here. I found Sierra and GLM FWD gear sets for $275. https://www.ebay.com/p/OMC-Forward-Gear-Set-V4-Sierra-International-18-2218/1022260727 and https://www.ebay.com/itm/JOHNSON-OM...ash=item33fc2487be:g:VRcAAOSwWrNcCYSR&vxp=mtr.

I'll see if they can handle the sticker shock. My concern is setting the cone point on the new pinion. I understand the process from the Boatinfo manual. But I don't have access to the measuring fixture shown.

So here is what I'm thinking:
The wear pattern on the good pinion teeth looks fine. I'll verify with the FWD gear when it comes out. This tells me the assembled length of the current pinion,shaft, carrier and shims is correct. The owner/kid works at a nearby top notch CNC shop. I know they have several digital height gages. I'll see if he can get me in to take comparative height measurements on the new and old pinion assemblies so I can figure any needed shim adjustments.

As a back up I can conjure up a holding fixture to get the differences in length measurements. Not as precise as a height gage/surface place, but probably close enough.
I've called the local dealer shops. So far no one has OMC special tools.

Any better suggestions?. Thanks.
Cobra prop pinion.jpg
 

Scott Danforth

Grumpy Vintage Moderator still playing with boats
Staff member
Joined
Jul 23, 2011
Messages
50,599
You do know an SEI conversion druve would have had the motor back in the water a while ago

I like the BBQ sauce packet holding the gear

A digital caliper and granite countertop is usually enough to compare the two gears

Dychem will verify pattern
 

Redrig

Master Chief Petty Officer
Joined
Oct 13, 2009
Messages
860
wow , how would that happen to only a few teeth ? most of that gear looks good , but those few are trashed
 

Lou C

Supreme Mariner
Joined
Nov 10, 2002
Messages
13,199
It'll be interesting to see the fwd/rev gears when you get them out...I wonder if a piece of one of the gears chipped off and got jammed in between for a few sec and then just tore up those few teeth.
I have heard that the conversion that Scott talked about (SEI which gives you a new pivot housing that allows you to mount an Alpha drive on the Cobra transom mount. The price is certainly right and from what I have seen it can work well, but there is the hit or miss quality of the SEI drives themselves to consider, but of course you could use just the conversion kit and use a genuine Merc drive instead....how much do they like the boat?
 

harringtondav

Commander
Joined
May 26, 2018
Messages
2,450
It'll be interesting to see the fwd/rev gears when you get them out...I wonder if a piece of one of the gears chipped off and got jammed in between for a few sec and then just tore up those few teeth.
I have heard that the conversion that Scott talked about (SEI which gives you a new pivot housing that allows you to mount an Alpha drive on the Cobra transom mount. The price is certainly right and from what I have seen it can work well, but there is the hit or miss quality of the SEI drives themselves to consider, but of course you could use just the conversion kit and use a genuine Merc drive instead....how much do they like the boat?

Neither my neighbor or his son are flush with cash. I don't foresee any more tragedies in the drive, which is in amazing shape for 31 yrs old. The part costs are at $490 + shipping, with the GLM FWD gear set. They said to proceed. Dad's sharing the cost....not sure the son is in on this.

The FWD pinion is trash 1/3-1/2 of the teeth are moonscape. The FWD gear contact surfaces showed distress. REV is fine to reuse. I'm trying to figure if the pinion was shot when the kid bought the boat, or the prop hit took out the pinion. The magnetic drain plug didn't have any serious shrapnel. I need to mop out the bullet nose and see if the chunks are there. If so, probably the prop hit. If not, I'm guessing he bought the mess, and is lucky he bent the prop so I could find the pinion before a bigger disaster.

Looking for advice on a seal extractor for the 3.0L front cover crankshaft oil seal. Gonna generate that post next.
Thanks Lou.
 

kenny nunez

Captain
Joined
Jun 20, 2017
Messages
3,355
Too bad I do not have those shimming tools. With out them you are shooting in the dark. Most times when I was working on them the shimming was .003-.005 in either direction.
Watch out with that timing cover, most times the leak was not the seal. There is an area on the cover that never gets paint and there is a pin hole.
What if you re installed the old pinion gear with the shims and measured from the bottom of the gear to the bottom of the gear case with an inside micrometer with the gear case inverted which should get you real close.
 

harringtondav

Commander
Joined
May 26, 2018
Messages
2,450
Too bad I do not have those shimming tools. With out them you are shooting in the dark. Most times when I was working on them the shimming was .003-.005 in either direction.
Watch out with that timing cover, most times the leak was not the seal. There is an area on the cover that never gets paint and there is a pin hole.
What if you re installed the old pinion gear with the shims and measured from the bottom of the gear to the bottom of the gear case with an inside micrometer with the gear case inverted which should get you real close.

You're my kinda guy Kenny. I woke up and figured out the lower case is the perfect setting fixture, assuming the old pinion/shim length is good. I'm planing to get a set of telescoping gauges and measure the pinion position as you note. I'm a little worried about preloading the assy. I have the Alpha II preload set up, but with the Cobra I'm planning to turn the lower case upside down, use gravity as the preload, spin the drive shaft to seat the thrust washer and measure the old pinion position...many times. Then repeat, many times with the new pinion.

Current shims are 2 x .0035" (?). Replacement shims are 003". I figure if I can get repeat measurements w/in .003", I've done all I can.

I witnessed the oil leak last summer. It was a very heavy dribble, just short of a stream of oil behind the balancer. I'll pull the balancer this weekend. I'm hoping like heck it's the seal, and I can R&R it without pulling the cover. Ref. https://forums.iboats.com/forum/oth...3-3-0l-crankcase-front-cover-oil-seal-removal I have no experience with the 3.0L, but Boatinfo manuals say I have to drop the oil pan to remove the cover. Hoping to avoid this. I've ordered this to sneak out the old seal. https://www.amazon.com/Lisle-58430-Shaft-Type-Puller/dp/B000FPYW4K I've prepped the owner for the cost of a Speedi Sleeve if needed.
Thanks.
 

kenny nunez

Captain
Joined
Jun 20, 2017
Messages
3,355
Hopefully it is only the seal, the hard part is driving the new one in without bending the cover, I have replaced quite a few timing covers without removing the oil pan. I just used a good grade of RTV and a new gasket to the block, always had good results. There are some short cuts I have used that would bring down a ton of “spankings” on some of these sites !
Your neighbor is really lucking out with your help. Good luck
 

harringtondav

Commander
Joined
May 26, 2018
Messages
2,450
There are some short cuts I have used that would bring down a ton of “spankings” on some of these sites !

Thanks again. I was thinking if I can pull the cover off, I'd RTV is back in with a new gasket. Don't know if it has a lip that's trapped by the front of the oil pan.

And the spankings....I've successfully straightened three Alpha II prop shafts. Press with a pressure gage, bench centers with a dial indicator, and Magnaflux spot check penetrant and developer to check for cracks. I'm doing this to save the neighbor $300 ... assuming no cracks. I won't be sharing that fix here. I already get enough hate mail from my Facebook replies.
 

kenny nunez

Captain
Joined
Jun 20, 2017
Messages
3,355
The timing cover comes off with some gentle prying, cut the lower cover to pan rubber seal flush with the block then load it up with RTV. If there is a pin hole in the cover 2 part JB weld will do a better long lasting repair from the inside. Most times I have found the hole to be located on the port side outer area where there is a lap joint.
A friend of mine who specializes in the Poker Run high dollar boats has a roller “V” block that he checks the shafts with while using his press and dial indicator.
 

harringtondav

Commander
Joined
May 26, 2018
Messages
2,450
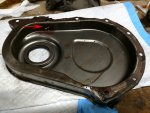
kenny nunez You right, kinda. Not a pin hole, more like bird shot. Seems the recirc pump had been dribbling on the cover for some time and rotted it from the outside. I've got JB or some kick a*s West Marine 404 high density filler + their epoxy/resin. Excellent stuff for metal bonding. The top flange is iffy for a good gasket clamp up. If I reuse it I'll epoxy up up the innards, loctite extend the rust, then multicoat the exterior with spray undercoat.

I estimated the neighbor a $110 Speedi-sleeve which won't be needed. New seal is in the mail. Hoping I can find a new cover for that amount. Do you know which GM autos used the 3.0L? Maybe I can find a new or salvaged cover for the $110. Assuming the timing mark tab will match.
Thanks again.

Cobra cover leak.jpg
 

kenny nunez

Captain
Joined
Jun 20, 2017
Messages
3,355
You should be able to use any cover from any inline Chevy engine, just be sure that the timing flag is in the same location or tack weld the old one on the new cover. Those timing covers never had any paint under the balancer and as you said the water pump leak is what caused the problem. I always sprayed them with 3M undercoat before pressing/banging the balancer back on if there was no retainer bolt like on the 2.5 engine.
 

Redrig

Master Chief Petty Officer
Joined
Oct 13, 2009
Messages
860
Dang Dude , you are one hell of a nice neighbor . You are getting deep in that project. I hope the neighbors are paying you with booze or mowing the lawn for the summer , or something . You are saving them alot of $ and time .
 

harringtondav

Commander
Joined
May 26, 2018
Messages
2,450
You should be able to use any cover from any inline Chevy engine, just be sure that the timing flag is in the same location or tack weld the old one on the new cover. Those timing covers never had any paint under the balancer and as you said the water pump leak is what caused the problem. I always sprayed them with 3M undercoat before pressing/banging the balancer back on if there was no retainer bolt like on the 2.5 engine.

I found a new cover on ebay for $53 all in. Great minds think alike. I was planning on giving a coat or two of the spray undercoat. I've decided to replace the gear yoke seal and the other two big upper O rings with the money the owner saved trading the Speedi-sleeve for the cover. Got the lower hsg. seal kit in transit. He bought in.

Getting the yoke shaft spanner nut off was a knock down drag out until I re-read the Boatinfo manual. Propane torch to soften the locking compound. ...don't have the spanner, but no one will ever notice the pipe wrench bite marks.

I believe the crankshaft is threaded. I'll rig up a grade 8 bolt & nut. I've got one of those ball bearing thrust washers I used on my kid's Neon balancer. I had to use my big impact wrench to pull the Cobra balancer. Not looking forward to sending it home.
 

harringtondav

Commander
Joined
May 26, 2018
Messages
2,450
Dang Dude , you are one hell of a nice neighbor . You are getting deep in that project. I hope the neighbors are paying you with booze or mowing the lawn for the summer , or something . You are saving them alot of $ and time .

The original deal was Jim Beam and Busch Light. Now with the scope creep I'm upping it to a big jug of Woodford reserve. Neighbor says his wife spots good buys on the stuff. I've never tasted it, but now is the time.

I work for booze & cigars for friends and family. They buy the parts. Likely I'll take my know-how to the grave. My son could care less. So I figure I'll put my knowledge to some good before I go toes up. Karma tends to work. I've got a nice pile of IOU favors.
 

froggy1150

Master Chief Petty Officer
Joined
Nov 3, 2017
Messages
869
You can heat the balancer to about 325 deg and it will help it go easier. Look up old 67 chevy balancer install without threaded crank. They make a tool that locks outer ring to inner ring so you can hit with hammer...... which you don't need but the way to heat the balancer to get boss to expand is the same. Have every thing ready and do a test run or two then cool down quick
 

harringtondav

Commander
Joined
May 26, 2018
Messages
2,450
Waiting for parts now. But I'm wondering why OMC didn't put a washer on the propshaft FWD gear pinion nut. I've got a spare Merc Alpha II washer, (same nut) and am thinking I'll get a better grab on the nut when I torque it all up if the washer drops the nut a bit.

I'll make a loose fit visual for interference with the clutch dog and FWD gear. But if it all clears, is there a reason not to use the washer?
 
Top