Need Plan of Attack: Stringer Replacement - 16.5' Fiberglass Boat

Twhjelmgren28

Petty Officer 3rd Class
Joined
May 31, 2016
Messages
85
Hey all - first off; just completed bell housing and gimbal housing rebuild on the motor, so thank you to those who helped with that.

I have a 1985 16.5 fiberglass fish and ski boat that I inherited from my Grandfather. The boat has been a great runner and, as mentioned, I've been working on maintenance and getting it back into shape.

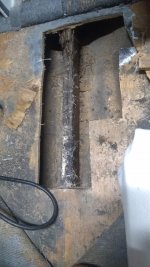
While working on it over the past month, I noticed a small (1' x 1' or less) mushy spot along the center of the floor near the driver's seat. I decided to cut into it. The plywood floor was a bit rotted - I'd say less than a square foot. I noticed the rot had crept up to the floor from the stringer.

Before I go any further, I'll mention that I think I know where the water crept in. The stringer is 2 plywood boards put together with fiberglass on the outside, however, the end near the hull was seemingly open (and/or didn't have any fiberglass) so any water between the floor and the hull was able to creep in through the end. I decided to keep cutting along the stringer (about a 6" width) and realized that the entire thing will need to be replaced. Luckily the stringer goes from just in front of the driver's seat to just in front of the engine compartment. The hull an everything else appear to be fiberglass:
IMG_20210817_202049109.jpg

I've never gotten into anything like this on a boat so looking for some advice and/or some good videos.

Since the floor seems pretty solid and doesn't look rotten (aside from the 1 square foot mentioned above), I'm planning on cutting the remaining 6" width to just in front of the engine compartment so I can remove the entire stringer. The entire length of the stringer is about 6 feet. That's about as far as I've gotten with my plan. Looking for advice on how to attack it - I'm feeling pretty good about the replacement of the floor itself but don't really know what I'm doing with the stringer.

Basically:

1. Am I on the right track and how should I go about putting the new stringer in?

2. Any good threads or videos that would give me a good idea of what I need to do?

3. Will I be able to do a stringer replacement without removing the entire floor? I'm trying to be as minimally invasive as I can.

*Also, I haven't done much research into it yet so hopefully I'm not jumping the gun too much by asking. Thought I'd go straight to the experts.

Thanks!
 

JASinIL2006

Vice Admiral
Joined
Feb 10, 2012
Messages
5,713
Have you drilled into the other stringer(s) and the transom (from the inside) to make sure those are the only bad spots? If not, that should be your first step.
 

GSPLures

Chief Petty Officer
Joined
Sep 3, 2019
Messages
564
Friscoboater has some good videos on youtube. As stated above, make sure that is your only area with rot. Usually if one stringer is bad the other one is also, along with the transom and bulkheads.

Also if you only replace one, how long will it be for the other side to rot. At that point you will be redoing all the work over again in a couple of years (including the stringer you replaced). It may be easier and cheaper in the long run to do it all now once it is opened.

I would at minimum remove the entire deck so you can see what is going on with all of the structure and do core samples.
 

Twhjelmgren28

Petty Officer 3rd Class
Joined
May 31, 2016
Messages
85
Have you drilled into the other stringer(s) and the transom (from the inside) to make sure those are the only bad spots? If not, that should be your first step.
Friscoboater has some good videos on youtube. As stated above, make sure that is your only area with rot. Usually if one stringer is bad the other one is also, along with the transom and bulkheads.

Also if you only replace one, how long will it be for the other side to rot. At that point you will be redoing all the work over again in a couple of years (including the stringer you replaced). It may be easier and cheaper in the long run to do it all now once it is opened.

I would at minimum remove the entire deck so you can see what is going on with all of the structure and do core samples.
Thanks for the responses. So the rotted stringer pictured above is at the bottom of the V in my V-hull - I believe the other 2 stringers sit up higher in the boat on the sides - if they are indeed stringers... The flooring in those areas feels much sturdier. When I get more of the floor out, I'll check those stringers from the side underneath the floor. The spots I was able to feel around felt really solid.

As far as the transom, I poked around it a bit this morning. Most of it feels really solid - maybe a couple of spots that are weak but I really need to look closer. Pretty much everything has looked / felt dry except for the stringer posted above. One thing I didn't mention is that I've had this boat now for about 8 years or so. I've kept it in my garage in the summers and shelter in the winters - I'm in MN. It's always felt really sturdy and the first hint of concern was this mushy spot in the floor that I noticed just this season for the first time.

I've read a couple of different methods on figuring out if the transom needs to be replaced. Any definitive clues I need to look for? If the transom is going, it will probably have to be a project for another time at this point - maybe a good project over winter.
 

JASinIL2006

Vice Admiral
Joined
Feb 10, 2012
Messages
5,713
The definitive test for wet wood/rot is to drill holes into the transom from the inside of the boat, using a 1/4" drill bit, going about 1.5" deep (enough to really sample the wood without drilling through to the hull). Drill in the spots suspected to be bad, and in the spots most likely to be exposed to water (around the keyhole, if an I/O; near any thru-hull fixtures; near the bottom of the transom). If those holes produce shavings that are light colored and dry, you can fill them with 3M 5200 and consider yourself luck. If they are wet and/or dark colored, you are looking at a transom placement, too.

I hope your problems are as localized as you think, but keep in mind that the deck is the very last part to show rot, so even if the other areas feel solid, checking the structure underneath is important to do.

Good luck and I'll have my fingers crossed on your behalf.
 

GSPLures

Chief Petty Officer
Joined
Sep 3, 2019
Messages
564
The structure can give the appearance of being solid and the cores rotted, the fiberglass can remain hard.

The stringers are attached together by the bulkheads normally wood on wood then covered. Water can travel through the wood and rot all of it from one spot that is open to water.
 

Twhjelmgren28

Petty Officer 3rd Class
Joined
May 31, 2016
Messages
85
The definitive test for wet wood/rot is to drill holes into the transom from the inside of the boat, using a 1/4" drill bit, going about 1.5" deep (enough to really sample the wood without drilling through to the hull). Drill in the spots suspected to be bad, and in the spots most likely to be exposed to water (around the keyhole, if an I/O; near any thru-hull fixtures; near the bottom of the transom). If those holes produce shavings that are light colored and dry, you can fill them with 3M 5200 and consider yourself luck. If they are wet and/or dark colored, you are looking at a transom placement, too.

I hope your problems are as localized as you think, but keep in mind that the deck is the very last part to show rot, so even if the other areas feel solid, checking the structure underneath is important to do.

Good luck and I'll have my fingers crossed on your behalf.
The structure can give the appearance of being solid and the cores rotted, the fiberglass can remain hard.

The stringers are attached together by the bulkheads normally wood on wood then covered. Water can travel through the wood and rot all of it from one spot that is open to water.

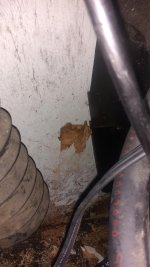
You guys were right. I checked the transom down near the coupler and the wood was a little soft. I was able to do this with my fingers:

IMG_20210818_173748424.jpg

The wood did feel dry and was light colored behind that little bit of softness. Once I got to the point in the picture above, the transom felt solid - I would say about 1/2" in. Does this look and sound like rot? It's a bit like that all around the lower part of the transom that touches the transom plate.

I've already gutted the boat except the very front - I've decided to take your advice and do my entire floor. I'm actually really excited because I plan on putting a rod locker in and pedestal seats to make the boat more spacious.

I'm less excited if I have to do the transom as well - I've never removed an engine. I'm pretty handy so I know I can do it but it just feels like a daunting task. Look forward to your replies. At some point, I'll be starting a new thread for the actual repairs because I'm sure I'll have tons of questions.
 

JASinIL2006

Vice Admiral
Joined
Feb 10, 2012
Messages
5,713
Is that chipboard rather than plywood? If it's flaking off in your hand, I say it's not good. If you doing all the to replace the other stuff, you sure don't want to leave a bad transom core in there, even if it's only partially rotted.
 

GSPLures

Chief Petty Officer
Joined
Sep 3, 2019
Messages
564
Transoms will rot around the keyhole from water intrusion from around the gimbal housing and any accessories on the back.

If a chunk came off with your fingers then I would replace it for sure.

If you are doing 1 stringer and the transom it is pointless to not replace it all. It is not much more work or supplies than what you will already need.

Was there any flotation foam? Didnt see any in the picture
 
Top