New transom 1977 skipjack 24’ open

skunkedskippy

Petty Officer 2nd Class
Joined
Apr 30, 2017
Messages
130
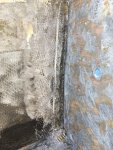
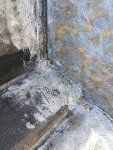
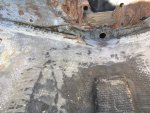
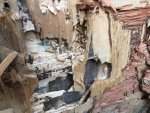
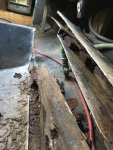
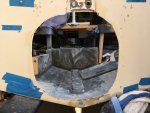
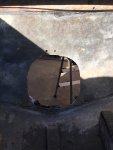
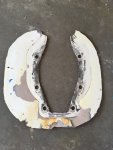
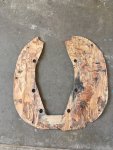
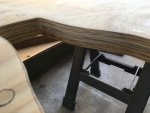
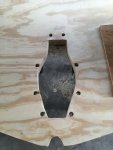
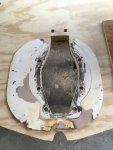
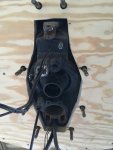
Had some rot issues so I chiseled out my transom, did some grinding, and now I’m getting ready to glass some wood back in. Never done anything like this before so I’m here to ask the experts some questions.

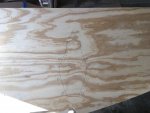
Sorry if the photos are bad. I had a weird half sun/half shade thing going so everything is zoomed in.

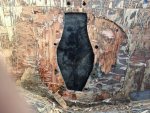
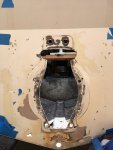
In in one of the pics you can see the bottom of the Mercruiser cutout and the outline of the repair of the original cutout (omc I believe). It’s clearly a bad repair so I plan to knock the patch out and reglass from the outside after replacing the plywood. seems straightforward but please let me know if there is better way to do it.

For the inside I thought I would start with a layer of csm against the skin with VE

2 layers of 3/4” acx ply either glued together with titebond III, or glassed with a layer of csm in between. Then glue the plys in with PB. I’ll probably use screws and fender washers from the outside to pull the wood into the glass. This is based on my lack of a clamping device. But if anyone knows of some affordable clamps, please let me know.

My first question is about making the cutout. Are there advantages/disadvantages to cutting it before or after gluing the wood to the hull? Only thing I can think of is that I would want to cut before gluing if I planned to clamp the wood in.

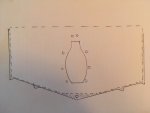
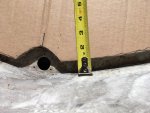
If you can look at my hand drawing without laughing, the solid outer line is the hull. Dashed line is the wood and the shading is PB. I’m not including the strakes in the wood outline just to make it easier - these areas would get filled in with PB. Drain plug hole is also not included to make sure water never has a chance of contacting the wood - this area would either be filled with PB or layers of glass. Probably do the same for the deck drain holes.

Then add layers of 1708 and build to thickness. Move on to the stringers, etc.

Appreciate any advice, comments, criticism.
 

Attachments

  • photo291722.jpg
    photo291722.jpg
    449.3 KB · Views: 2
  • photo291723.jpg
    photo291723.jpg
    1.9 MB · Views: 3
  • photo291724.jpg
    photo291724.jpg
    2 MB · Views: 2
  • photo291725.jpg
    photo291725.jpg
    1.8 MB · Views: 3

Scott Danforth

Grumpy Vintage Moderator still playing with boats
Staff member
Joined
Jul 23, 2011
Messages
50,234

skunkedskippy

Petty Officer 2nd Class
Joined
Apr 30, 2017
Messages
130
Thanks for the reply. Yes one of my stringers is completely rotten but my leaky gas tank caused that. Another stringer had termites which is also the reason I’m replacing the transom. The other two stringers were good but I had to remove small sections to access the transom. Skipjack laminated each stringer and bulkhead so that a layer of glass separates each piece, except for the nails that they used to tack them together.

More pics attached of the outdrive cutout repair, gas rotten stringer, and termites.
 

Attachments

  • photo291742.jpg
    photo291742.jpg
    1.2 MB · Views: 0
  • photo291743.jpg
    photo291743.jpg
    1.4 MB · Views: 0
  • photo291744.jpg
    photo291744.jpg
    1.9 MB · Views: 0

Woodonglass

Supreme Mariner
Joined
Dec 29, 2009
Messages
25,929
It's critical that the finish transom thickness is +- 2- 2 1/4". It's also critical that the angle is the same in order to align the outdrive properly. I'd recommend cutting the transom wood to fit and then temporarily clamp it in place and trace the keyhole onto the wood along with the bolt holes. Then do a Dry install with the bolts to ensure it all lines up. Once it's good to go. apply the PB tot he wood and the skin and clamp install it using the bolts for alignment and some 2x4 for lateral clamps. Make sure to wrap the bolts with saran wrap to avoid getting the threads clogged with resin during glue up. The second link below has some good info on how to prep the boat, and fabricate the transom as well as how to GLUE it in place.
 

skunkedskippy

Petty Officer 2nd Class
Joined
Apr 30, 2017
Messages
130
Do you mean the bolts of the gimble housing? So glue it with the housing bolted up? Seems like it would get in the way of the clamps.

What about predrilling the bolt holes oversized and then filling with PB? That way any water that gets past the housing won’t contact the wood. I was also thinking about glassing the inside of the cutout.

I’ve read the suggested threads already and learned a lot from them. I’m just trying to get as much info as possible before I attempt this. Thanks again!
 

Woodonglass

Supreme Mariner
Joined
Dec 29, 2009
Messages
25,929
I mean to use the bolts to align the wood with the outer skin when installing the transom. If you drill Oversized holes filled with PB the alignment will be lots easier Just the edges of the key hole need to be aligned.
 

Scott Danforth

Grumpy Vintage Moderator still playing with boats
Staff member
Joined
Jul 23, 2011
Messages
50,234
Wood cant rot from leaking gas tank. Fuel is a good biocide. However wet and rotten stringers can corrode a fuel tank
 

skunkedskippy

Petty Officer 2nd Class
Joined
Apr 30, 2017
Messages
130
I’d say the wet foam corroded the tank and both water and fuel found their way into the stringer. The rotten wood definitely smelled like gas. I also burned a small chunk just for fun and stayed lit for a really long time.

I’ve come up with a slightly different game plan based on the working times of resin and adhesives. Please tell me your thoughts.

Trace template, cut and dry fit a single ply. Trace keyhole, bolt holes, deck drain holes. Tear out the repair patch on transom skin - to be reglassed later.

Glue the plys together with PL and clamp using all-thread like friscoboater did. I’m choosing PL because of it’s longer working time compared to resin or titebond 3. I’m not worried about the longer cure time because I only work on the boat on weekends so it will likely cure for at least a week.

Cut keyhole and oversized bolt holes and deck drains.

Coat both sides of wood with VE and CSM to waterproof. Also add CSM to inside of transom skin. PL glue wood to skin and clamp with all-thread again.

Add PB fillets, fill oversized holes, tab and glass inside. Then go back and reglass the outside section around the keyhole. Build to 2” thickness.

I’m sure I left something out so please chime in.
 

skunkedskippy

Petty Officer 2nd Class
Joined
Apr 30, 2017
Messages
130
Hey guys, still grinding away but I picked up my plywood and cut a template. I’ve read that wood should not contact the hull so I cut the template a little small. But I have a 1” gap near my drain plug hole. Is this too much?
 

Attachments

  • photo292752.jpg
    photo292752.jpg
    1 MB · Views: 0

Woodonglass

Supreme Mariner
Joined
Dec 29, 2009
Messages
25,929
That's a little big but PB will fill it in. I'd reconsider on the PL. I'ts just not the right stuff for a transom build. PB is a much better product.
 

skunkedskippy

Petty Officer 2nd Class
Joined
Apr 30, 2017
Messages
130
Thanks WOG. I’ll redo the template.

I think PL is out and I’ll PB the ply to the transom skin. Should I PB the 2 plys together or can I just use resin with csm between the plys?
 

skunkedskippy

Petty Officer 2nd Class
Joined
Apr 30, 2017
Messages
130
Got a little more work done recently. Cut my first sheet of ply and dry fitted it. Had to grind a bit here and there but got it to fit really well. Also traced the keyhole, bolt holes and drain holes.

Used the first sheet to cut the second and clamped them together with poly and csm. Used a bunch of screws to hold them together. I think I’ll leave them in.

Cut out the glass repair patch that must’ve been done with the last repower by the previous owner.

Plan to lay csm on the inside of the skin and maybe on the mating side of the wood before I pb them together. Fillet, tab, build to 2-2.25” thickness, etc.

Would it be easier to cut the keyhole now, glue the wood, and then reglass the outside? Or glue the wood, glass the outside, and then cut the keyhole (before the gelcoat)?

Thanks for all the advice so far. I’ve never done anything like this before, so I’m literally learning as I go.
 

Attachments

  • photo294536.jpg
    photo294536.jpg
    852.5 KB · Views: 2
  • photo294537.jpg
    photo294537.jpg
    544.5 KB · Views: 1
  • photo294538.jpg
    photo294538.jpg
    1,017.6 KB · Views: 0
  • photo294539.jpg
    photo294539.jpg
    1.1 MB · Views: 2

skunkedskippy

Petty Officer 2nd Class
Joined
Apr 30, 2017
Messages
130
After reading my post, I think I need to cut and drill first because I was planning to oversize the holes, fill with pb, and then redrill so that the wood will never be able to contact water. Seems like this would be hard to do once the wood is glued in and reglassed. Please let me know if this will work. Thanks again!
 
Last edited:

skunkedskippy

Petty Officer 2nd Class
Joined
Apr 30, 2017
Messages
130
Some pics of the old repair patch that I cut out. Very thin glass layup which is why I chose to redo it.

Any thoughts on my last question? Cut and drill BEFORE or AFTER I reglass the outer skin?
 

Attachments

  • photo294597.jpg
    photo294597.jpg
    1.4 MB · Views: 0
  • photo294598.jpg
    photo294598.jpg
    1.8 MB · Views: 0

Woodonglass

Supreme Mariner
Joined
Dec 29, 2009
Messages
25,929
Nothing wrong with NEWB's Pretty soon you'll be teaching me a few tricks!!!:D
 

skunkedskippy

Petty Officer 2nd Class
Joined
Apr 30, 2017
Messages
130
Just cut the keyhole. Make the cut about 1/8” inside my line to leave a little room for error and leave a bit more “meat” for when I oversize the bolt holes.

I think I did a pretty good job of clamping the two plys, if I do say so myself. After a few drinks I might try to rip the plys of the cutout apart.

Also made some stilts for my easyup so I can have some shade in the boat.
 

Attachments

  • photo294622.jpg
    photo294622.jpg
    952.9 KB · Views: 1
  • photo294623.jpg
    photo294623.jpg
    1 MB · Views: 1
  • photo294624.jpg
    photo294624.jpg
    1.3 MB · Views: 1

skunkedskippy

Petty Officer 2nd Class
Joined
Apr 30, 2017
Messages
130
Ok so cutting inside of my line did nothing but make more work for me. I ended up having to recut and grind out to the line.

I drilled the bolt holes at 3/4” with a guide that I got from amazon.

After i stepped back to admire my work I realized that the keyhole is not centered relative to my drain cutout. Also looks like some of my bolt holes are not straight across from each other. The 2 lower right side holes are a bit lower than their left counterparts. But the gimble housing seems to fit just fine. And if I lay the original skin on top it’s all aligned.

What do the experts think? Would it be best to start over with new plys or is this not an issue? Will my motor be misaligned and need to be “tilted” to compensate?

Please help a newb out.
 

Attachments

  • photo294969.jpg
    photo294969.jpg
    2.2 MB · Views: 0
  • photo294970.jpg
    photo294970.jpg
    630 KB · Views: 0
  • photo294971.jpg
    photo294971.jpg
    1.8 MB · Views: 0
Top