Nostalgic's Restoration pics

drewpster

Commander
Joined
Oct 17, 2006
Messages
2,059
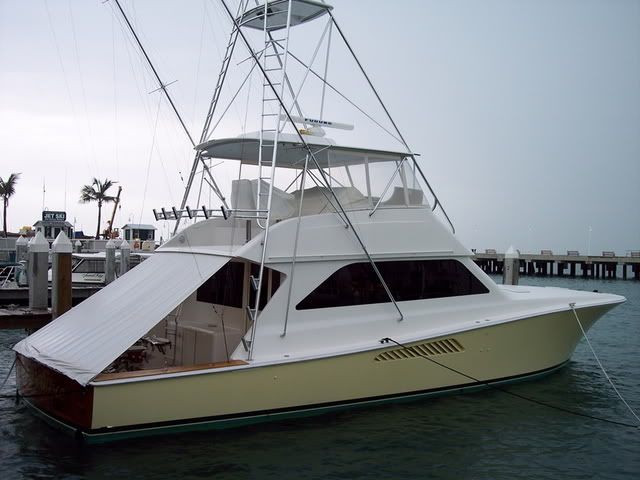
It was suggested that I start a thread to chronicle my boat restoration. I gladly comply. The boat is a 1969 Revelcraft Revelier sport fishing boat. My wife and I bought the boat about 5 years ago. We used it for two years previous to my daughter being born. After she came along the fun began.
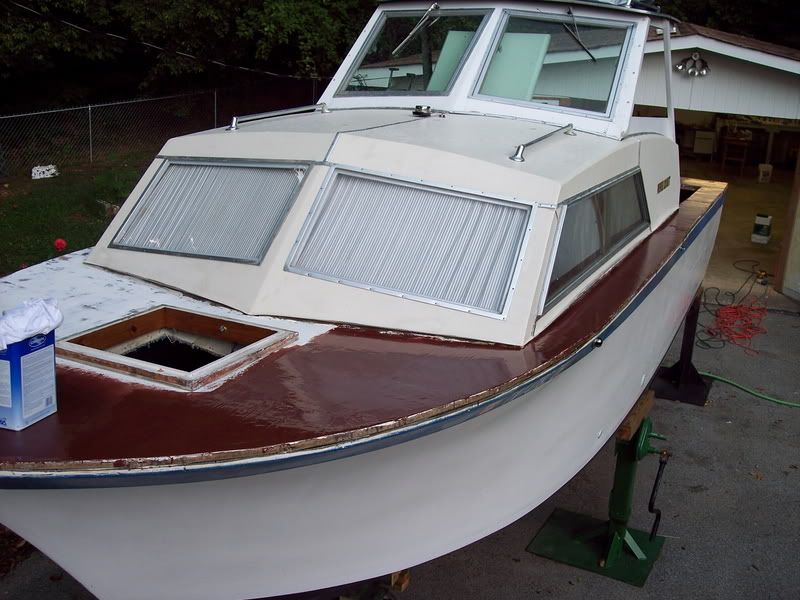
This is a pic the day we brought it home. It turned out to be a real job. I live on a steep hill. Unfortunately for us there was no way we were going to get the thing turned around so we attempted to back the trailer up the steep drive. Not happening! Luckily my neighbor has a four wheel drive one ton truck. He locked the hubs in low range and up she came. I thought we were going back to the lake for awhile there.
on_trailer.jpg

My first priority was refinishing. The engine and all the systems on board work just fine and are mechanically sound. I have never had a minute's trouble out of the drive train. Mainly she needs updating and a general prettying up. (simple right?) I started on the deck. It needed some serious work. The gelcoat was basically gone. After a little investigation I realized that a previous bonehead had painted the deck using latex house paint. It is pointless to try to describe how bad it looked. Stains, missing paint, screw holes, scuffs, in fact it was a shambles. I stripped the paint off and decided to use a fairing compound to get it kinda smooth.
080106029.jpg

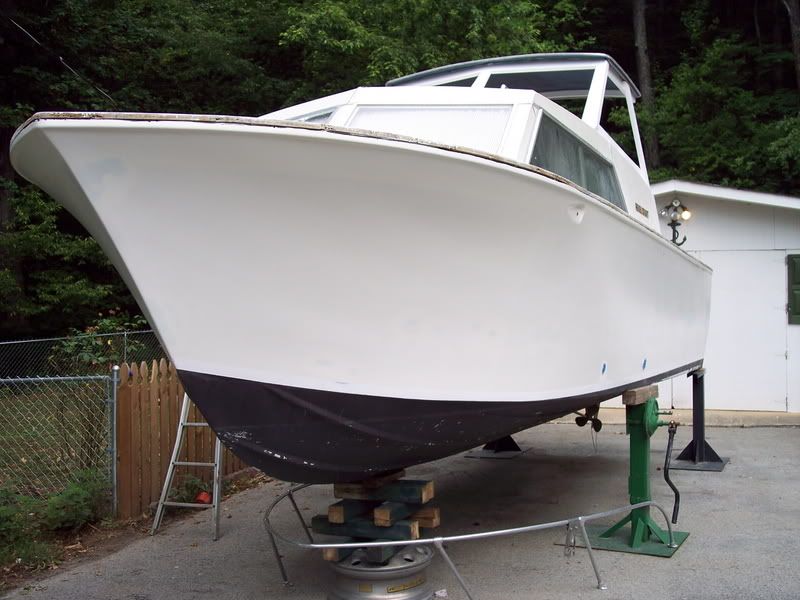
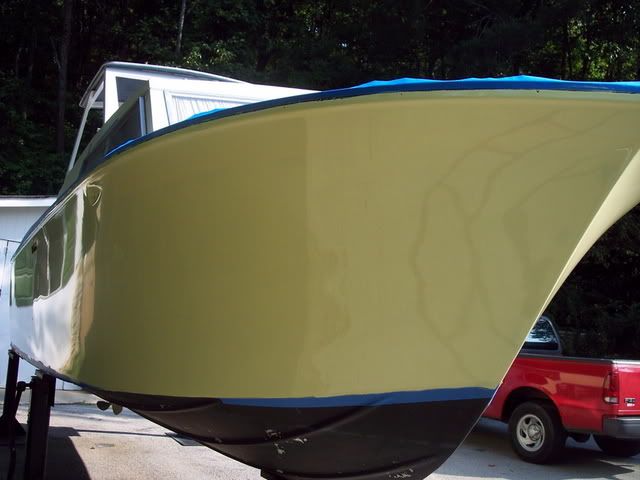
After what seemed to be a month of sanding I primed and painted using Interlux prekote and Brightside paint. Turned out ok.
firstcoatdeck.jpg

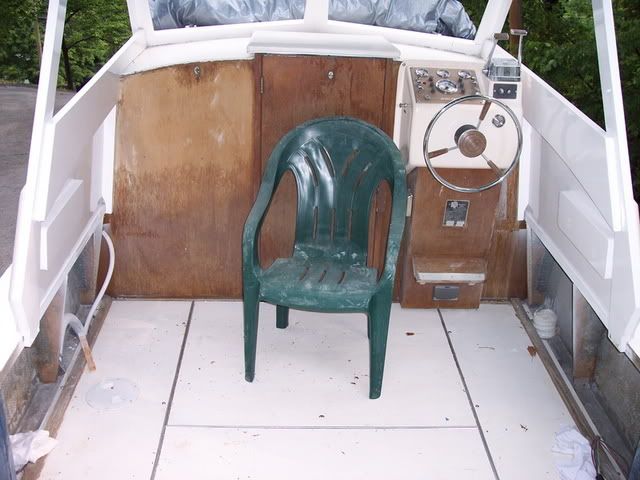
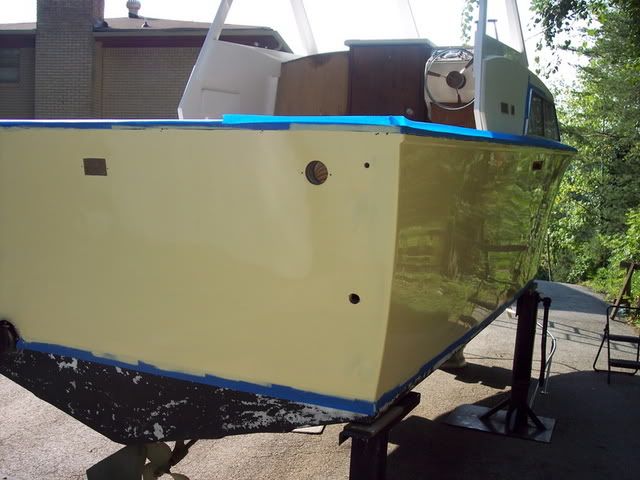
Next I decided to do some work on the side walls inside the cockpit. I knew the sanding here and detail were going to be time consuming. They were in just a bad a shape as the deck. But after stripping, sanding, filling, more sanding, primer and more Brightside they took on a good shine. The amidships bulkhead is Mahogany I am told, and will get a stain finish. (Cetol maybe?)
102_2119.jpg
 

drewpster

Commander
Joined
Oct 17, 2006
Messages
2,059
Re: Nostalgic's Restoration pics

Next I switched to the hull. Man oh man what a mess! There was gelcoat damage everywhere. After stripping the old faded stripes off I went about filling and repairing all the dings and scratches. I first meticulously cleaned and sanded the complete hull. Luckily there was very little crazing and no stress cracks. I used Interlux Watertite filler...allot.
filler'aplenty
102_2161.jpg

After another month's worth of weekends sanding and filling the Interlux Epoxy Primekote went on. After all the sanding. I proved Dewalt makes a good sander. Still buzzing.
Baby Butt smooth!
102_2187.jpg

Finally some pretty comes along! After taping the hull with fineline skirted with blue painter's tape the first coat of Interlux Perfection was applied. I picked Interlux products because they were recommended to me and I have no complaints. I waited for the right conditions, got the right equipment, and used the techniques and WALLA it works.
perfect2.jpg

Got show off more, and this is the first coat!
perfect4.jpg

The slot you see amidships is an opening I made for a nice stainless vent that will go there. I did not like the way the bilge was vented and I hope this will bring in some fresh air. I am still planning my next move. Time is a real factor for me these days so the boat has been idle for awhile. I hope to have some more progress soon. Needless to say the projects have been stacking up and I will have more updates as I move along.
 

tmcalavy

Rear Admiral
Joined
Aug 29, 2001
Messages
4,005
Re: Nostalgic's Restoration pics

More pix, more pix. How did you apply the hull paint?
 

tysonnathan

Petty Officer 1st Class
Joined
Jun 2, 2008
Messages
246
Re: Nostalgic's Restoration pics

that paint looks slick! if you dont mind me asking: was the inerlux expensive? I have a 20' bowrider that I want to repaint, but I dont want to have to sell the boat to pay for the paint:) How much did you sand? HOw did you know when to stop sanding? Does the interlux com in other colors?
 

gallavantin

Cadet
Joined
Jul 5, 2008
Messages
13
Re: Nostalgic's Restoration pics

I'm curious about the paint process too. I've got one in the water and one in the driveway, both need paint.
 

NSBCraig

Lieutenant Commander
Joined
Aug 21, 2007
Messages
1,907
Re: Nostalgic's Restoration pics

Looking good.

Latex huh that's brutal!
 

OV1961

Petty Officer 2nd Class
Joined
Aug 14, 2007
Messages
127
Re: Nostalgic's Restoration pics

Is that Fighting Lady Yellow? I like that color and I want to paint my boat with it. Been around a while but very popular now.
 

drewpster

Commander
Joined
Oct 17, 2006
Messages
2,059
Re: Nostalgic's Restoration pics

Thanks for the kind words.
The yellow part of the hull is in fact Fighting Lady yellow. I picked the color because of this boat. I took this pic at a marina near Mallory Square in Key West Florida and we loved the color.
KeyWest2006024.jpg

The topcoat is Interlux's "Perfection" paint. It comes in several different colors. (they do need more however) You can find all the paint and products I used at their website. The site also outlines how-to's and has video of the process of applying the paint. Their product guide is very helpful in selecting what you will need to do the job. (solvents, fillers, primers, paint ect.) I used all the processes they recommend for every aspect of the job.
http://www.yachtpaint.com/usa/default.asp
Compared to other marine polyurethanes, Perfection's price range is about middle of the road. (about $60 a quart) But don't let the price scare you. I used one quart per coat of paint to do my boat. She measures 24 feet long and has about 3.5 feet of freeboard. (about 180 sq. ft. painted area) And I had a little paint left in the pan. This stuff covers! You could easily completely paint a 17 foot runabout with two quarts. The only reason I recommend two quarts is because Perfection is two part paint. If you wanted to, you could measure out the amount of paint and curing agent you need to do a single coat out of a single quart. As long as you measure accurately, you could possibly paint a boat that size with a single quart. But you would have to be very accurate. Once the curing agent is mixed with the paint it must be used.
I applied the paint using the techniques recommended by Interlux. (and by some folks in here) It is called the roll/tip method. Basically you apply the paint with a short nap foam roller then immediately "tip" the paint off with a brush to smooth it out. After tipping, the paint continues to flow out smooth and dries with a high shine. The process is shown in the videos at the website. I know I sound like a salesman at Interlux but a assure you I am not. I just had a good experience using their products and I do recommend them for first timers like me.
To prep the surface you are likely going to have to do some sanding. Whatever surface you are going to paint will at very least have to be cleaned with a good dewaxing solvent and lightly sanded to get a good bond. A good general rule about sanding is to sand just enough to get the surface smooth and flat. If you are sanding a flat surface use a sanding block. You can use a actual sanding block made for that purpose or a plain old piece of 2 x 4. Just make sure it is flat. If you have to sand a curved surface either use a curved block that matches the radius of the curve or use a flexible piece of wood that can be bent to match it. The point here is to avoid sanding using your hand alone unless it is a small area where a block cannot be used. Start sanding using a power sander. Get either a air sander (DA) or an electric orbital sander to do the rough work in the beginning. When the surface comes up smooth, do the final sanding using blocks by hand. If you have to do any gelcoat repair or any filling apply the filler so that it is only slightly higher than the finish surface. Rough sand using the power sander just enough to get the filler close to flush with the surface. Good marine fillers are made to be slightly softer than gelcoat when cured. It is possible however to over sand the surface around the filler if you get too aggressive with the sander. It is important to stay on the filler more than the surrounding surface while using the power sander. When the filler gets close to flush finish the sanding using a block until it levels out flush and is smooth. I use my fingers and the flat of my palm to carefully feel when the surface is smooth and flat. After a few spots you will figure it out. After all the sanding and filling I have had to do so far I should be an expert!:eek: I highly recommend spending the vast majority of the job on prep work. Get the thing smooth and flat before picking up any paint brushes. This paint has a high shine to it. If you leave any imperfections in the surface it will show up. Spend about 90 percent of your time getting it ready for paint and 10 percent actually painting and you will get the results you want.
 

fishie

Petty Officer 2nd Class
Joined
Apr 15, 2008
Messages
142
Re: Nostalgic's Restoration pics

She's a beaut! I wanna see some updates! Whats the cabin look like... still in good shape?
 
Top