


yorab
Ensign
- Joined
- Jul 6, 2002
- Messages
- 960
First of all, I'm a lousy painter and always have been. I'm not afraid to admit it. I'm also not afraid to tackle jobs that I'm not so good at. What doesn't kill you only makes you stronger...
I'm repainting my 1963 75hp Evinrude Starflite. I want this project to turn out well both mechanically (which I'm confident it will), and aesthetically (which I'm not so sure of due to my limited experience with painting). Therefore, I've done a LOT of research into painting blocks and I believe that I have followed all recommendations for a good paint job, but the results aren't as good as I had hoped.
The block was bead-blasted at the shop and degreased. When I got it home, I vigorously scrubbed all sufaces with dish detergent and very hot water. It was allowed to dry completely. Just before painting, I rubbed down all surfaces with acetone to remove all oils, grease, etc. From that point forward, I only handled the block with nitrile gloves.
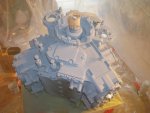
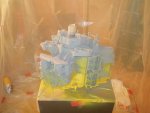
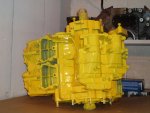
I then made a make-shift paint booth in my buddy's shed. I covered the floor with plastic and made "walls" by hanging plastic from the rafters. I hit the bare aluminum with two light coats of Plasti-Kote Etching Primer. I followed the instructions on the back of the can. The primer coat was very even and covered all surfaces. You can see this in the attached pics. I waited the recommended 30 minutes and then began to apply Plasti-Kote Engine Enamel. I applied 3 light coats. By the 3rd coat, the paint was definitely thick enough. I even paid special attention to areas where the block casting had deep depressions. Then I followed up with one coat of Plasti-Kote Engine Clear.
I did this on Saturday afternoon because we had an unusual, low-humidity day here in central Pennsylvania. The temp was about 80 and the humidity was around 40%. When I looked at the powerhead today, I see that some areas are not well covered. Because the primer is a grayish color, the paint appears to be greenish where the yellow is not thick enough. I see too much greenish color for my liking.
Can I simply apply another coat of yellow to those areas that are not covered enough? Will the clear coat affect this at all? Will the paint get too thick in those areas? Any other ideas on how to get the green out? Thanks.
BTW, the covers will come off and be painted a different color, so I'm not concerned that they are not painted well.
I'm repainting my 1963 75hp Evinrude Starflite. I want this project to turn out well both mechanically (which I'm confident it will), and aesthetically (which I'm not so sure of due to my limited experience with painting). Therefore, I've done a LOT of research into painting blocks and I believe that I have followed all recommendations for a good paint job, but the results aren't as good as I had hoped.
The block was bead-blasted at the shop and degreased. When I got it home, I vigorously scrubbed all sufaces with dish detergent and very hot water. It was allowed to dry completely. Just before painting, I rubbed down all surfaces with acetone to remove all oils, grease, etc. From that point forward, I only handled the block with nitrile gloves.
I then made a make-shift paint booth in my buddy's shed. I covered the floor with plastic and made "walls" by hanging plastic from the rafters. I hit the bare aluminum with two light coats of Plasti-Kote Etching Primer. I followed the instructions on the back of the can. The primer coat was very even and covered all surfaces. You can see this in the attached pics. I waited the recommended 30 minutes and then began to apply Plasti-Kote Engine Enamel. I applied 3 light coats. By the 3rd coat, the paint was definitely thick enough. I even paid special attention to areas where the block casting had deep depressions. Then I followed up with one coat of Plasti-Kote Engine Clear.
I did this on Saturday afternoon because we had an unusual, low-humidity day here in central Pennsylvania. The temp was about 80 and the humidity was around 40%. When I looked at the powerhead today, I see that some areas are not well covered. Because the primer is a grayish color, the paint appears to be greenish where the yellow is not thick enough. I see too much greenish color for my liking.
Can I simply apply another coat of yellow to those areas that are not covered enough? Will the clear coat affect this at all? Will the paint get too thick in those areas? Any other ideas on how to get the green out? Thanks.
BTW, the covers will come off and be painted a different color, so I'm not concerned that they are not painted well.

")