Re: Pinion Gear And Nut ?'s
Re: Pinion Gear And Nut ?'s
Let me see--We are talking about the one piece lower unit, correct? Since the pinion is already loose, much of the work has been done for you. Usually it is stuck on the locking taper and you need some sort of impact tool to pull the shaft.
In your case, remove the water pump and lower mounting plate (7 screws total). When you pry up the lower plate, you will see the top bearing. All you need to do is pull up on the shaft. The pinion should drop into the case and now you can remove both the pinion and forward gear.
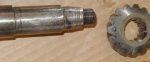
At the bottom of the shaft where the pinion locks on, you should see the taper about 1/2 inch long and the stub splines below the taper about 1/4 inch long. If the splines are broken off, then that calls for replacement of the drive shaft--it can not be reworked. You must also check the splines inside the pinion. If they are damaged, it needs replacement too.
Remember I said "nothing is ever simple"?
Well, when you replace the shaft, if you decide to buy a new one, it is a couple-3 hundred bucks. And it comes only with the bearing attached. Whether you get a new or a used shaft, it is absolutely MANDATORY to re-shim the pinion to the gears. SO, if your shaft is bad, Then you would be best off buying a good used lower unit. Now I will explain why:
While it doesn't look it, the lower unit is an extremely precise assembly. The gears must mesh to within a very close tolerance "sweet spot" or they will self destruct. The degree of mis-mating is completely predictive of the running life they will have. A high degree of mismatch will give a running life of only minutes. A high degree can be only a 5-10 thousandths of an inch. Remember: A lot of horsepower is being transmitted through about 3-4 teeth resulting in very high surface loads on the tooth faces. That's why an extreme pressure lubricant is needed.
The factory used some extremely accurate machining to set the forward and reverse gears into relation with each other and in fact, some forward gears are shimmed to the tapered roller bearing that carries them. Some cases are marked and some gears are also marked to ensure proper assembly tolerances. Anyway, you need not do anything with forward and reverse gears except set the prop shaft end play---this is an easy job. That's what the steel shim inside the forward gear does.
However, since the pinion can be set on the taper differently on each shaft because of tolerance, and because the upper bearing can sit differently on the drive shaft, you must shim the pinion. The upper bearing outer race is shimmed into the case and this controls the depth of engagement of the pinion into the other two gears.
There is a special tool to measure this. You can however shim without the tool but you must have a feel for it and you must be extremely careful and precise.
If you decide to try it without the tool, Here is what you do: You hold up the pinion and forward gear. You will see a very definite burnished pattern where the teeth mesh. Put the pinion and gear into engagement and roll them together. You will notice that at the "sweet spot" they will be silky smooth and at other depths of engagement they will feel rough or ragged. Measure the distance from the inside of the forward gear teeth to the pinion teeth.
Start with the shim pack already under the outer race of the upper bearing. Inset the forward gear, insert the shaft , and attach the pinion. using the old nut, torque to 85 inch pounds. Now, push down on the shaft while turning it. If it feels silky smooth, then double check by looking at the depth of engagement and by carefully putting some light grease on the pinion. Check to see that it rubs off onto the forward gear only on the burnished parts of the gears. If it does, you are finished. replace the nut with a new one and reassemble the gearcase.
If it does not, then you must see if the pinion is high or low and either subtract or add shims. Obviously, this can be very time consuming since you must disassemble, clean, and reassemble for each try. The tool uses a standard shim and a reference point so you only need to do it once.
I got carried away again--a little wordy but now you have learned something.


")