Power Cat - Same rule as V hull?

Jim Hawkins

Chief Petty Officer
Joined
Mar 11, 2013
Messages
506
Welllll, of course I take full responsibility, However...

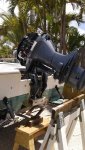
The guy that bought my old motor also helped me lift the new motor onto the transom and bolt it on. As soon as he slid the motor onto the bolts I said "It looks low" Sighting down the vent plate he noted that you looked right at the bottom of the center keel so I said OK, after all, the guy was a certified Yamaha tech.

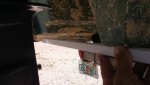
But, now I realize the motor was not trimmed parallel to the boat hull so once the motor was squared up with the hull, dot, dot, dot...

Yamaha techs are human too.

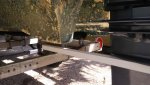
PS, note the incredibly embarrassing photo of the motor bracket hanging down into the path of the water in photo 1. and, and, and, before anyone says it I will be sanding the hull and giving it a bottom job. That aught to be good for an rpm or two.
 

Attachments

  • photo292489.jpg
    photo292489.jpg
    216.3 KB · Views: 0
  • photo292490.jpg
    photo292490.jpg
    233.3 KB · Views: 0

Jim Hawkins

Chief Petty Officer
Joined
Mar 11, 2013
Messages
506
Just some pictures to tell more of the story

First pic is a straight edge held under the center keel showing it is still lower than the side hulls. My guess is one more notch up will get me to the shweet spot but I want to go one notch at a time to study results.

Second picture is just my answer to my question, "How am I going to lift this motor without dropping it on my toe."

Third pic shows the boat with the cooler/seat removed to begin lightening it. Forward is a heavy deck that I removed and then just set back in place. It weighs in excess of 100 lbs. I can build a much lighter deck to replace it but hope to keep the original if I can. Aft is also a deck that bolts on and includes a livewell which I never use. This deck will be the next to go and replaced with two lightweight seat/steps in the aft corners.
 

Attachments

  • photo292494.jpg
    photo292494.jpg
    178.9 KB · Views: 0
  • photo292495.jpg
    photo292495.jpg
    321.5 KB · Views: 0
  • photo292496.jpg
    photo292496.jpg
    273.8 KB · Views: 0
Last edited:

ahicks

Captain
Joined
Sep 16, 2013
Messages
3,957
So I see now this IS one of those Florida fishing boats w/tunnel hulls! Best of luck on the new sea trials!
 

Jim Hawkins

Chief Petty Officer
Joined
Mar 11, 2013
Messages
506
Today, although no great leap forward, was somewhat informative. Overall performance was not much difference although the water around the motor looked much better and less splash. Motor would go up to 3000 rpm at 19 mph until I trimmed all the way up at which point it went to 4000 and gained a few mph. When it went to 4000 it went all at once and if I trimmed it down a bit it bogged right back down to 3000. This was with a full boat, passengers and gear.

Although the motor may still need to come up I think I have the flow close enough to try a new prop. From 15" I'll be going down to either 11" or 13" depending on what the prop guy says. So far he is recommending 14 X 11 - 3 blade which means going up 5/8 in diameter. My uneducated thinking was that something like a 13 X 13 - 4 blade would be better, but I will take his advice.
 

Attachments

  • photo292508.jpg
    photo292508.jpg
    117.1 KB · Views: 0
  • photo292509.jpg
    photo292509.jpg
    238.5 KB · Views: 0

ahicks

Captain
Joined
Sep 16, 2013
Messages
3,957
Looks like maybe you have some air coming out the back now, and the "step" in your performance makes it sound like you're getting closer to design hull speed. The bottom end of it anyway.
 

Jim Hawkins

Chief Petty Officer
Joined
Mar 11, 2013
Messages
506
3 steps forward and two steps back.

I got the new prop, 14 X 11. The prop guy said the leaps from 3000 to 4000 rpm was cavitation. He also corrected me that what I was calling the ventilation plate is the cavitation plate. He also liked my old stainless prop and offered me $150.

Well after so much disappointment I feared the worst but put the new prop on only to find that at 5000 rpms and 1/4 mile I heard a noise and came to the realization that I forgot to put the thrust bearing on. No idea how much damage I did beyond the obvious wear on the back of the prop and the inside of the gearbox housing.

Anyway, I put the thrust washer on and put everything together again and the prop certainly did make a difference. No more rpm swings from cavitation just a steady increase with the throttle. 25 mph @ 5000 rpm was top, and cruising nice at 19 mph and 3500, and a much better feel lifting out of the water. Next step is to go out with a passenger so they can take the helm whilst I study my wake and water flow to see if I need to go up 1 more notch.

I'm just sick about my trust washer blunder.
 

jimmbo

Supreme Mariner
Joined
May 24, 2004
Messages
13,677
The prop guy is wrong about the Anti Ventilation Plate, 4 decades ago they were called cavitation plates, but most engine manufacturers have corrected that. The reduce air being sucked down into the prop(not all props can run with blades partially exposed). He was also wrong about the engine speed ups being from cavitation, not ventilation. Cavitation is the water boiling in low pressure area of the propeller blade. The bubble collapsing against the prop can/will result in tiny amount of paint and/or metal being eroded. That erosion is called Cavitaion Burn
I've seen gear cases ruined by the lack of thrust washer. I've also seen some interesting engineering applied to recover from that damage.
 

Jim Hawkins

Chief Petty Officer
Joined
Mar 11, 2013
Messages
506
Thanks Jimmbo, I stand corrected back to my original thinking then on cavitation plates.

On the thrust washer fiasco, the damage I saw was paint and aluminum rubbing and seems to be minimal although I can imagine had I not stopped things would be real bad. But , tell me, has the damage you have seen been to the gear case only or have you ever witnessed damage to internal parts?
 

Sea Rider

Supreme Mariner
Joined
Sep 20, 2008
Messages
12,345
If damage was only a scraped paint issue, nothing to worry about. Have seen cases where the prop spinning inwards prop housing without a washer destroyed the whole shatft cover, seal and shaft bearing jamming the gear box due to severe water intrussion to lower leg while prop kept spinning at wot and filing shaft parts, bad music indeed.

The moron who installed a new prop for owner forgot all about placing the removed thrust washer and ended screwing fully a new gear box. Luckily you spotted the missing thrust washer issue opportunely. Thumbs Up!!

Happy Boating
 
Last edited:

ahicks

Captain
Joined
Sep 16, 2013
Messages
3,957
So maybe we tip our hat regarding our age when calling it a cavitation plate? That's what I've known it as for a long time (like 4 decades or more!) and the term I use when discussing it. Splitting hairs really. I think when talking outboards, either term will get your point across.

Cavitatation vs. ventilation, generally speaking, who cares? The prop slipping, it's lost it's grip!

If it seems OK with the thrust washer in place, I doubt there's any internal damage.
 

jimmbo

Supreme Mariner
Joined
May 24, 2004
Messages
13,677
Cavitatation vs. ventilation, generally speaking, who cares? The prop slipping, it's lost it's grip!

Cavitating props generally have not lost their grip/bite on the water. They really are two totally different actions.
 

jimmbo

Supreme Mariner
Joined
May 24, 2004
Messages
13,677
The damage I've seen from missing thrust hubs was never internal. Usually what l've seen is the last 3.8" of the gearcase housed chewed away, leaving a 1/4" gap between the housing and the prop. Should have allowed great amounts of exhaust out to cause the prop to slip, sort of like a over and thru hub exhaust. Seemed to be okay as I skied behind one and it pulled me up fine. that was 39 yrs ago
 

Jim Hawkins

Chief Petty Officer
Joined
Mar 11, 2013
Messages
506
So, I've had the boat out some more this time loaded, fishing gear, snorkel gear and 2 passengers total weight added between 350 and 400 lbs not counting myself and a full tank of fuel this time. I'd have thought that would bog me down but it only took off 200 rpm's and 1 mph.

Looking at my wake the Anti-Ventilation Plate was still submerged and I could just see a bit of the plate above it.

Something else my prop guy said got me thinking. He asked if the cat hull tends to plow the water like he said some do. I told him no my bow is always pointed well up. So while going 24 mph I asked the passenger to look under the bow between the hulls and see how far back the air/water line was which turned out to be about halfway back. Add to that 350 lbs added forward in the boat did not make much difference, however removing my 75 lb. cooler seat from the aft end of the boat made a noticeable improvement and add to that that no air is getting through the tunnel and so' I'm thinking I need to lighten the rear end of this boat and shift weight forward. And I think I need to do that before I raise the motor another notch. Or in other words try to lower the water instead of raising the motor.

Now that I have the boat running at the bottom end of my expectations this is getting to be more fun. I wish while I had it out I had tried trimming the motor to bring the bow down to see how close I could get to getting air flowing between the hulls and out the back. And even though I don't like trim tabs I do have them and could have deployed them also.

I'm going to have the boat out of the water for a while so I won't be able to post results any time soon but when I test again I will have taken about 100 lbs. off the stern and sanded and painted my crusty bottom. Hoping for the best.

By the way gas mileage is great compared to my old 90hp 2 stroke.
 

ahicks

Captain
Joined
Sep 16, 2013
Messages
3,957
<<< try to lower the water instead of raising the motor.>>>

Yes, that's exactly what I was thinking/trying to say earlier!
 
Top