Re: Question on use of clamps to glue plywood on transom
Here's how to build a set of clamps thanks to Old Hickory from the checkmate forum site
http://checkmate-boats.com/forums/blog.php?b=31
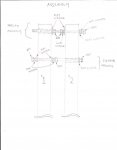
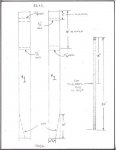
Well I finally got around to it....here are the plans; instructions and parts list for assembling your own GIANT Jorgensen type transom clamps.See attachments for the plans....they are a little crude but should be self explainatory.
Once you have completed them, you will have two clamps that will have approximately 30-32 inches of depth and 9-9.5 inches of width. This is usable clamping power So, here it is.
Tools
drill w/ 3/4" and 7/8" or 1" paddle bits
saw(s) wood and metal
tape measure
pencil
adjustable wrench
Materials
2ea 8' 2x4 ( I used pine; maple would make a stronger and more durable clamp)
2ea 36" 3/4" 10 thread rod
12ea 3/4" 10 thread nuts
12ea 3/4" flat washers
8ea 3/4" lock washers
Notes
* Be sure to use 8' 2x4's and cut them in half. If you buy studs you'll be shorting youself 4 1/2". I know it sounds moronic....but you guys can do the math
* Trick for drilling holes if you don't have a drill press...mark your 2" and 16" centers on both 2x4 edges. Then drill toward each other; first one side then the other. They won't be perfect; but will be fairly straight.
* The reason for the 7/8-1" holes is to allow some play so the jaws can clamp slightly out of parallel. This is important....if all four holes are 3/4" they won't clamp. I started w/ 7/8" and had to ream one out a little more so if you don't have a 7/8" bit a 1" should work fine. You can always take more out...but it's hard to add. I must also add that I did not use a 1" bit due to the appearance that there would be too little wood left on the outer edge of the 2x4...about a 1/4" on each side of the hole. 7/8" bit gives just a little more wood for strength
* Be sure to get the nuts w/ lock washers good and tight....and try to get them as close to the ends of the rods as possible.....too much threaded rod sticking out narrows the spread width of the jaws.
* Be sure to follow the "Assembly" page(pg2) exactly. The rear assembly "spreads" and the front assembly "clamps". This creates the fulcrum that gives Jorgensen type clamps their power.
* The The 10" angle cuts on the nose of the jaws are optional. I thought it would be advantageous to have them come to a moderate point in order to get the clamps into tighter spaces. Besides, I think they look better this way. Sand and finish to your own discretion. I didn't put alot of time in the finish on mine.
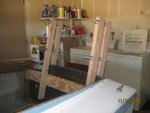
* All the materials I purchased at Ace Hardware and Lumber. Lowes and Home depot should have the same. Total cost for 2 clamps was less than $40. Hardened steel and maple will make more durable clamps....but unless you plan on building boats for a living....these should be fine. They have worked very well on my Enforcer resto.
* I will be posting more pics of the clamps being used in my Enforcer blog. Good luck! I hope they work well for you.
Hick
here are the plans