Restoring childhood boat. A 1972 Ranger. Help needed (pictures).

artfan1

Seaman
Joined
Aug 14, 2015
Messages
71
Hello. I just joined this forum so this is my first post. I've been reading and searching here for a few weeks and have learned a lot. Thanks. Hopefully I don't ask too many questions here that are answered elsewhere. I did a lot of searching before posting.

So here goes. Back in 1972 my Dad bought his first bass boat. We drove to Flippin, Arkansas (I was only 7 years old at the time), and picked up our new Ranger boat. This was the first boat I had ever fished in and I even skied behind this boat. The first photo is of my Dad and me fishing at Leach Lake in Minnesota in 1972. I grew up with this boat and it meant a lot to me.
slide121b.jpg


Fast forward to 2015. While visiting my Dad in Missouri this summer, he asked me if I wanted the old Ranger. Of course I did and after a few hours of work on the trailer, (new wheels, tires, bearings, etc), I drove it back to Illinois.
IMG_3975.jpg


I'm sure you all know the process I went through as I slowly discovered there was more damage and decay than any of us had realized. You see, my Dad had moved on to other boats about 7 years ago and stored this one behind his barn. It's been uncovered through 7 winters and summers. (Really wish he had kept those original Ranger seats.

IMG_4017.jpg


I know this type of project isn't going to be easy. And I understand that I could go find another used boat and spend less money on it. And that I will spend more money on it than it will be worth, but none of that matters to me since this boat will never be sold. It's important to me to bring this Ranger back to life so I can fish with my Dad with my kids in it. So thats the history and now on to the questions at hand.

After removing all of the old astroturf, I realized the floor was spongy. I spent some time reading here and based on what I had read, I decided to investigate by cutting a section out and drilling a hole in the floor in front of the fuel compartment. It was full of water and the wood floor was pretty soft.
IMG_4126.jpg


Soft enough that I could grab it by hand and pull out a large section. So now I know a little more about what it looks like. No foam. 2"x2" stringers.

IMG_4127.jpg


After getting most of the water out, I used my iPhone and a large flashlight to take pictures.
This one is the view from the opening in the floor, towards the stern. You can see a small drain hole which spills out into the recessed square located in the fuel/battery compartment.
IMG_4148c.jpg
IMG_4164c.jpg


The next photo is taken from the same tear out opening but pointing towards the bow. Pretty scary looking.
IMG_4153.jpg


I have lots of questions about this type of design but I will cross that later. For now, I need to properly remove the entire floor so I can examine the stringers. By the way, the stringers are solid as a rock in the area torn out. I'm doubtful they will be as nice all the way to the transom but who knows. The wood forming the box that has the drain hole in it does appear to be damaged however. You can see that in the photo showing the drain hole.

My first question is this. Since the plywood runs under the compartments, I will need to remove those compartments, correct? I was wondering if there was a particular location of cuts to be made that would allow me to put them back in by fiberglassing them in place?
IMG_4164.jpg

Then there is the live well and long compartment. Do I cut these across the back, then down the front and along the floor? And if so, do I leave a tab of about 2" on the top and front so I can realign and tab it back into place?
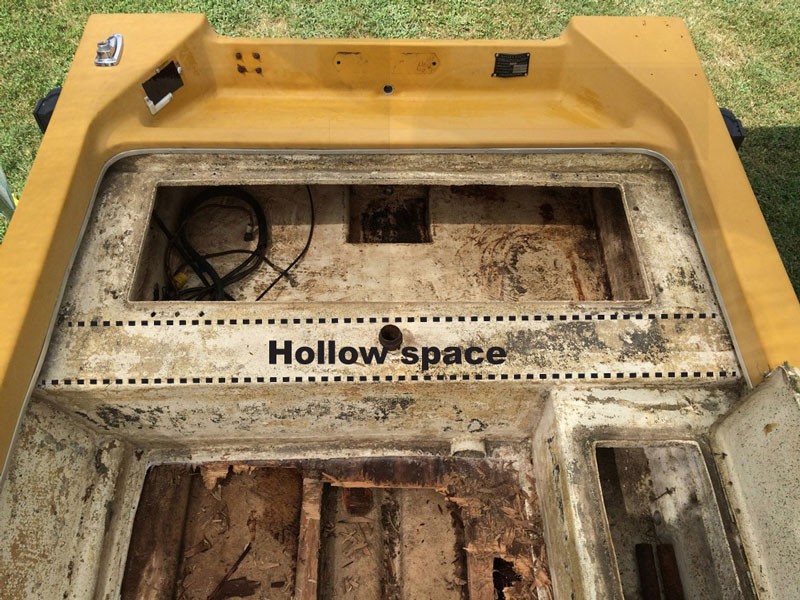
The fuel/battery compartment is double walled on the front side. There is about 6" of hollow space in there that the seat support drops down into. Not sure if that matters or not.
IMG_4164b.jpg


In case any of it matters, I will list some additional info here and come back to them in more detail later.
-The boat is on the original trailer and appears to be well supported.
-I haven't inspected the transom yet. From the outside it feels solid but I plan to cut into the fiberglass from the inside once I have the fuel compartment cut out.
-I have removed the trim/bumper, but the cap is for sure laminated to the hull. I can feel on the inside that it's smooth and there is no seam. So that can't come off.
-I'm not afraid of hard work. Your help won't be taken for granted, and I appreciate any and all answers.

Thanks!
 
Joined
Jul 18, 2015
Messages
29
Well unfortunately I can't be of much help with your questions but I will encourage you! That looks like a worthy project if I've ever seen one indeed! I'm still in the deconstruction stage with my boat but can say that it's not all half bad and goes quickly with a few hours here and there every week. I'm sure one of these other guys can chime in and answers your questions. Good luck!
 

kcassells

Fleet Admiral
Joined
Oct 16, 2012
Messages
8,738
Welcome aboard DryDock Art,
Just my .02...Looks like you can remove the entire cap that is connected to the hull under the rub rail. From that point you can remove/cut out large sections of the liner {areas you mentioned} And keep the cuts under the gunwhale. After reinstall of liner and glass work those areas {most of em} should end up being concealed when the cap goes back on.
Bunch of good guys here that will chime in shortly with other ideas. Nice boat.
 

artfan1

Seaman
Joined
Aug 14, 2015
Messages
71
Well unfortunately I can't be of much help with your questions but I will encourage you! That looks like a worthy project if I've ever seen one indeed! ... Good luck!
Thanks for the comments and encouragement.

Welcome aboard DryDock Art,
Just my .02...Looks like you can remove the entire cap that is connected to the hull under the rub rail. ...
kcassells, I was hoping the cap could come off and it would expose a removable liner so that compartments, floor and sides would all lift out as one. Wouldn't that be nice? Unfortunately that doesn't appear to be the case. I believe the floor's fiberglass is meant to be laminated to the plywood, even though it's currently delaminated. And the compartments appear to be built in piece by piece. Maybe not. Maybe they dropped it in as one unit but in either case, it's all laminated to the inside of the cap. Even though the cap looks like it's just setting on the hull, then riveted into place, it's actually glassed solid all the way around the inside. You can see in the images I took today that it would require me to cut the cap off. I think.
IMG_4179.jpg


IMG_4192.jpg


IMG_4196.jpg

Found this link, hope it helps.............
http://forums.iboats.com/forum/boat...568-1972-ranger-bass-boat-restoration-project
[h=1]1972 Ranger Bass Boat Restoration Project[/h]
Also, thanks for the link. I had found that one already. It's one that I have bookmarked. It's not actually a 1972 but a 1976 in that thread. Not that it makes a big difference but the compartments are build differently. For some reason in that project, he replaced the rotted floor without removing any of the compartments. So that left me a little confused.

(Sorry for all the large pictures but I can't embed image icons until I have posted 3 times).

Thanks again!
 

kcassells

Fleet Admiral
Joined
Oct 16, 2012
Messages
8,738
Yes it appears that the cap would need to be cut off and then areas of the liner to gain access to the repairs you'll need. It's not unusual to have to do this,
Take a lot of pictures as you move along, they'll help with the reconstruct. I noticed the dates also from a 72 to a 76 for that thread. Just keep pluggin along, the beauty of glass is you can always put it back together.
 

redneckvulcanrider

Petty Officer 3rd Class
Joined
Apr 27, 2014
Messages
90
Artfan1 where about in Illinois are you I'm in Mt sterling and I swear I seen this boat pulled through town a couple weeks ago
 

gm280

Supreme Mariner
Joined
Jun 26, 2011
Messages
14,605
artfan1, the very first thing I want todo is :welcome: to iboats. Great to have you aboard and an interesting boat project as well.

I read your thread and seen the pictures. There is no way to refurbish this without removing the cap in my opinion. Yes you could crawl under things and work in tight places. But your efforts will go a lot further with the cap removed. And knowing that this is more a personal refurbish effort then anything else, you want it done right. You couldn't have found a better place anywhere to post such a project. The amount of quality help available to you on here is amazing. So let's get going... Everything that is rotted has to be removed and grinded down to fresh fiberglass before you can start replacing anything. This IS the dirtiest, smelliest, itchiest, crappiest part of any refurbishing effort there is. And you will need a Tyvek full body coverall suit and a quality respirator as well as eye protection too. Now they don't cost very much, but please don't do this without the PPE equipment if you value your health. You can buy the Tyvek coveralls at Lowes or HD or places like them. The don't cost very much, but protect your body from the dust that will absolutely cover everything as you grind the hull. I use a 3M 6700 series respirator with cartridges. You can buy those as well at the Lowes type stores or online for a real savings. Buy both dust AND vapor filters for the mask. Use the dust filters while grinding, and the vapor filters when you start polyester/glassing... So post your progress as you do the demolition part. We are here and will help you along! :thumb:
 

artfan1

Seaman
Joined
Aug 14, 2015
Messages
71
Artfan1 where about in Illinois are you I'm in Mt sterling and I swear I seen this boat pulled through town a couple weeks ago

redneckvulcanrider, I live near Champaign, IL but I did pull this boat home from my Dads in Missouri. My route took me through Pittsfield, IL. Were you by any chance the gentleman that talked to me at the Shell station? He was riding a motorcycle and based on your screen name, maybe that was you. If so, what a small world.
 

artfan1

Seaman
Joined
Aug 14, 2015
Messages
71
Yes it appears that the cap would need to be cut off and then areas of the liner to gain access to the repairs you'll need. ...

? There is no way to refurbish this without removing the cap in my opinion. ...

Ok so based on what you are all telling me, the cap should come off. Are you saying that the liner, (fiberglass floor, walls, compartments, etc) will lift out of this boat as one unit once the cap is removed?

I'm still a little lost on how I should go about cutting the cap off.
I've drawn a diagram of what I believe I am seeing on my boat. It's not perfect because I am guessing on some of it by feeling the inner surface and running my hand down.
72_Ranger_cap_cross.jpg

The rivets and rub rail have been removed and I can feel some movement on the outside of cap. In other words, the lap of the cap on the outside does pull out slightly using my fingertips. The inside however feels like one solid layer all the way up and round the inside of the cap. It appears to have been laminated over the hull/liner and the cap, covering the entire seam or lap area. I have no idea how to find the seam under the fiberglass laminate. Then, once I do find (or guess) where it's at, how do I go about cutting all the way around? Some areas of the cap's underside, such as the bow above the casting deck, are completely inaccessible. As is parts of the area inside the fuel compartment.

Is there a process somewhere on the forum I can look at? I've searched and don't find this type of cap being removed anywhere. All I ever read is that Ranger bass boat caps are not easy or impossible to remove.

Lastly, before I do remove this cap, what precautions do I need to take in order to maintain support for the hull's shape. I don't have a lift or support above to create one. I'm working outside on the trailer at the moment. Should I build a 2x4 cradle before I begin this? Like the one posted in the article recommended by kcassells, http://forums.iboats.com/forum/boat...ratos-2250-here-we-go-again/page6#post9072434 (nice post by the way.)

I do have my 3M mask, Tyvek, etc. ready to go. Thanks.
 

Woodonglass

Supreme Mariner
Joined
Dec 29, 2009
Messages
25,929
Once all the rivets are out and the rail is removed you can use a sawsall and flexible blade and cut her free. Others have had to do this. You may also have to cut down thru the transom as well. It's fiberglass so ANYTHING and EVERYTHING can be repaired and made to look NEW again.;)
 

gm280

Supreme Mariner
Joined
Jun 26, 2011
Messages
14,605
artfan1, do follow WOG's suggestions. He knows what he talks about on here. He will guide you through this project with quality help and suggestions!

I will mention that you do need to make some type cradle to support the hull once the cap is off. Because the hull will splay out otherwise and then when you get ready to install the cap back on, it won't fit. So take plenty of pictures NOW, and measurements before removing the cap. Some folks even take 2 X 4's and make cross supports to screw into the hull lip to keep it from splaying out. But they can and do get in the way. If you can build some outside supports, that would allow you to work without jumping over any inside supports. But however you want to do it is your decision. Either way works, just one way is a little more cumbersome... I built a move around cradle for my hull and it works great and still does because I haven't finished my rebuild project yet as well... :thumb:
 

artfan1

Seaman
Joined
Aug 14, 2015
Messages
71
I guess I messed up by cutting the floor out like I did, since it would have lifted out. Oh well, it can be repaired I guess.

It sounds like 2 things are for sure. I need to cut the cap off and I need to build a cradle support. I believe I should build the cradle first, before cutting the cap off.

I like the cradle in that post mentioned above but I will look around in the forum for other ideas. Since this is my first boat restoration, I don't have any first hand knowledge of moving it off of the trailer and onto the cradle.
Is there such a thing as a cradle that can be built on top of the trailer? Perhaps utilize the frame for the cradle to rest on? Just a thought. I might try and get creative with that and see how it goes.

Once I have that done, I will get the sawsall out and start cutting the cap off. As WOG said, it's all fiberglass so it' all repairable.

I'll be back here soon with updates.
Thanks again to everyone.
 

danieldw

Cadet
Joined
Aug 16, 2015
Messages
13
1983 Because I knew friends of the plant manager I got a not normally allowed personal tour of the Ranger Bass Boat Factory in Arkansas. The tour given by the plant manager started in the beginning, we watched two men use an outside mold of a ranger hull, they placed fiberglass batting in the mold, than added a very foul smelling liquid and started rolling the material, after a period of time they placed an item in the mold, and turned the hull out, upside down, and started applying a liquid to the outside, than we moved on to the next station, where they were placing modular items inside a completed hull, wiring harness, consoles, gas tanks, flotation foam, and the list goes on and on. near the end of the line is where they added the top deck, so it makes sense that they guys are saying to remove that top deck to access all the guts., interesting project. All the workers back than smoked, and because of the highly flammable chemicals used in the process they walked across the street to take their smoke breaks. Best of luck on your project!!
 

sphelps

Supreme Mariner
Joined
Nov 16, 2011
Messages
11,475
Love theses kind of rebuilds ! Welcome aboard artfan1 ! Great pics !
Tagging along if there's room ... :pop2:
 

artfan1

Seaman
Joined
Aug 14, 2015
Messages
71
Here's a little more read;
[h=1]Project Carlson CVX-18 - Removing the Cap[/h]
https://www.youtube.com/watch?v=_BwwYfqvxoQ

Yes, this was helpful. I do have one of those multitools. I'm planning to use it along with the sawsall once I get to that point. I also liked his video on building a cradle. I plan to try and build mine on the trailer since it's already got the two outer bunks supporting the boat. I am going to try and adapt what he did in that video. Thanks for the reference.
 

DeepBlue2010

Lieutenant
Joined
Aug 19, 2010
Messages
1,305
The mental image of another picture of you, your father and your son on the same boat after she is all done and ready put next to the first picture you posted is by itself worth all the work and efforts. That is a great project you got there and I can understand it is very personal. We are here to help, if you need any help just ask away
 
Top