Stumped. OMC 235 HP I/O

Jjoosshh

Cadet
Joined
May 19, 2021
Messages
15
Hi everyone. long time listener, first time caller. I feel like I have searched as many threads as I can and I’m feeling pretty stumped. This is my first boat and I'm soaking in all the knowledge I can.

I recently bought a 1977 Glastron with an OMC 235 HP I/O. I checked all the fluids and took her to the lake. She fired up easily and we cruised for about three hours with no issues aside from listing starboard a little when not at cruising plane. Near the end of the evening we were moving along at about 2200 RPM when we heard a loud whine and immediately lost thrust with the engine revs out of control along with a bit of smoke and rubber smell….. I throttled back and tried several times to engage forward or reverse and neither had any thrust and neither gave the standard “thud” when engaging. Shortly thereafter the engine began to overheat and spit coolant out… it seemed obvious that the impeller was no longer working either. We got a tow back to the dock and made it home, pulled the plug and a good amount water and antifreeze drained out.

I’ve read that this is quite common so I’ve gone through the following steps and I’m hoping someone can point out what I’m missing. Thanks!

1. I read forums for days…… then

2. Downloaded the manual….

3. Looked for rubber beneath the engine and could not find any but there’s all kinds of gunk and liquid still there.

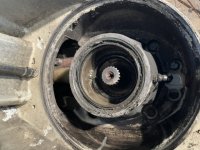
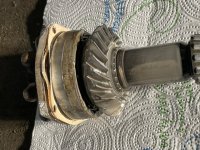
4. Inspected ball gears which appeared mildly worn but not damaged.

5. With battery on and outdrive fully down-

Engaged full forward and turned the prop CCW which I was able to do with medium pressure. Prop turned freely CW.

Engaged full reverse and turned the prop CW which I was able to do with medium pressure. Prop turned freely CCW.

6. Removed the prop and repeated step four with the same results.

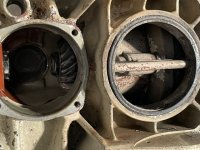
7. Opened the upper gearcase to find milky oil (it wasn’t milky before the trip). I couldn’t immediately identify anything out of the norm otherwise.

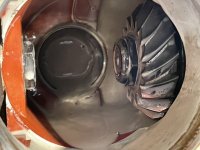
8. Removed and inspected lower gear case at a basic level. Fluids and components looked good.

9. With it reassembled I put the outdrive down into a container of water and started the engine and could not get any action out of the outdrive just like at the lake.

10. Removed the outdrive per the manual but I left the shift wires connected and kept the outdrive grounded to the intermediate.

11. With the battery on and gear all the way forward I secured the outdrive ball gear and tried to spin the prop shaft CCW and I could not. This makes me think everything in the outdrive is good aside from the seal letting in water to the upper gearcase.

12. Trained intermediate though almost nothing came out until I pulled the driveshaft out and then maybe a cup or two of fluid.

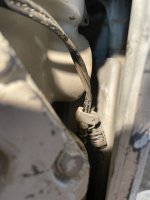
13. Removed and inspected driveshaft. Bearings all appear good and the spline teeth are covered in rust but the teeth are still intact.

14. Flash light and tool probing of coupling through the intermediate and I can see lots of rust powder and the teeth appear to be worn in the middle but look good on each end. I can feel the teeth with the wire probe.

15. I re-insert the driveshaft, battery on, and try both forward and reverse as I turn the driveshaft in both directions using a wrench. The teeth grip without issue and I can hear the engine compressing the air through the carb.

16…… come here and post this.

What am I missing… I don’t want to pull the engine to inspect the coupling if its strong enough to turn the crankshaft then what has gone wrong? Thanks for your time!
 

Scott Danforth

Grumpy Vintage Moderator still playing with boats
Staff member
Joined
Jul 23, 2011
Messages
50,301
Your OMC has a solid coupler, so it cant be the coupler. However you will find the vertical driveshaft in the drive most likely is toast.

The rubber smell was the rubber exhaust hoses burning from lack of cooling water

You need to pull your drive apart and have the 3 piece vertical driveshaft replaced.

This requires a pile of shims, custom OMC tools, and the knowledge to do the job
 

Jjoosshh

Cadet
Joined
May 19, 2021
Messages
15
Thanks for the information. Any idea what might cause this or is this a wear and tear thing? I really appreciate your time.
 

Jjoosshh

Cadet
Joined
May 19, 2021
Messages
15
Since it caused the pump and the prop to stop is there a particular place to start like in the upper or would it be anyone's guess?
 
Last edited:

Scott Danforth

Grumpy Vintage Moderator still playing with boats
Staff member
Joined
Jul 23, 2011
Messages
50,301
Thanks for the information. Any idea what might cause this or is this a wear and tear thing? I really appreciate your time.
its a design flaw with ALL OMC stringer drives. its not if they will fail, its when they will fail.

the drive has a 3-piece driveshaft, the section in the upper, the piece thru the raw water pump and the part in the lower. the male/female splines wear, then shear.

you literally need to have the whole outdrive pulled apart and rebuilt to replace the shafts. many times the input shaft needs replacing because the end past the seals where the ball gears are is also rusted and about to fail. additionally, if there is rust on the ball gear shaft in the intermediate housing, you may need to rebuild that as well.

TC electronics offers old OMC drive rebuilding. http://sterndrive.info/
 

Redrig

Master Chief Petty Officer
Joined
Oct 13, 2009
Messages
860
Since it caused the pump and the prop to stop is there a particular place to start like in the upper or would it be anyone's guess?
It could be any of the shafts as Scott mentioned. You are rooting for it to be the actual water pump shaft (bottom of upper unit) as that is an easy quick replacement.

if any of the other shafts go , I believe you are reshimming components which will be no fun.

get a new impeller and seal kit for the upper while you are in that deep.
 

Jjoosshh

Cadet
Joined
May 19, 2021
Messages
15
its a design flaw with ALL OMC stringer drives. its not if they will fail, its when they will fail.

the drive has a 3-piece driveshaft, the section in the upper, the piece thru the raw water pump and the part in the lower. the male/female splines wear, then shear.

you literally need to have the whole outdrive pulled apart and rebuilt to replace the shafts. many times the input shaft needs replacing because the end past the seals where the ball gears are is also rusted and about to fail. additionally, if there is rust on the ball gear shaft in the intermediate housing, you may need to rebuild that as well.

TC electronics offers old OMC drive rebuilding. http://sterndrive.info/
Thank you. Since I’d have to order special tools and what not... I’m wondering if I should just look for a reman’d out drive upper or lower or both. Any idea if there is another drive that can mount up to this particular intermediate or is this the only type that will match?
 

kenny nunez

Captain
Joined
Jun 20, 2017
Messages
3,335
These are the part#s you need from Sierra.
18-3386 water pump kit
18-3731. Locknut
18-2185 water pump shaft
18-2667 upper seal kit
18-2183 pinion shaft
18-7198 “O” ring. Qty 2 of


If you have a vise mount the case with the quadrant gear.
Remove the 4 stainless bolts and remove the water pump and pinion housing then separate the pump housing and shaft. Save the shims, you will use them over. You need to remove the pinion locknut, then the shaft has to be driven out the pinion housing, it will be easier if you have a press, the lower seals will also come out with the shaft. Install the tapered bearing on the new pinion shaft. Put the shaft in the housing put the gear on the shaft with some Loctite. Install the tapered cone and new locknut, using the new water pump shaft in the bottom of the pinion shaft as a holder torque the nut to 90lbs.
The lower seals install back to back. Without the seal protector you have to be real careful installing the seals over the shaft and try to keep them square .Aviation Permatex is a good sealer for this job.
Use #2 Permatex to seal both surfaces of the water pump.
I hope you have a service manual
This is the best I can do on the site. 504 427 6905 is my cell.
 

Jjoosshh

Cadet
Joined
May 19, 2021
Messages
15
These are the part#s you need from Sierra.
18-3386 water pump kit
18-3731. Locknut
18-2185 water pump shaft
18-2667 upper seal kit
18-2183 pinion shaft
18-7198 “O” ring. Qty 2 of


If you have a vise mount the case with the quadrant gear.
Remove the 4 stainless bolts and remove the water pump and pinion housing then separate the pump housing and shaft. Save the shims, you will use them over. You need to remove the pinion locknut, then the shaft has to be driven out the pinion housing, it will be easier if you have a press, the lower seals will also come out with the shaft. Install the tapered bearing on the new pinion shaft. Put the shaft in the housing put the gear on the shaft with some Loctite. Install the tapered cone and new locknut, using the new water pump shaft in the bottom of the pinion shaft as a holder torque the nut to 90lbs.
The lower seals install back to back. Without the seal protector you have to be real careful installing the seals over the shaft and try to keep them square .Aviation Permatex is a good sealer for this job.
Use #2 Permatex to seal both surfaces of the water pump.
I hope you have a service manual
This is the best I can do on the site. 504 427 6905 is my cell.
Thank you all for the time to give such specific details. I can't tell you how much your support is helping my mental frustration. I'm about to start digging into the upper. As I got it set upright, we noticed that the shift cable clamp/spring inside the upper was unsprung. Is this spring there just to clear the cable from the drive hardware or is this spring providing some sort of function to the rest of the upper?
 

Attachments

  • IMG_0481.jpg
    IMG_0481.jpg
    2 MB · Views: 6

Scott Danforth

Grumpy Vintage Moderator still playing with boats
Staff member
Joined
Jul 23, 2011
Messages
50,301
Thank you. Since I’d have to order special tools and what not... I’m wondering if I should just look for a reman’d out drive upper or lower or both. Any idea if there is another drive that can mount up to this particular intermediate or is this the only type that will match?
the only thing that goes back in the OMC hole is an OMC drive

there are videos of tear down on the link I provided in post #5. They also do reman service. No I am not affiliated with them, however they were the only source of OMC data there was 15 years ago when I rebuilt my Stringer 400 from the same vertical driveshaft issue.

Kenny (post above) is a retired OMC guy. probably one of two left in the world that I know of

you will need a really good long snap ring pliers for the vertical shaft in the lower as you need to pull the prop shaft carrier

part numbers in this thread: https://forums.iboats.com/threads/large-circlips-pliers-for-omc-lower-units.744047/
 

Jjoosshh

Cadet
Joined
May 19, 2021
Messages
15
the only thing that goes back in the OMC hole is an OMC drive

there are videos of tear down on the link I provided in post #5. They also do reman service. No I am not affiliated with them, however they were the only source of OMC data there was 15 years ago when I rebuilt my Stringer 400 from the same vertical driveshaft issue.

Kenny (post above) is a retired OMC guy. probably one of two left in the world that I know of

you will need a really good long snap ring pliers for the vertical shaft in the lower as you need to pull the prop shaft carrier

part numbers in this thread: https://forums.iboats.com/threads/large-circlips-pliers-for-omc-lower-units.744047/
I’m soaking your knowledge. Thank you for the details.
 

Jjoosshh

Cadet
Joined
May 19, 2021
Messages
15
Here is where we are at with the out drive. I could be missing something huge since this is my first time working on a boat but that aside, I’m seeing parts that all look good and not any metal shavings. How do I test for which section is gone? Must be the lower?

I’m enjoy learning and to get firsthand guidance from folks like you is humbling. Thank you.
 

Attachments

  • 05EA7419-B09C-4AAE-BBED-925B0D85BCCD.jpeg
    05EA7419-B09C-4AAE-BBED-925B0D85BCCD.jpeg
    124.7 KB · Views: 7
  • 9469219F-C72D-419E-81F9-0AC1B08EA4C0.jpeg
    9469219F-C72D-419E-81F9-0AC1B08EA4C0.jpeg
    110.2 KB · Views: 6
  • F08EB401-A50D-4DFD-B21C-7EF3EBBBBB44.jpeg
    F08EB401-A50D-4DFD-B21C-7EF3EBBBBB44.jpeg
    116.6 KB · Views: 6
  • D28D9181-924A-49A6-8A77-B135D78193EA.jpeg
    D28D9181-924A-49A6-8A77-B135D78193EA.jpeg
    87.5 KB · Views: 6
  • 2D9D903F-A15F-4B93-A471-9131D1D1ED76.jpeg
    2D9D903F-A15F-4B93-A471-9131D1D1ED76.jpeg
    150.9 KB · Views: 6
  • 00130B24-0F93-471E-BEA9-68BC1513E70E.jpeg
    00130B24-0F93-471E-BEA9-68BC1513E70E.jpeg
    138.2 KB · Views: 7

Redrig

Master Chief Petty Officer
Joined
Oct 13, 2009
Messages
860
Undo the 4 big bolts at the bottom of the upper.

A big plastic puck type thing will then be accessible . The impeller and water pump shaft will right there .

See Kenny's detailed post above , walks you through it
 

Jjoosshh

Cadet
Joined
May 19, 2021
Messages
15
Sorry. I had trouble visualizing what he was saying in the post above. I got bumped on the head too many times as an adult. Is this the culprit for the entire loss of cooling and prop rotation?
 

Attachments

  • 5F23475D-2E67-4B70-93F7-7E6C2B7A4AC3.jpeg
    5F23475D-2E67-4B70-93F7-7E6C2B7A4AC3.jpeg
    252.8 KB · Views: 14

Scott Danforth

Grumpy Vintage Moderator still playing with boats
Staff member
Joined
Jul 23, 2011
Messages
50,301
Sorry. I had trouble visualizing what he was saying in the post above. I got bumped on the head too many times as an adult. Is this the culprit for the entire loss of cooling and prop rotation?
yes, and the other shaft that that one plugs into

remember, when you get the drive all sorted away, you need to replace the rubber exhaust hoses on the engine as the insides of them will be all burned up from lack of water.
 

Jjoosshh

Cadet
Joined
May 19, 2021
Messages
15
yes, and the other shaft that that one plugs into

remember, when you get the drive all sorted away, you need to replace the rubber exhaust hoses on the engine as the insides of them will be all burned up from lack of water.
Thank you.. I'll get those ordered right now. I got everything else done last night.
 

Jjoosshh

Cadet
Joined
May 19, 2021
Messages
15
yes, and the other shaft that that one plugs into

remember, when you get the drive all sorted away, you need to replace the rubber exhaust hoses on the engine as the insides of them will be all burned up from lack of water.
Are you referencing the exhaust elbow bellows or thermo housing to exhaust manifold hoses? Or both? Thanks!
 
Top